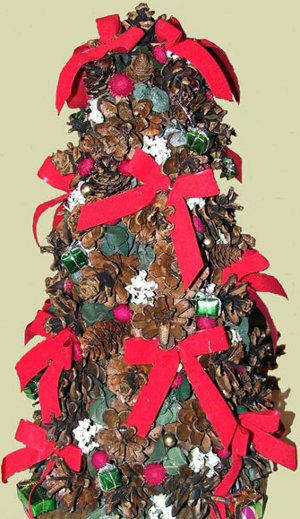
Ribbon and Berry Pinecone Tree
This cute and easy Christmas craft will look great as your holiday centerpiece. The Ribbon and Berry Pinecone Tree is a fun project for the entire family to make. Use it as a centerpiece or place it on your mantel for a decoration you can have out all winter long. You could even sprinkle some fake snow over the tree or add some glitter to really make this project shine. Easy DIY Christmas craft ideas like this are a great way to show off the beauty of winter.
Materials:
- 1 Can Spray Varnish or Lacquer
- 1- Green Styrofoam Cone 12"X4"
- Package of Green Preserved Boxwood or Eucalyptus
- 1/2" Red Velvet Ribbon - 4 Yards
- 1/2" Covered Box Decorations - 1 Package
- Florist Wood Picks With Wire - 1 Package
- Red Berry Spray With Multiple Berries or Dried Red Floral Bulbs
- Miniature White Floral Flowers (I used ones that looked like snow flakes)
- Dried or Preserved Pine Cones of Various Shapes and Sizes
- 1/4" Pine Wood - 6" by 6"
- 3/4" Wood Dowel - 3" Long
- Wood Screw - 1 1/2" Long
- Wood Stain - 1 Small Can
- Wire Cutters
- Drill
- Sand Paper
- Dual Temperature Glue Gun
- Glue Gun and Glue Sticks
Instructions:
-
Cut a 6" by 6" square out of the 1/4" pine wood. Round the edges and then completely sand it.
-
Cut a 3" long piece out of the 3/4" dowel.
-
Measure the center of the 6"x6" square and mark both the top of the square and bottom of the square with an X.
-
Drill a small starter hole in the bottom of the 6"x6" square at the X for the wood screw.
-
Screw the 1 1/2" long wood screw to the bottom of the 6"X6" square until just the tip of it is showing through to the top.
-
Position the dowel on the X on the top of the 6"x6" square centering the tip of the wood screw at the center of the dowel.
-
Finish screwing the 6"x6" square to the wood dowel until they are both secure.
-
Stain the 6"x6" square and dowel with the wood stain. Let dry completely.
-
Spray the 6”x6” square and dowel with the varnish or lacquer. Let dry completely.
-
Position the center of the bottom of the green Styrofoam cone onto the dowel and push it down the dowel until the bottom of the Styrofoam cone is flat against the top of the 6"x6" square. You may need to carve out a small amount of the center bottom of the green Styrofoam cone to get this area started.
-
Remove the green Styrofoam cone from the dowel and glue all around the dowel and center bottom of the 6"x6"square using the low temperature setting of the dual temperature glue gun. Then re-position the green Styrofoam cone onto the dowel and center of the 6"x6" square.
-
Glue the first layer of medium sized pine cones to the green Styrofoam cone using the low temperature setting of the dual temperature glue gun. Position the pine cones so they abut one another and are pleasing to the eye. Don't worry about gaps in between the pine cones as you will be filling these in with smaller pine cones.
-
Continue gluing the pine cones in rows in this manner using the low temperature setting of the dual temperature glue gun until you reach the top of the green Styrofoam cone.
-
Glue a medium sized pine cone to the top of the green Styrofoam cone using the low temperature setting of the dual temperature glue gun.
-
Using the low temperature setting of the dual temperature glue gun glue the smaller pine cones in between the larger pine cones until all the gaps are filled.
-
Spray the tree and pine cones with varnish or lacquer. Let dry completely.
-
Using the wire cutters cut several 2" - 3" pieces of the preserved boxwood or eucalyptus and then using the low temperature setting of the dual temperature glue gun glue the preserved box wood or eucalyptus amongst the pine cones until the arrangement is pleasing to the eye.
-
Using the wire cutters cut the red berries so they are individual and then using the low temperature setting of the dual temperature glue gun glue the red berries amongst the pine cones until their placement is pleasing to the eye.
-
Using the wire cutters cut the miniature white flowers into individual pieces and then using the low temperature setting of the dual temperature glue gun glue the miniature white flowers amongst the pine cones until their placement is pleasing to the eye.
-
Stick the bottom center of the 1/2" covered box decorations with a floral pick and then stick them amongst the pine cones until their placement is pleasing to the eye. Glue to hold if necessary using the low temperature setting of the dual temperature glue gun.
- Cut sixteen 12" pieces of the 1/2" red velvet ribbon and then tie each into a bow. Tie the wire of the floral pick around the center of the bow and then fasten the floral pick and bow amongst the pine cones until their placement is pleasing to the eye. Glue to hold if necessary using the low temperature setting of the dual temperature glue gun.
Read Next23 Christmas Bead Crafts
Your Recently Viewed Projects

Thanks for your comment. Don't forget to share!
Melissa Ryan
Oct 19, 2012
This would make a great decoration all winter long. I think I'd make the simple pine cone tree and then sprinkle it with fake snow and glitter. What a beautiful winter scene that would be perfect for a bay window or mantel!
Report Inappropriate Comment
Are you sure you would like to report this comment? It will be flagged for our moderators to take action.
Thank you for taking the time to improve the content on our site.