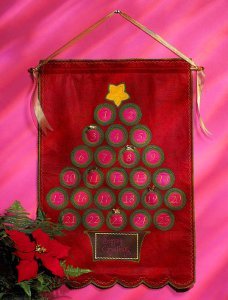
Christmas Tree Advent Calendar
Make colorful felt circles that serve as pockets for treats with this easy DIY Christmas craft from Baby Lock! The Christmas tree advent calendar is a yummy, crafty way to countdown to Christmas.

Materials:
- Baby Lock Sewing and Embroidery Machine
- 1 1/8 yard red felt
- 1 ¼ yard olive green felt
- ½ yard forest green felt
- ¼ yard bright pink felt
- ¼ yard brown felt
- ¼ yard golden yellow felt
- 1 ½ yards gold ribbon
- Embroidery thread--bright pink, red, kiwi green
- Gold metallic thread
- Monofilament thread
- Baby Lock Rinse-Away Tear Away stabilizer
- Pinking shears
- Fusible webbing
- 7/16 inch café rod
- Amazing Designs “Ho! Ho! Holidays” (ADP-37P)
- Thread
Instructions:
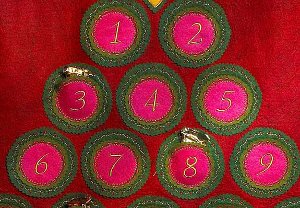
- All of the circle frames and numbers are first embroidered on the olive green and bright pink felt. Use Baby Lock Rinse-Away Tear Away stabilizer to embroider the designs.
- Hoop the olive green felt in the embroidery frame. Select the satin stitch triangle circle frame pattern, resize the pattern (6.3 x 6.3 cm), and embroider the circle with bright pink thread. Do not remove the hoop from the embroidery unit. Note: after each circle pattern is selected (straight stitched circle, blanket stitched circle, and satin triangle circle), save the pattern in the memory of the machine.
- Place a small square of bright pink felt over the circle pattern embroidered in step 2. Be sure that the pink felt completely covers the stitching. Select the straight stitch circle frame pattern, resize the pattern (5.2 x 5.2 cm) and embroider the pattern on the pink felt with pink thread.
- Remove the embroidery frame from the embroidery unit, and trim the pink felt around the outside of the stitches.
- Reattach the embroidery frame to the embroidery unit, and select the blanket stitch circle frame pattern. Resize the pattern (5.2 x 5.2 cm) and embroider the pattern with kiwi green thread on the pink felt to create an appliqué.
- Keep the hoop attached to the unit. Select an alphabet/number pattern with a height no taller than 2.9 cm. Select the correct sequence of numbers and embroider into the center of the frame pattern with kiwi green thread. Be sure to “center” the selected number before stitching it onto the stitched frame.
- Remove the felt from the hoop with pinking shears and trim around the outside edge of the circle, leave ¼” of the olive green felt showing.
- Repeat steps 2-7 for the remaining 24 days, recalling the frame patterns from memory.
- Hoop the forest green felt into the large embroidery frame. Select the wreath design circle frame pattern, resize the pattern (8.1 x 8.1 cm) and save in the memory.
- Move the pattern to the upper left corner of the embroidery frame. Adjust the pattern placement after each wreath is stitched. Six wreathes will fit within one hooping of the large embroidery frame. Stitch the first step of the wreath with kiwi green thread and the berries with red thread.
- Remove wreaths from the embroidery hoop. Re-hoop and continue stitching the remaining 19 wreaths in groups of 6 per hoop.
- Apply fusible webbing to the back of all wreaths.
- Cut out all 25 wreaths with pinking shears, again allowing 1/4th inch of felt to remain along the outer edge of each wreath.
- Pin an olive green/pink number appliqué to the center of each forest green felt wreath. Stitch the appliqué in place from 2 o’clock position to the 10 o’clock position of the appliqué with monofilament thread. This will form the small pockets for the treats and surprises!
- Fuse the pockets to the red felt in rows according to the photo.
- Hoop the forest green felt, select the star appliqué pattern and enlarge (9.5 x 9.0cm), stitch the straight stitch outline of the star. Place the golden yellow felt on the star outline. Be sure the golden yellow felt completely covers the outline.
- Embroider the star pattern on the golden yellow felt. Remove the embroidery frame from the embroidery unit, and trim around the outside of the stitches.
- Select the satin stitch step of the star appliqué; stitch with gold metallic thread. Do not remove from hoop.
- Resize the star pattern (7.9 x 7.5 cm) and stitch the straight stitch step only in the center of the original star using the gold thread. Remove from the hoop.
- Apply fusible webbing to the back of the forest green felt. Cut out the star with pinking shears allowing ¼” to remain around all sides.
- Fuse the star to the top of the tree.
- Hoop the brown felt. Select a rectangle frame pattern and enlarge (approximately 10.3 x 17cm). Stitch with kiwi green thread. Do not remove hoop from unit.
- Embroider Amazing Designs -- “Season’s Greetings” in the center of the frame with bright pink thread. Remove from hoop.
- Apply fusible webbing to the back of the brown felt, cut out a pot shape from the felt around the embroidered frame. Fuse the brown pot to olive green felt.
- Apply fusible webbing to the olive green felt. Trim around all edges of the pot with pinking shears. Fuse in place at the base of the Christmas tree.
- Trim the red banner felt with pinking shear to measure (24” wide x 35” length), adding a gentle scallop at the bottom. Select a decorative stitch and stitch around the outer edge of the banner with kiwi thread.
- With monofilament thread, stitch the red banner to a piece of olive green felt. Leave an opening one inch from the top to insert the café rod. Trim the olive green felt with pinking shears, leaving approximately ¼”.
- Tie the golden ribbon to the ends of the café rod.
- Fill the pockets with treats!
Read NextDIY Sparkly Pinecones