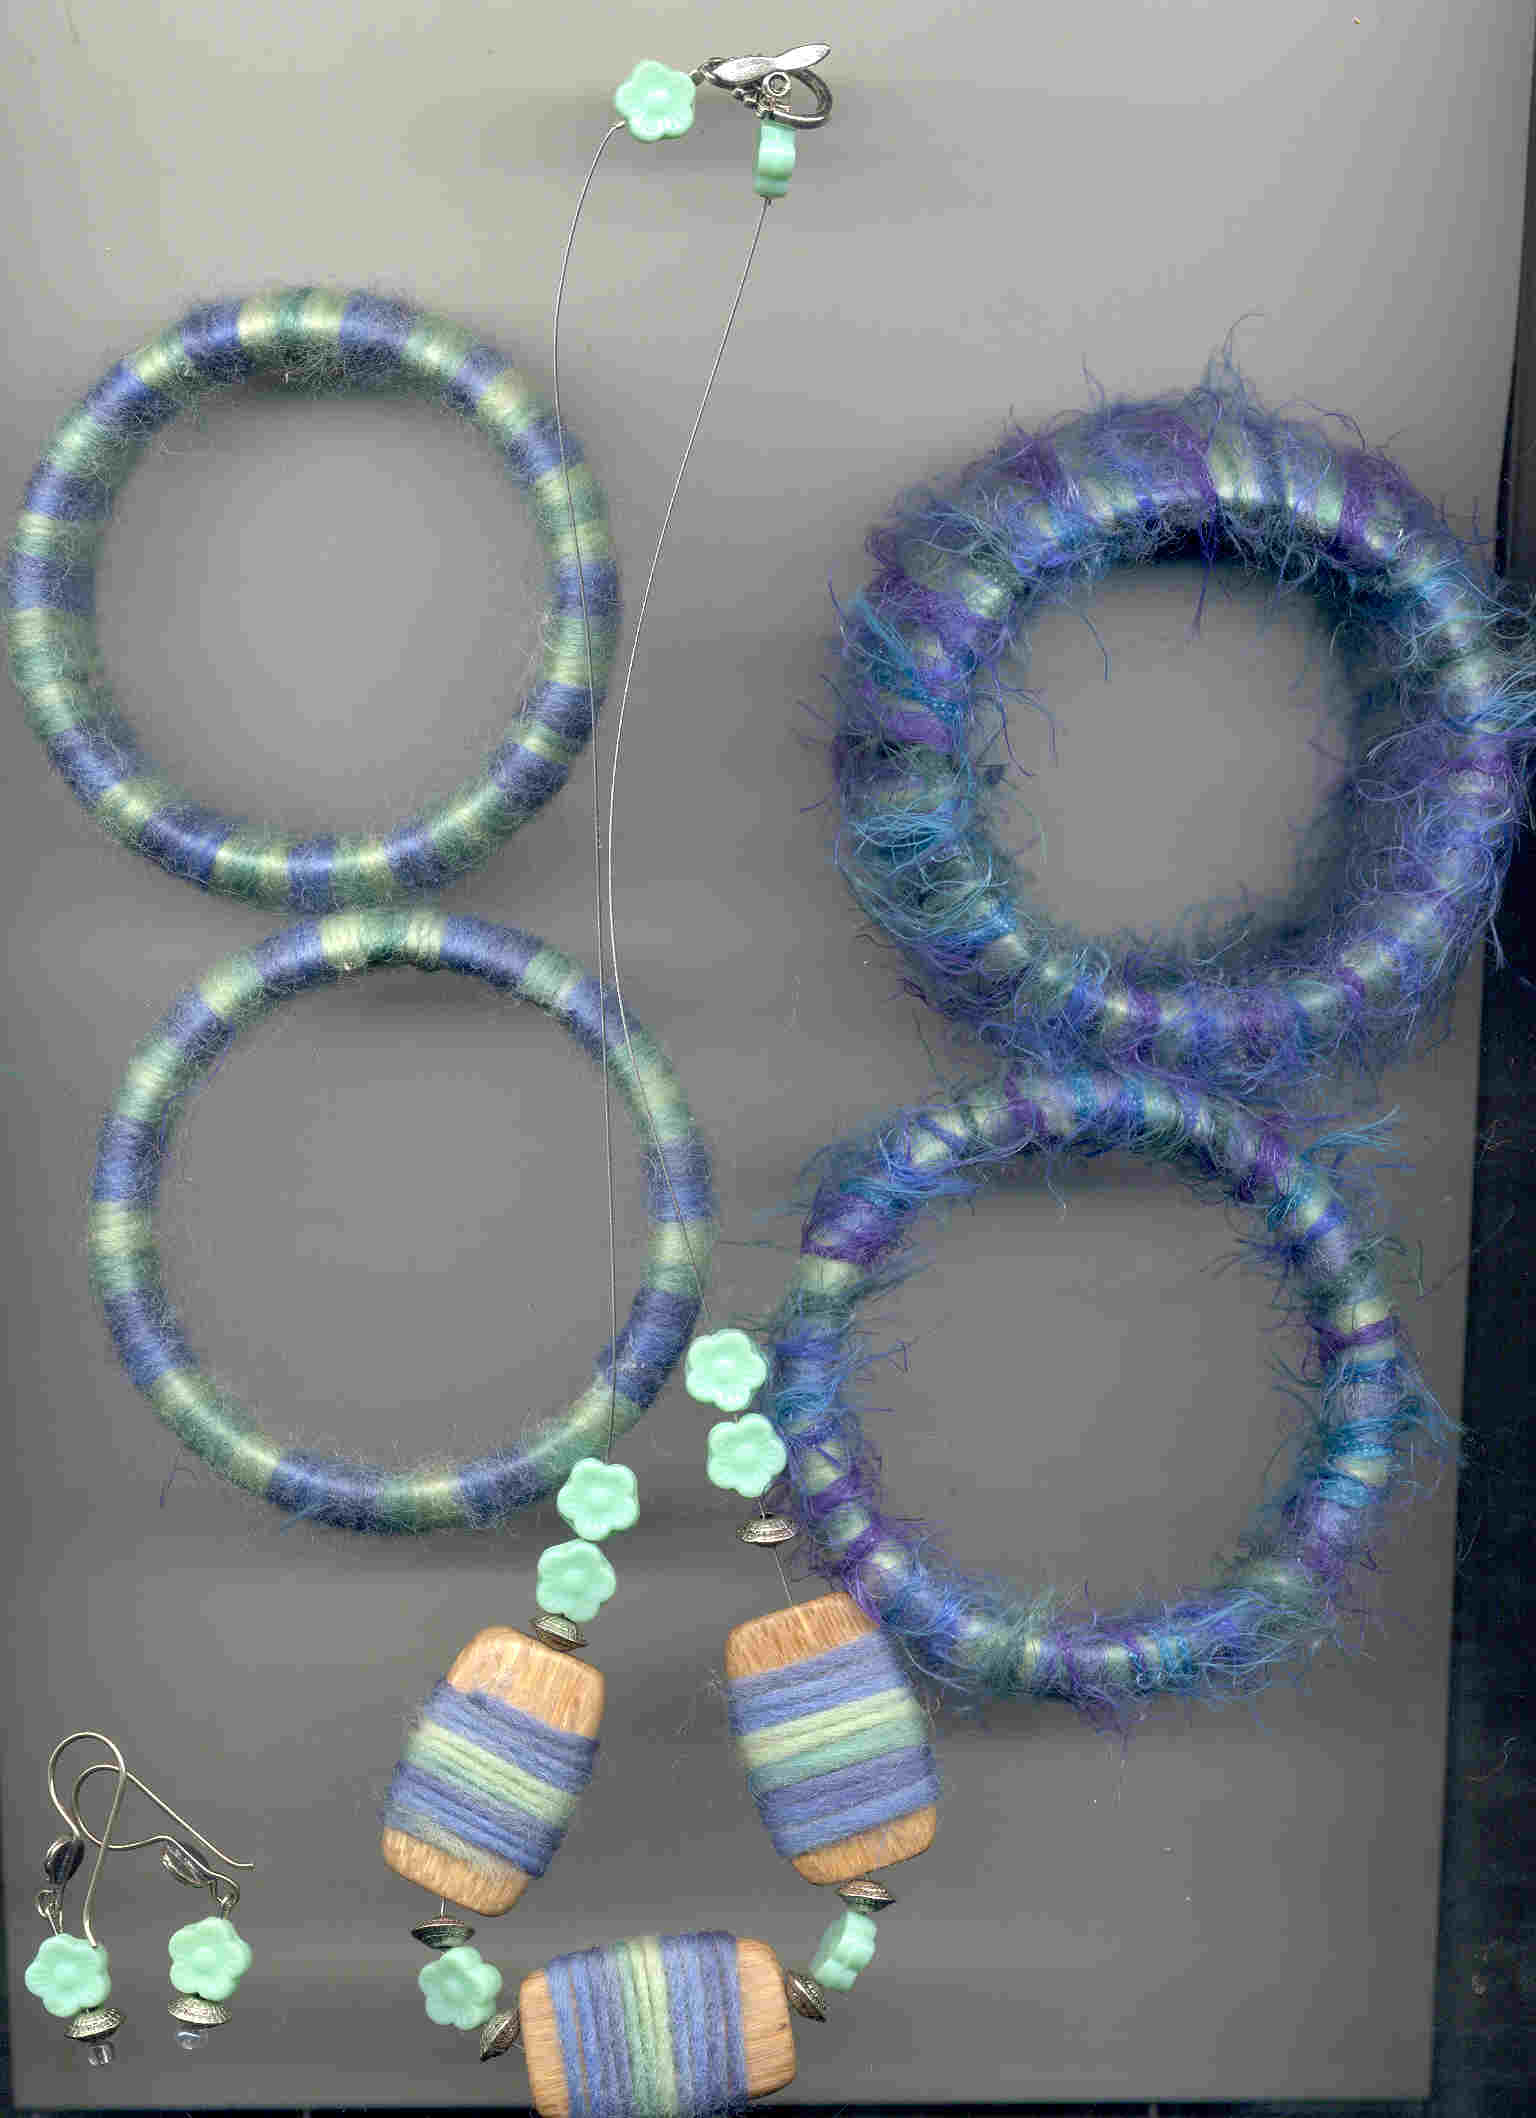
Yarn Bangles
Recycle old bangle bracelets into a new look and make a necklace with a little yarn and some vintage flower beads.
Materials:
- Yarn*
- Optional: Eyelash specialty yarn (fiber)
- Plastic or wood bangle bracelets 1/2” to 2”
- 3 Flat wood beads
- 10 Vintage green flower beads
- 8 Antique silver spacer beads
- 2 Clear E beads
- 2 Head pins
- 2 Earring wires
- 4 Crimping beads silver
- Steel tigertail beading wire
- Clasp
- Crimping tool
- Round needle nose pliers
- Wire cutters
- Ruler
- Jewelry, fabric, or hot glue gun and glue
- Rubbing Alcohol
- Sanding paper or emery board
*Caron Felt-It wool yarn was used for this project. The yarn is variegated giving the look of strips. Wool yarn gives excellent coverage, but if wearer is allergic to wool, acrylic yarn can be substituted.
Instructions:
Bracelets
- If using plastic bracelets clean bracelet with rubbing alcohol and allow to dry. Using sanding paper or emery board sand the inside area of the bracelet (plastic or wood, both need to be sanded) to give some teeth to the surface. Cut yarn into 36” lengths 10-15 lengths will be needed depending on the height of the bracelet (1/2” to 2” are shown).
- Begin wrapping the bracelet with a length of yarn. Dab a little adhesive to the inside, press one raw end of the yarn into it and continue to hold with thumb or finger. Wrap the yarn around and around the bracelet firmly (you don’t want the yarn loose). When you reach the end of the yarn, gently push and slide the yarn down the bracelet towards glued raw end. Not too much, but you want a solid wrap. Glue second raw end of yarn to inside of bracelet. Repeat this step until entire bracelet is wrapped.
Note: If using a hot glue gun, watch your fingers with the hot glue! You only need a little dab of hot glue. Tip: Keep a small bowl of ice water on your worktable. Before using the hot glue dip your fingers into the cold water and you’ll be able to carefully work with the glue and not burn your fingers.
- Optional: Using eyelash yarn (this type of specialty yarn has a feathery, wispy look to it and if often referred to as fiber rather than yarn) to add an additional layer of yarn to your wrapped bracelet. Leave about 1/2” between wraps for a lighter look. You don’t need to wrap it as solidly as the wool yarn. Leave as is or trim the “eyelashes” to desired length. The samples shown were trimmed down to 1/2” wisps.
Necklace
- Center wrap 3 flat wood beads with wool yarn leaving some wood showing at each end. Allow to dry.
- Cut length of tigertail (25” were cut for this project) to your desired length of necklace. Keep in mind to measure your neckline then add at least 3” to your measurement. Sting on a crimp bead, vintage flower bead, another crimp bead, and one part of your clasp. Thread tigertail wire back through the crimp bead, flower bead, and second crimp bead. Crimp both crimp beads. This double crimp bead style is just a way to make the clasp ends of your necklace pretty and adds some strength to the connection.
- String on two vintage flower beads, spacer, yarn wrapped wood bead, spacer, flower, spacer, yarn wrapped wood bead, spacer, flower, spacer, last yarn wrapped wood bead, spacer, two flower beads.
- Repeat crimping for second part of clasp. Sting on a crimp bead, vintage flower bead, another crimp bead, and one part of your clasp. Thread tigertail wire back through the crimp bead, flower bead, and second crimp bead. Crimp both crimp beads. Trim any excess tigertail beading wire.
Earrings
- String a clear E bead, spacer, and flower bead onto a head pin.
- Create loop with needle nose pliers. Add earring wire and close the loop. Repeat for second earring.
Read Next81 Free Beaded Bracelet Patterns
Your Recently Viewed Projects

Thanks for your comment. Don't forget to share!
koolie78 4050924
Feb 17, 2013
Where do you get the plastic bracelets? I've looked at AC Moore and Michaels and no luck!
jillshope 123
Sep 16, 2011
This couldn't have to have so much material could it?? Some of us, can't get all this stuff! Sorry, but you goofed this time. I won't even waste my time on how to make. Would cost too much to make, if all your thingys, had so much stuff!!!!!
Kelly Sas
May 03, 2011
While this looks really nice, I made these bracelets years ago and it isn't practical. The yarn gets dingy and dirty looking very fast. It picks up every thing including oily substances it rubs on - like on your desk etc.
Report Inappropriate Comment
Are you sure you would like to report this comment? It will be flagged for our moderators to take action.
Thank you for taking the time to improve the content on our site.