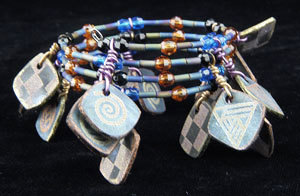
Charms Bracelet made with Shrink Plastic
Combine Pearl Ex powders and Pearl Ex Stamp Pads for a wonderful look on shrink plastic from Jacquard Products. It's easy and fun!

Materials:
- Jacquard Pearl Ex Stamp Pads (Sepia, Gold, Copper)
- Stamps (swirl from Stampa Rosa, checkerboard from Rubber Stampede, all others from Impress Me
- Jacquard Pearl Ex Pigments (Duo Blue-Green, Duo Green-Yellow)
- Hole punches, Soft paintbrush, Needlenose pliers, Scissors
- Memory wire by Remembrance™
- Sandpaper 200-400 grit or fine sanding block
- Beads (black, amber and turquoise plastic faceted from the Beadery, anodized metal tubes from Legendary Beads)
- Colored wire by Fun Wire™
- PolyShrink™ plastic/Lucky Squirrel (Black)
- Heat embossing gun or oven
Steps:
- Sand both sides of a sheet of black PolyShrink™ plastic evenly with the fine grade sandpaper. Sand in both directions, lengthwise and widthwise. The pigments and inks will become embedded into the surface when the plastic shrinks.
- Stamp one side of the sheet with a checkerboard pattern using the Sepia colored Jacquard Pearl Ex Stamp Pad. Let dry.
- On the other side of the sheet, dust the surface lightly with the two Jacquard Pearl Ex Pigments. Use a soft brush and randomly alternate the two colors. The color will intensify when the plastic shrinks.
- On top of the colored side, stamp some single motifs with the Gold and Copper Jacquard Stamp Pads. For this bracelet we used 3 different motifs and made 17 charms.
- Cut out the shapes that you want to use. We used a square with slightly bulging sides and rounded corners. Remember that your shape will be about 45% of its original size.
- Punch a hole in the plastic using a hole punch. We used just a round hole punch but hole punches come in many different shapes so you may want to experiment. The holes will maintain their shape even when they shrink.
- If using a heat embossing tool, lay the piece on a flat surface that won’t be damaged by the heat embossing tool. A thick piece of wood is good. Heat the piece by aiming the tool at the plastic. The plastic will begin to move and curl when you heat it. If you feel it is shrinking too fast, hold the tool a little further away. When the piece is completely shrunk, lay flat and allow it to cool. If using an oven, put the piece of plastic on a Teflon sheet in a regular or toaster oven no hotter than 300 to 350 degrees for approximately 3 minutes.
- After the piece is cooled, sand the edges to smooth any rough areas.
- Roll the edges of each piece onto the Copper or Gold stamp pad to get color on the edges.
- To make the charms dangle from the wire, we used colored wire to make an extension that could be threaded onto the memory wire. Using a copper and a purple colored wire alternately, loop through the holes in the charms. Twist the wire around itself close together and close to the charm. On the other end make a loop that the memory wire will go through and twist the wire back on itself.
- Cut the memory wire the length you want it and twist the end in a spiral to keep the beads from falling off.
- Place the beads and charms onto the memory wire with any sort of pattern.
- When you come to the end of the wire, twist it into a spiral like you did with the first end.

Love shrink plastic crafts? Find more gorgeous ideas for what to make with shrink plastic in DIY Shrinky Dinks: A Shrink Plastic Craft Guide.
Read Next27 Friendship Bracelet Patterns
Your Recently Viewed Projects
Thanks for your comment. Don't forget to share!
Report Inappropriate Comment
Are you sure you would like to report this comment? It will be flagged for our moderators to take action.
Thank you for taking the time to improve the content on our site.