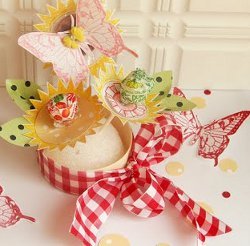
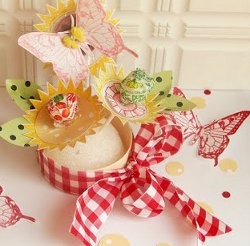
Stamp Art Lollipop "Bouquet"
If you're looking for a cute and creative craft idea for your daughter's next birthday party, check out this Stamp Art Lollipop Bouquet project from Jenni Bowlin Studios, great for decorating a party table or even as a thank-you gift! It's a fun and easy craft project for kids to make anytime, and the stamping is such a unique way to let their imaginations run wild.
Materials:
- JBS Mercantile 3 inch x 3 inch Seal stamp
- JBS Mercantile 3 inch x 3 inch Blue Ribbon stamp
- JBS Mercantile 3 inch x 3 inch Butterfly stamp
- JBS Mercantile Lemon Drops Ink Pad
- JBS Mercantile Chewing Gum Ink Pad
- JBS Mercantile Cough Syrup Ink Pad
- JBS Mercantile Yellow Rhinstone Bow embellishment
- Red ribbon
- White cardstock
- Scissors
- Glue Dot
- Egg shaped foam
- Small Wooden Box (from craft stores)
- Green Family Tree paper
- Various lollipops
Instructions:
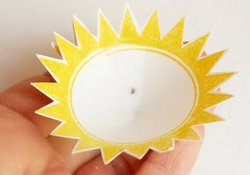
- Place stamp on Lemon Drops Ink Pad. Stamp on to white cardboard and cut out. Snip a little piece out of the image.

- Fold the two ends of the seal stamp together and attach with a Glue Dot. This creates a cone shape that will form around the lollipop better than a flat image.
- Poke a hole in the center where the lollipop will go.
- Stamp solid image of the 3” x 3” Blue Ribbon stamp onto white cardstock with Chewing Gum Ink, and top it with the outline stamp in Cough Syrup Ink.
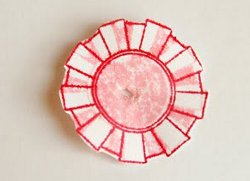
- Cut out the image and poke a hole in the center (but don't stamp the tails of the Blue Ribbon, just the circle).
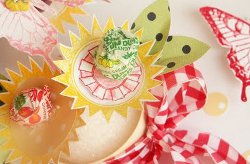
- Layer stamped images together and poke a lollipop down through the hole. Take a piece Family Tree paper to cut the green polkadot leaves and attach them under the lollipop flower.

- If your lollipop is flat, you can adhere the flower underneath it and add the 3 inch x 3 inch Butterfly stamp. Top with Yellow Rhinestone Bow embellishment.

- Take wooden box and wrap with red ribbon. Fill the bottom with foam to hold the lollipops.
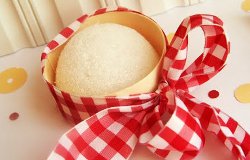
- Cut an egg shaped foam in half and adhere to bottom.
- Poke the dressed-up lollipops into the foam.
Read NextHow to Make Tulle Flowers