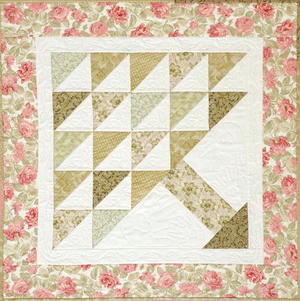
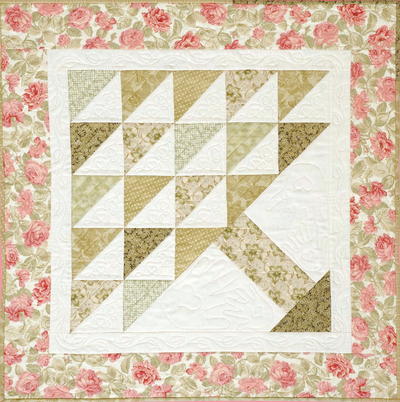
Tree Baby Quilt
This baby quilt pattern would be perfect for a new little girl. Great for those who are still somewhat new to quilting, this free quilt design is simple and elegant. You could even use blue fabric and make this for a little boy as well. This modern baby quilt tutorial is easy to follow and comes with step by step photos to help guide you along the way. You'll be a regular quilting queen when you master these easy quilt instructions!
Materials:
Fabric amounts are based on a 42" fabric width
- 1 yard assorted light and medium value sage green prints (Fabric A) (6 different prints were used)
- 1-1/8 yards White-on-white print (Fabric B) for block background and inner border
- 2/3 yard large-scale pink and sage green rose (or other theme) print (Fabric C) for outer border
- 2-1⁄2 yards of fabric for backing
- 42" × 42" piece of batting
Measurements:
- Quilt top size: 37 1⁄2" × 37 1⁄2"
- Finished block size: 25"
- Number of blocks: 1
- All measurements include a 1⁄4"-wide seam allowance.
Instructions:
Fabric A
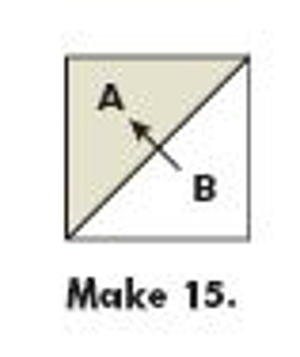
- Cut a total of 10 squares 57⁄8" × 57⁄8" for the blocks; then cut each square in half once diagonally to make 2 triangles (20 total) for the block. You will have 1 triangle left over.
- Cut 1 square 61⁄2" × 61⁄2" for the block.
- Cut 1 rectangle 43⁄4" × 141⁄2" for the block.
- Cut 4 strips 21⁄8" × the fabric width for the binding.
Fabric B
- Cut 8 squares 57⁄8" × 57⁄8" for the block background; then cut each square in half once diagonally to make 2 triangles (16 total) for the block. You will have 1 triangle left over.
- Cut 1 square 181⁄4" × 181⁄4"; then cut the square in half twice diagonally to make 4 triangles for the block. You will have 2 triangles left over.
- Cut 4 strips 21⁄2" × the fabric width for the inner border.
Fabric C
- Cut 4 strips 41⁄2" × the fabric width for the outer border.
Making the Block
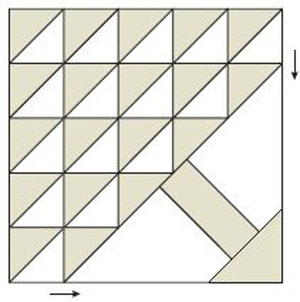
- Sew a Fabric A triangle right sides together with a small Fabric B triangle (cut from a 5 7⁄8" square), as shown. Press. Make 15.
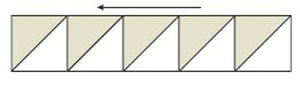
- Arrange 5 units from Step 1 as shown. Sew the units together. Press.
- Arrange 4 units from Step 1 and a Fabric A triangle as shown. Sew the units and triangle together. Press. Repeat using 3 units and a triangle; 2 units and a triangle; and 1 unit and a triangle. Press.
- Arrange the rows from Steps 2 and 3 as shown. Sew the rows together. Press.
- Measure and mark the center of one of the short sides of the 43⁄4" × 141⁄2" Fabric A rectangle. Place the 45° line of your quilter’s ruler along the top edge of the Fabric A rectangle. Trim twice to your center mark at a 90° angle, as shown.
- Sew a large Fabric B triangle (cut from an 181⁄4" square) to opposite sides of the trimmed rectangle from Step 5, as shown. Press.

- Draw a line diagonally, corner to corner, on the wrong side of the 61⁄2" Fabric A square. Align the square with the 90° corner of the unit from Step 6, right sides together, as shown. Sew directly on the drawn line and trim, leaving a 1⁄4" seam allowance. Press.
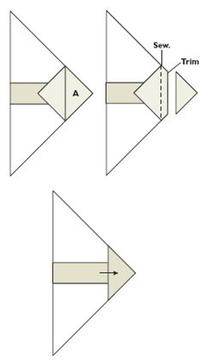
- Sew the unit from Step 4 to the unit from Step 7, as shown. Press.
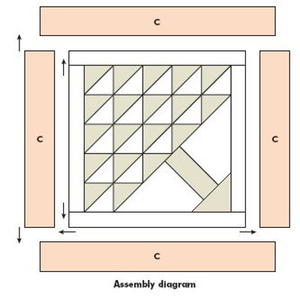
Quilt Assembly
- Refer to Butted Borders on page 10. Measure the quilt top through the center from top to bottom. Trim two 21⁄2"-wide Fabric B inner border strips to this measurement. Sew a trimmed border strip to opposite sides of the quilt. Press.
- Measure the quilt top through the center from side to side, including the borders just added. Trim the remaining 21⁄2"-wide inner border strips to this measurement. Sew a trimmed border strip to the top and bottom of the quilt. Press.
- Repeat Steps 1 and 2 to trim and sew the 41⁄2"-wide Fabric C outer border strips to the sides, top, and bottom of the quilt. Press.
Finishing
- Follow the general instructions on pages 11–14 to layer, baste, and quilt your quilt. Sew the 21⁄8"-wide Fabric A strips together end to end with diagonal seams and use them to bind the edges. For this quilt, I used an assortment of the Fabric A prints for the binding.
Read NextAnimal Nursery Quilt
Your Recently Viewed Projects
Thanks for your comment. Don't forget to share!
Report Inappropriate Comment
Are you sure you would like to report this comment? It will be flagged for our moderators to take action.
Thank you for taking the time to improve the content on our site.