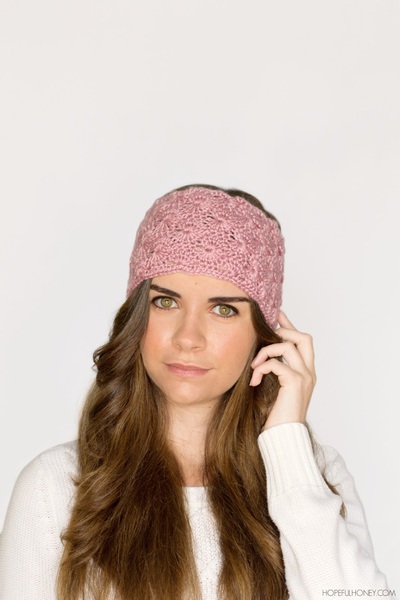
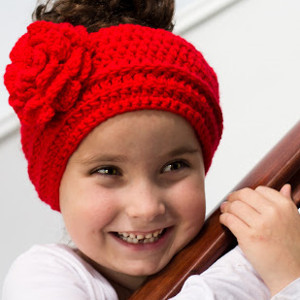
Sweet Crochet Headband
Whether it's red, pink, purple or blue, this Sweet Crochet Headband will look great on you. This crochet pattern will show you how to make a headband in any color you wish. Sometimes all you need in order to gain a little extra confidence is a super cute accessory. If you're ready to make a statement, this Sweet Crochet Headband is the perfect eye-popping accessory for you to wear. Find a color that speaks to you and learn how to crochet a headband. You'll never want to leave home without it.

Materials:
- 4.50 Crochet Hook
- 8ply Wool
- Tapestry or Wool Needle
- Scissors
- Button
- 8ply Yarn
Instructions:
Headband
- Make a Slip Knot with 2 strands of yarn. Then chain a Chain Stitches long enough to go around you head. All the way to the top of your head and around to the nape of your neck.
- Row 1 Taking your crochet hook, push your hook through the second last stitch and make a single crochet. Crochet 9 more single crochets. Then crochet Half Double Crochets till you get to the last 10 stitches. Now crochet single crochets to the end of the row.
- Row 2 Crochet 2 up. Slip stitch into the first 10 stitches. Then crochet half double crochets till you get to the last 10 stitches. Slip stitch to the end of the row.
- Row 3 Same as row 1.
- Row 4 Same as row 2.
- Row 5 Same as row 1.
- Row 6 Same as row 2.
- Row 7 Same as row 1.
- Now it's time to single crochet all the way around, but before you do tha you need to make a hole for the button. Chain one, then single crochet in the first 2 stitches. chain 2, skip 2 stitches then single crochet all the way around the headband. Fasten off.
- Sew on a button where it should be.
Rose
- Start off by taking your 4.50mm crochet hook and making a Slip Knot, then crochet 76 Chains. {If you'd like your flower to be larger simply add sets of 3 chains till you've reached your desired length.}
- Row 1 Chain 2, skip 2 chains from your hook, then crochet Half Double Crochets all across into every chain.
- Row 2 Chain 4, skip 2 stitches and then crochet a half double crochet into the third stitch.
- Chain 3, skip 2 stitches and then crochet a half double crochet into the third stitch. Repeat the last step all across.
- Row 3 Chain 3 then crochet 3 Double Crochets into the first loop you made in the previous row. Chain 3 then slip stitch down into the loop. Then make a slip stitch into the next loop. Keep repeating this order of stitches all across finishing off with a slip stitch. These will be your rose petals.
- After doing the last double crochet of your last petal, chain three and do a slip stitch down into the loop. Fasten off but make sure to cut the strand of yarn at about 30cm. {You'll need it later on}.
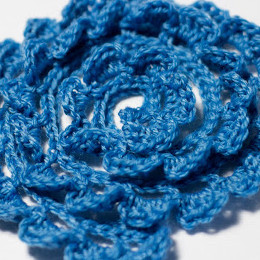
- Now lay your long strip of petals down in a circle, working your way in. If you want the flower more flat, make it quite open and loose, or if you want it thicker and chunkier you'll have to lay it tighter and more on top of each other. When you've decided which way you'd like it, take your wool needle and just start sewing it together using the 30cm strand of yarn you left over before.
- Fasten off and weave in any loose ends.
- Now attach the rose to the headband. Go to a mirror and put on your headband. Place the completed flower on the headband, and position it where you'd like it to be. Take the headband off and then sew the flower onto the headband.
Read NextLong Crochet Lacy Duster Pattern
Your Recently Viewed Projects
Thanks for your comment. Don't forget to share!
princess6860504
May 01, 2017
I love this flower motif winter headband! It is constructed from two pieces. First is the band, obviously, then you make the simple but elegant flower and attach it to the headband. The type of stitch sued is what will make it nice and stretchy. It is shown on a little girl but I think Mamma could wear one, too. If you can't handle wool (too scratchy for some folks) then just use a bulky yarn- not super bulky.
Report Inappropriate Comment
Are you sure you would like to report this comment? It will be flagged for our moderators to take action.
Thank you for taking the time to improve the content on our site.