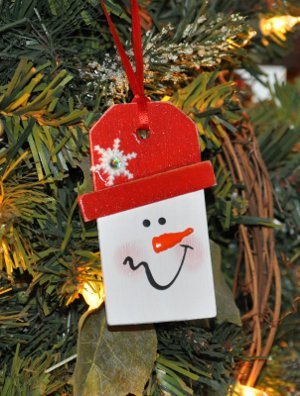
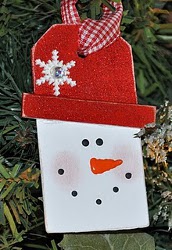
Tipped Hat Snowman
Cute snowmen Christmas crafts are the definition of winter fun. This Tipped Hat Snowman from Meggan Maravich will instantly brighten your tree.

Materials:
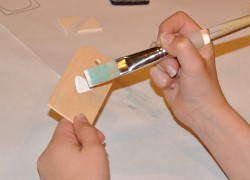
- The 3.25" wood tag we've been using a craft stick cut in half (also remove rounded ends)
- 6" ribbon for hanging
- Acrylic Paints: White, Red, Black
- Multi-Purpose Sealer
- Pink Powder Blush & Cotton Swab
- Extreme Glitter: Red
- Tacky Glue
- Sanding Block, Permanent Black Marker
- Plastic Snowflake Button
- Tiny Bling
- Tulip Slick Dimensional Fabric Paint in orange
Instructions:
-
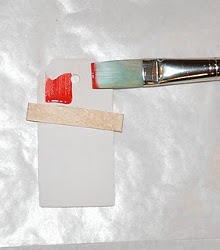
Brush on Multi-Purpose sealer (front, back, and sides). When completely dry, apply two light coats of White. Attach the hat brim (craft stick) with Tacky Glue. Sand edges with Sanding Block.
-
Paint hat and hat brim with several coats of Red. When dry, sand the edges to remove some of the paint.
-
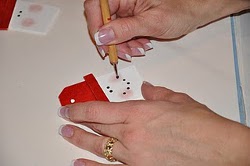
Apply Extreme Glitter Red. I usually apply two thin coats. More coats = more glitter! Add dip dots for eyes with stylus and Black paint.
-
Use pink powder blush and cotton swab to swirl cheeks.
-
For traditional coal smiling mouth, dip stylus into a small puddle of Black paint.
-
Starting on the left blushed cheek, apply dots in a curving row; dipping stylus into fresh paint before each dot.
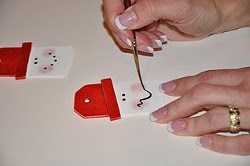
-
To shake things up a bit, I've created a crooked little smile with a damp liner brush (dip into clean water and blot on paper towel) and Black paint.
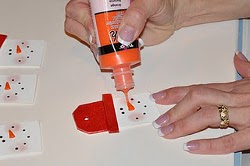
-
Practice the nose on scratch paper or paper towel before applying to your ornament. Start on the left, apply an even amount of pressure, sort of "scribble" up and down to create the base of the carrot nose, then pull towards the right ending in a point. The key here is applying the same amount of pressure as you're creating the nose. Squeezing too hard creates a large blob which is difficult to work with ... not squeezing hard enough will give you a scrawny-looking carrot.
Read NextPlastic Bag Wreath