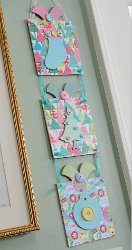
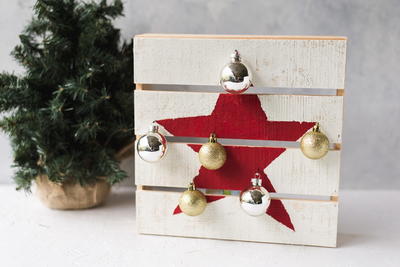
Stack Of Gifts Door Hanger
This Stack Of Gifts Door Hanger from Plaid, used for a door or as a wall hanging, makes for one of the more unique decoupage ideas for homemade Christmas crafts. Using nontraditional holiday colors, brighten your home with Christmas house crafts like this one.

Materials:
- Wood package shapes, 3 (you can use plaques also)
- Wood shapes – reccommend a stocking, a tree and an ornament
- FolkArt Acrylic Paint – Bright Baby Pink, Sky Blue, Light Blue, Soft Apple
- Mod Podge Matte
- Scrapbook paper, 3 sheets – holiday prints
- Buttons, assorted – recommend Blumenthal Lansing
- Candle or small piece of wax
- Drill
- Ribbon of your choice, 3 feet
Instructions:
- Prepare surfaces.
- Measure the square part of your package shapes and use these measurements to cut out the scrapbook paper. You should have three sheets – set them aside.
- Paint one of the packages Sky Blue, one Bright Baby Pink and the other Soft Apple. Allow to dry.
- While the package shapes are drying, paint your wood ornament shapes. See the photo for reference.
- Take the package shapes and distress the bows. To do this, rub the candle or wax pieces on top of the bow part of each package. Rub the candle on the edges and on top of the bow.
- Paint each bow with a different color than you did the first time. I painted the Sky Blue bow with Bright Baby Pink, the Soft Apple bow with Sky Blue and the Bright Baby Pink bow with Soft Apple. Allow to dry.
- When the paint is completely dry on the bows, you will use the sandpaper to distress them. Lightly sand the bows in the areas where you painted the wax, and the paint on top of the wax will rub away quickly. You’ll see the first color you painted come through. Sand less for subtle distressing and more for obvious distressing. Be careful not to sand too much – you don’t want the wood to show through.
- Use Mod Podge to adhere the square sheets of scrapbook paper you set aside to the main parts of the packages. Smooth thoroughly. Allow to dry for 15 – 20 minutes.
- Mod Podge the top of the scrapbook paper to seal. Allow to dry.
- At this time you’ll want to use your drill to create holes for the hangers as shown in the photo. I drilled one hole on each corner of each package.
- Use craft glue to glue the wooden shapes down, one to each center of each package.
- Mod Podge again – this time Mod Podge the entire front and back of the package shapes, including the wooden shapes on top. This seals the project.
- Glue buttons down on each shape and on the package bows as shown.
- Finish the project by tying the ribbon through each hole and attaching the packages as shown. Allow to dry for 24 hours before hanging.