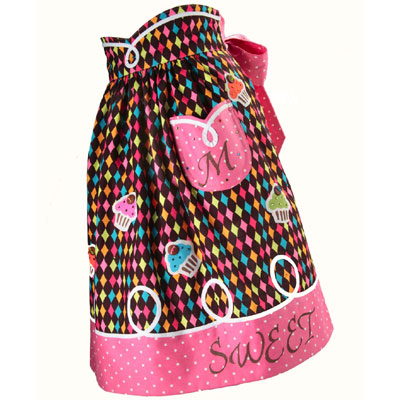
Delicious Cupcake Apron
Sweeten up the kitchen and wear this delightful apron. It's fabulous! It's you!
Materials:
- Aleene’s Fabric Fusion Permanent Fabric Adhesive
- Tulip Multi-Surface Stencil
- Italics Alphabet
- Tulip Sticky Fabric Stencils
- 23267 Birthday
- Tulip Soft Fabric Paint
- BI15800 Chocolate
- Retro
- Tulip Cordless Heat Setting Tool
- Tulip Glam-It-Up!™ Iron-On Crystals
- 300 Multi-color Pack
- Needle with large eye
- Muslin, 1/4 yard white
- Sewing machine
- Thread to match
- Fabrics: 1 yard each background and accent
- Buttons, seven 1/2” brown
- Bias tape, 1/4” wide white
- Embroidery floss to match paint colors
- Crayon
- Tape measure
- Masking tape, low tack
- Foil
- Corrugated cardboard
- Sponges, wedge make-up
- Straight pins
- Scissors
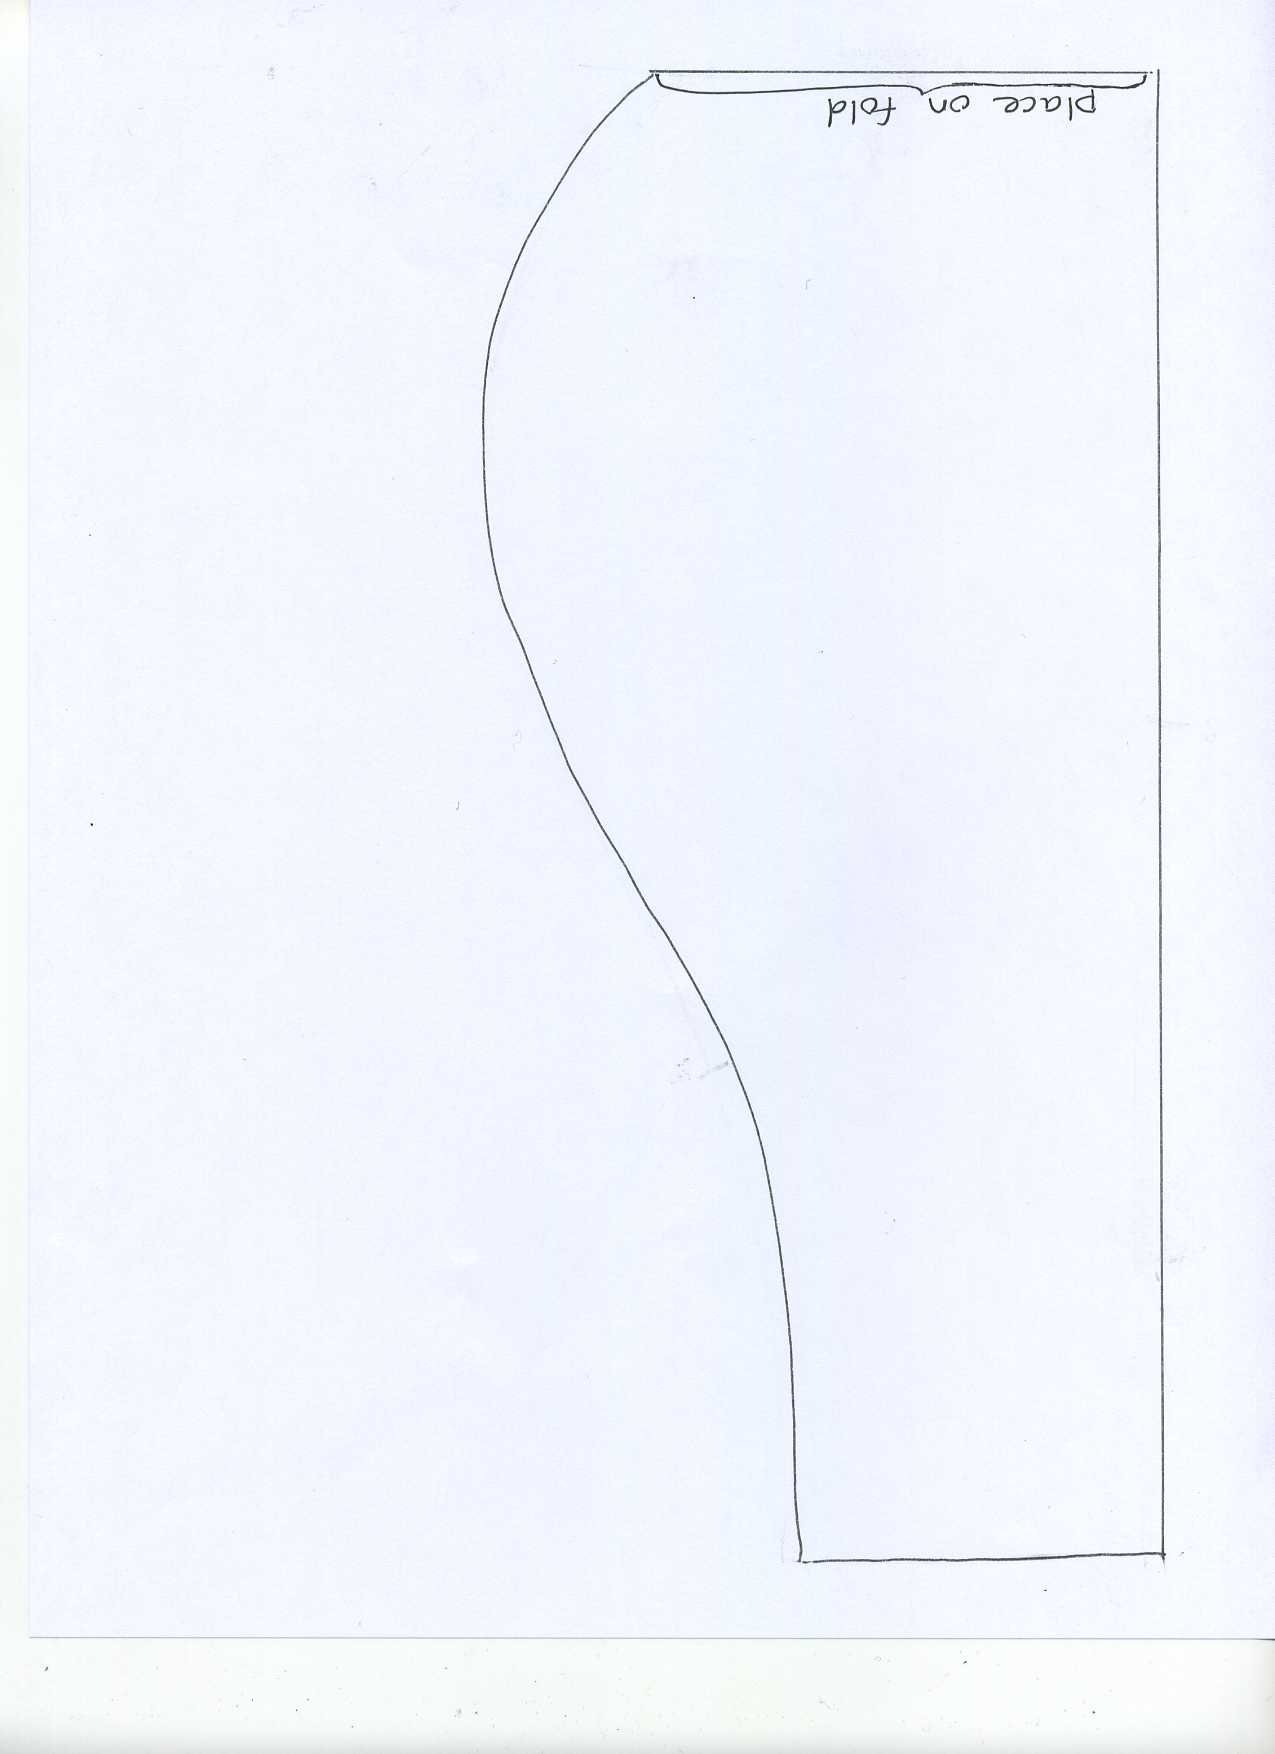
- Pocket Pattern and Waistband Scroll Placement Pattern
- Waistband Pattern
Instructions:
Apron:
-
Measure and cut a 19” X 33” piece of background fabric for skirt. Pin waistband pattern (see link, above) on the fold on remaining background fabric and cut out two.
-
From accent fabric, measure and cut a 9” X 33” strip for lower band and four 36” x 4 ½” strips for ties.
-
To create ties, sew two strips, right sides together, angling at one end and leaving one end open. Repeat for other tie. Trim seam then turn inside out and iron smooth. Topstitch around edge.
-
Finish sides of apron skirt by folding over ¼” then again, and sew in place. Iron smooth.
-
Pin unfinished ends of ties onto right side at ends of waistband, leaving seam allowance at top and bottom. Fold up one side of lower edge of waistband and pin in place. Sew along three sides of waistband, sewing ties in place, leaving bottom edge of waistband open. Trim and clip seams then turn inside out and iron smooth.
-
Sew two gathering lines along top edge of skirt. Pin to unfolded edge of waistband, gathering to fit. Sew together. Remove gather threads and trim seam to 1/2”. Pin waistband back in place covering stitches. Topstitch around entire waistband.
-
Fold and iron a seam allowance along one long side of accent strip. Pin, right sides together, cut edge of accent band to bottom edge of apron extending edges for seam allowance at sides. Sew in place. Iron seam toward strip. Fold and pin right sides together and sew. Trim seams then turn inside out, forming band along bottom edge of apron. Pin folded edge of band in place covering stitching lines. Sew in place by stitching in the ditch so it won’t show.
-
Pin and cut pocket pattern from accent fabric. Pin right sides together then sew leaving a small opening for turning. Turn inside out and iron flat.
-
Iron bias tape smooth. Carefully open bias tape, and then working in short sections at a time, run a thin bead of Fabric Fusion along inside edge. Finger press together and let dry.
-
Measure length of lower band then divide into sixths and mark with pins.
-
Place corrugated cardboard on work surface. Lay apron on top. Position end of bias tape at top of lower band extending end over about 2”. Pin tape in place along sewn edge creating loops at each pin. Ease bias tape into shape, pinning in place across entire apron.
-
Glue in place with Fabric Fusion by working in short sections, removing pins, carefully lift bias tape and apply a thin bead of glue along back of tape. Carefully replace on apron and adjust as needed. If needed, hold in place with small pieces of masking tape until dry. Fold ends of bias tape to back and glue in place. Repeat steps for pocket. For waistband, cut edges of bias tape, fold to back and glue in place, creating finished ends. Glue in place.
- Sew pocket in place on apron.
Cupcakes:
-
Cover work surface with a few paper towels. Lay muslin fabric on surface.
-
Cut cupcake design from stencil strip leaving as much border as possible.
-
Carefully remove stencil from backing removing all excess pieces. Press onto fabric. Use small pieces of low tack masking tape to cover everything but cake and frosting. Add more tape around edges to extend border of stencil. Run a fingernail along inside edges to prevent seepage.
-
Squeeze a small puddle of each Soft Paint on foil. Cut wedge sponge in half lengthwise creating enough for each color.
-
Tap flat end of sponge into Chocolate and tap excess onto foil – too much paint will cause seepage under stencil. Pounce paint into cake design of stencil applying a thin even application. Pounce Pink onto frosting design. Carefully peel off stencil and press onto another area of fabric. Repeat steps for desired number of cupcakes of each color. Let dry.
-
Thread needle with pink floss, thread through holes of buttons a few times then knot ends in front and trim ends. Continue with remaining buttons, changing colors to match cupcakes.
-
Apply Fabric Fusion to back of button then press in place at top of cupcakes. Let dry.
-
Use scissors to cut out each cupcake design leaving a 1/4” border of fabric around each.
-
Determine position of cupcakes on skirt of apron then mark with small pieces of masking tape.
- Squeeze a puddle of Fabric Fusion on foil. Place a paper towel on work surface. Flip cupcake over onto paper towel. Using flat end of wedge sponge, scoop up glue on sponge then swipe across back of cutout applying a thin even coating of glue to entire area. Carefully lift off, position in place on apron then press in place. Continue with remaining cupcakes using a clean paper towel for each – that way no glue will get on front of design. Let dry.
Lettering:
-
Cut desired letters from Italic Stencil sheet leaving as much border around each. Place last letter of word in place where shown. Line up remaining letters trimming excess stencil for an even space between each. Add small pieces of tape around word to create a wider border then add smaller pieces between to cover any fabric that may show.
- Pounce Chocolate Soft Paint within stencil. Carefully remove stencil and let dry. Repeat step for initial on pocket. Let dry.
Crystals:
- Turn on Heat-Setting Tool following package instructions. Press crayon on top of Crystal then position on frosting of cupcake - the crayon will hold it just long enough to position in place. Gently touch tip of heated tool to top of Crystal and hold in place for 5 – 8 seconds. Let cool then touch with finger. If not adhered – repeat step adding a few more seconds. Continue with remaining Crystals on frosting, pocket, within each loop and randomly on skirt.
Note:
- Wait 72 hours to wash. Machine wash warm on gentle cycle. Do not use harsh detergents or bleach. Remove promptly and line dry. Iron on back of
Read NextRoyal Headpiece


Thanks for your comment. Don't forget to share!
bethdishong 648551 9
Apr 07, 2011
This is absolutely beautiful. I just can't wait to receive my fave crafts email so I can find new and fun things to sew and craft. I just love it. Thank you!! Thank you!! Thank you!! Beth Dishong, Groveport Ohio
mariibaby94 910356 4
Mar 26, 2011
is there any way that i can buy this apron instead of making it, if so how much would it cost me?
rtapia11 6417149
Nov 21, 2010
I have made 2 of this aprons for Christmas gifts. I used Christmas fabric yet keeping the same principle. One I made use ginger bread men and the other was with snowmen. They turn out so darling and it only take under 2 hour from start to finish. Thank you for this neat pattern.
Crafter 17942
Apr 14, 2010
Did anyone else have trouble finding or understanding the waiste band pattern ?
Report Inappropriate Comment
Are you sure you would like to report this comment? It will be flagged for our moderators to take action.
Thank you for taking the time to improve the content on our site.


