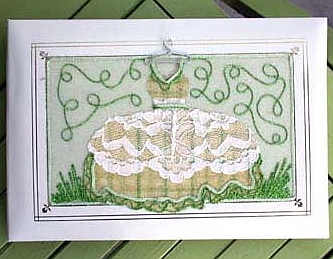
Summer Dress Album
Here's a beautiful project to make as a gift or for your own wedding. The techniques are fast and easy, but the result is high-end. You'll be amazed and impressed at how you can transform a plain white photo album into a memorable creation. By including personal items, such as buttons, lace from a real wedding dress, etc, the album becomes even more of a cherished family heirloom.
Materials:
- 5x7 White Photo Album (Pioneer Photo Albums Inc. white style no. MB-57)
- Dress template (suggest die cut or My Mother's Dress stamp by Inkadinkado)
- Green Plaid Paper (Sizzix Little Sizzles Classics by Provo Craft)
- Lace (Wyla Laces style 97001 010-432-06)
- Kreinik #12 Tapestry Braid 015 Chartreuse
- Kreinik 1/8" Ribbon 087C Meadow Grass
- 8x10 Treasure Tape sheet
- Diamond Beadlets
- Paper clip
Instructions:
- Cut your tape pieces. You need one piece of Treasure Tape the same size as your album's cover. Apply a second piece of tape to the patterned side of your green plaid paper. Cut your dress shape from this paper: you can use a die cut machine like Sizzix, or use a rubber stamp as a guide.
- Cut a piece of lace that is as wide as the widest part of your dress. Peel the red liner off your dress shape and center the lace on the dress, with the top edge at the waist. Press the lace into the tape and trim off the excess. Continue to embellish your dress with threads. When finished, place your dress in a shallow tray or ziploc® bag and pour beadlets over the exposed tape. Swirl to cover fully and tape to remove excess beadlets.
- Make your hanger using a paper clip: Pull both sides upward so they form the triangular base. With pliers, bend the smaller loop back in the middle to form the hook. Wrap the other end of the clip around the base of the hook. Attach your finished hanger to your dress using small strips of tape on the back of the dress.
- Peel the white liner off one corner of your large piece of Treasure Tape and center it on your album. Peel back the rest of the white liner and adhere the rest of your tape to the album cover, smoothing out any air pockets as you go. Center your finished dress and hanger on the tape and press to secure. Decorate the rest of your cover with thread, adding a border and grass around the dress. When finished with your design, place the album in your tray or ziplock bag and pour beadlets over the taped areas. Swirl to cover fully and tape to remove excess beadlets. Your album is ready for photos!
Tip: Use the same technique and concept to make any kind of dress. The album can then be used for little girls, a night out or New Year's Eve album (use a cocktail dress pattern), etc.
Kreinik threads available through needlework stores or www.kreinik.com.
Read Next17 Homemade Suncatchers to Make