Scarecrow Wreath
Learn how to make a Sammy Scarecrow Wreath for this Fall. Welcome your friends into your home this season. Get them out of the cool breezy air.
Materials:
-
STYROFOAM* Brand Products:
- 6" ball, one
- 4" balls, two
- Fabrics: unbleached muslin, 1 yd.; small plaid in autumn colors, 14" x 32"; denim, 1/2 yd. (or pant leg from denim jeans)
- Polyester fiberfill, small amount
- 9' silk autumn leaf garland
- 16" straw wreath
- Curly raffia, one package
- Wood slat, 2-13/16" x 7-1/4"
- Greening (floral) pins, 12
- Fabric glue
- Acrylic paints: orange; black; white; red
- Paintbrushes: stencil; small shader or round
- Black permanent markers: fine-line; broad-line
- Jute
- Wire cutters
- Scissors
- Serrated knife
- Candle stub or paraffin
- Ruler
- Rubber bands
- Pencil
- Dressmaker's carbon
- Toothpicks
- Extra-long straight pins
-
Hot glue gun and glue sticks
Pattern
Instructions:
-
Attach garland to front of wreath with greening pins or hot glue. Wrap garland around wreath twice, keeping leaves on top not sides.
-
Wax serrated knife with candle stub or paraffin and then cut 4" foam balls in half. (Hint: Reserve one half ball for a future project.)
-
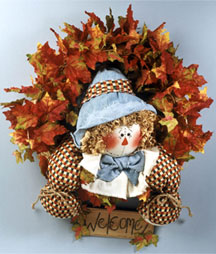
Cut one 24" square and two 9" squares from muslin. Wrap 24" square tightly around 6" foam ball for head. Smooth any wrinkles from face area and then secure excess muslin with a rubber band or short length of jute (refer to photo). Apply a small amount of glue to further secure. Repeat, wrapping 9" muslin square around each half ball, tying off excess fabric on flat side of foam. When glue is dry, trim excess fabric.
-
Using pattern and dressmaker's carbon, transfer face to 6" muslin-covered head.
-
Use a stencil brush and very little red paint to drybrush 1-3/4" circle cheeks, overlapping ends of smile. Paint nose orange. Dip eraser end of pencil in black paint to dot eyes. Let dry. Dip toothpick in white to dot highlights on eyes and cheeks. Using a fine-line black marker, draw eyebrows, lower lashes, and penstitching details on face.
-
Glue curly raffia around top and sides of head for hair, framing face (refer to photo). Glue and insert two toothpicks halfway into flat side of one uncovered half ball. Apply glue to extended ends of toothpicks and then attach the half ball to top of head.
-
In succeeding steps, use straight pins to secure fabrics to foam while glue dries.
-
Tear a 12" x 36" strip of muslin. Gather fabric lengthwise at center with your fingers and tie with jute. Fold gathered fabric in half for collar. Glue collar (fold line only) below scarecrow's face approximately 1-1/2" from smile.
-
Cut one 2" x 22" strip and one 19" x 14" rectangle from denim. Tie denim strip in a bow and glue to center top of collar. Trim ends of bow diagonally. Wrap denim rectangle around top of head with attached half ball, overlapping at center back for a hat. Fold up a 1-1/4" cuff around bottom of hat and spot glue to secure. Glue hat seam at back. Tie a 10" length of jute around top of hat, leaving ends intact to tie to wreath later.
-
Tear a 2" x 32" strip of plaid fabric and wrap it around denim hat for a hatband (refer to photo). Overlap and glue ends, trimming as necessary.
-
Fold remaining 12" x 32" rectangle of plaid fabric in half lengthwise right sides together and glue long edges. Turn tube right side out and lightly stuff center with fiberfill to within 4" of each end. Insert a muslin-covered half ball into each end of tube, letting curves peek out one-third beyond fabric to form hands and sleeves. Glue to secure. Tie jute in a bow around each sleeve just above hand.
-
Place scarecrow head on inside center bottom of wreath. Separate muslin collar layers, draping one half over front of wreath and other half over back. Glue back half of collar to wreath. Tie jute at top of hat around wreath to anchor scarecrow head. Center and glue sleeve tube behind bottom back of head, letting arms and hands hang down over front of wreath (refer to photo).
-
Using pattern, transfer sign lettering to wood slat. Trace over lines with broad- and fine-line black markers. Use fine-line marker to draw a wavy border around edges of sign (refer to photo).
- Cut two 5" lengths of jute. Fold each length in half to form a loop and then tie knots in both ends. Glue knotted ends of one loop to a top back corner of welcome sign and back of corresponding hand. Repeat for remaining loop, making sure sign hangs properly. Trim a few small silk leaves from wreath and then glue to sign (refer to photo).
®™ Trademark of The Dow Chemical Company ("Dow") or an affiliated company of Dow. For more project ideas, please see styrofoamstyle.com.
Read NextJumbo Planter Makeover Secret
Your Recently Viewed Projects

Thanks for your comment. Don't forget to share!
Report Inappropriate Comment
Are you sure you would like to report this comment? It will be flagged for our moderators to take action.
Thank you for taking the time to improve the content on our site.