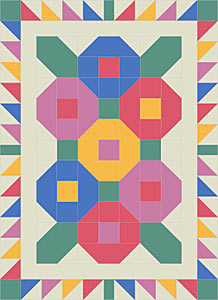
Quilted Flower Bouquet Wall Hanging
Hang a quilted bouquet of flowers from your wall in bright, cheerful colors. Rotary cut and piece together different shapes and then either machine quilt or hand quilt.
Project time: 1 - 2 days
Materials:
- Collins Crystal Glasshead Pins (C104)
- Collins Invisible Monofilament Thread (C324)
- Collins Machine Quilting Needles (C167)
- Omnigrid 45 mm Rotary Cutter (2050)
- Omnigrid cutting Mat
- 6" x 12" Omnigrid Ruler (R12 Yellow)
- Thread
- Materials: 100% cotton 44" wide fabric
- Pink ¼ yard
- Yellow ¼ yard
- Lavender ¼ yard
- Blue ¼ yard
- Green ¼ yard
- White ¼ yard
- Backing ¼ yard
- Batting 25” x 33”
Instructions:
Basics:
- Sew using ¼" seams. Seam allowance is included in all cutting measurements.
- Press as you go. Press seams in one direction (not open) toward the darker fabric whenever possible.
- Label each group of cut pieces.
Cutting:
From Pink, cut:
1 strip, 2½” x width of fabric
Subcut into 11 squares, 2½" x 2½"
1 strip, 2 7/8" x width of fabric
Subcut into 9 squares, 2 7/8" x 2 7/8"
Cut each square once diagonally from corner to corner to yield 18 triangles
From Yellow, cut:
1 strip, 2½" x width of fabric
Subcut into 6 squares, 2½" x 2½"
1 strip, 2 7/8" x width of fabric
Subcut into 7 squares, 2 7/8" x 2 7/8"
Cut each square once diagonally from corner to corner to yield 14 triangles
From Lavender, cut:
1 strip, 2½" x width of fabric
Subcut into 10 squares, 2½" x 2½"
1 strip, 2 7/8" x width of fabric
Subcut into 9 squares, 2 7/8" x 2 7/8"
Cut each square once diagonally from corner to corner to yield 18 triangles
From Blue, cut:
1 strip, 2½" x width of fabric
Subcut into 8 squares, 2½" x 2½"
1 strip, 2 7/8" x width of fabric
Subcut into 9 squares, 2 7/8" x 2 7/8"
Cut each square once diagonally from corner to corner to yield
18 triangles
From Green, cut:
1 strip 2½" x width of fabric
Subcut into 16 squares, 2½" x 2½"
4 rectangles 2½" x 1½"
1 strip 2 7/8" x width of fabric
Subcut into 4 squares 2 7/8" x 2 7/8"
Cut each square once diagonally from corner to corner to yield 8 triangles
From White, cut:
2 squares, 2½" x 2½"
1 strip, 2 7/8" x width of fabric
Subcut into 30 squares, 2 7/8" x 2 7/8"
Cut each square once diagonally from corner to corner to yield 60 triangles
2 strips, 2" x width of fabric
Subcut into
2 strips, 2" x 22½" for side float borders
2 strips, 2" x 17½" for top and bottom float borders
Sewing Instructions:
1. Sew triangles together to make half square triangle units in the combinations listed:

PINK
14 pink & white
2 pink & blue Illustration. #1
1 pink & lavender
1 pink & yellow
YELLOW
10 yellow & white
2 yellow & lavender
1 yellow & blue
LAVENDER
14 lavender & white
1 lavender & blue
BLUE
14 blue & white
GREEN
8 green & white
2. To create the center of the wall quilt design, arrange the squares and half square triangle units as shown. Sew the pieces together in horizontal rows; then sew rows together.
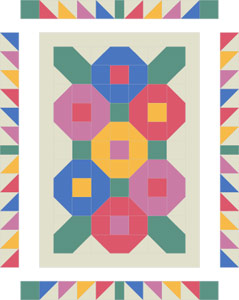
3. Sew white float borders to the center design, sides first then top and bottom.
Finishing Quilt:
1. On wrong side of quilt top, lightly mark a seam line ¼" from raw edges all the way around the quilt top.
2. Place a 25" x 33" piece of batting on a flat surface and smooth out any wrinkles.
3. Cut the batting fabric 22" x 30" and center on top of the batting with right side up.
4. Center the quilt top, right side down, on top of the backing fabric.
5. Smooth layers and pin together around the edges.
6. Sew around the entire quilt top on marked ¼" seam line, through all layers leaving a 5" opening along one side for turning.
7. Trim batting and backing fabric to the exact side of the quilt top.
8. Turn the quilt right side out through opening between quilt top and backing fabric.
9. Press. Hand sew opening closed.
Prepare to Quilt:
1. Using small safety pins, pin-baste layers together every 4 inches. If you prefer you may thread baste layers instead.
2. Decide if you want to machine quilt or hand quilt your project.
Machine Quilting
1. Set the machine for a slightly longer stitch length.
2. Stitch around quilt ¼" from finished edges.
3. Determine how much quilting you would like. Begin in the middle of the quilt and stitch down the center of chosen seams (this is called “stitch in the ditch”).
Hand Quilting:
1. Stitch around the quilt ¼" from the finished edges.
2. Stitch ¼" from seam lines using a small, even running stitch.
Read NextGirl's Favorite Quilt Block
Your Recently Viewed Projects
Thanks for your comment. Don't forget to share!
Report Inappropriate Comment
Are you sure you would like to report this comment? It will be flagged for our moderators to take action.
Thank you for taking the time to improve the content on our site.