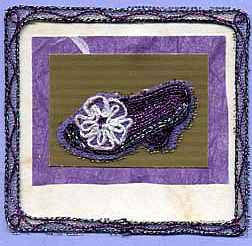
Purple Victorian Shoe Card
Here's a feminine card to make for Mother's Day. It is also an easy design for a women's group to make in bulk and sell as a fundraiser or give as encouragement cards.
Materials:
- Shoe stamp (Stampin Up)
- 5/8" X 1 1/8" Gold stripe paper- Specialty Mat Stacks, Die Cuts with a View
- 1.5" X 2" purple textured paper
- 2.25" square Cream Parchment paper
- 3" square Lavender cardstock (2)
- Blank card, cream (Halcraft Value Pack)
- Kreinik Fine #8 Braid 026V, 242HL
- Kreinik Tapestry #12 Braid 032, 5002
- Diamond Beadlets
- Treasure Tape Sheets 4" x 6"
- Glue stick
Instructions:
-
Center and mount your lavender cardstock at the top of your card. Center and mount your gold paper on the purple paper. Center and mount the purple paper at the top of the parchment paper. Cut a 2.5" square of treasure tape. Peel the white backer off and center it on your lavendar cardstock. Peel back the red liner and center your parchment square on the tape. Press to remove any air pockets.
-
Begin to embellish the exposed tape border, first creating an outline around the inside and outside with your 5002 #12 Braid.
-
Embellish inside the outlines with the 242HL #8 Braid, creating a zigzag pattern. Place your card into a shallow tray or ziploc bag and pour beadlets over the tape surface. Swirl to cover fully and tap to remove excess beads.
-
Peel the white liner from a piece of Treasure Tape and s tamp your shoe design on the sticky tape surface. Replace the liner and cut out your shoe. Remove the white liner again and place your tape shape on your second piece of cardstock. Cut out again. Adhere your shoe shape to the center of the gold paper on your card.
-
Peel the red liner off your shoe and begin to embellish, using the photo as a guide. Follow the outlines of the stamp first and then fill in your design. When you are done embellishing, press all threads down using your leftover red liner. Then place your card back in the tray or ziploc bag and pour beadlets over the tape surface. Swirl to cover fully and tap to remove excess beads.
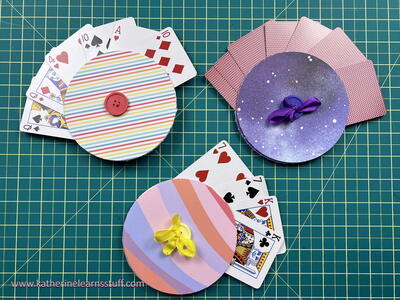
Read NextNo-sew Playing Card Holder