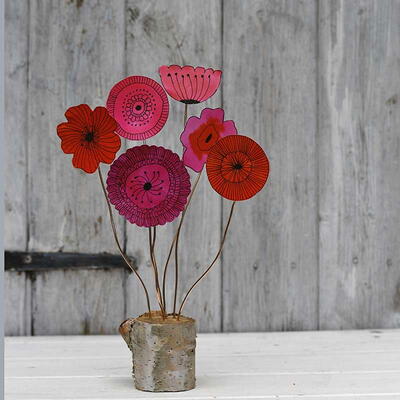
Invite with Embellished Glass
Invite your closest friends for a get together. Create these amazing invitations from Diamond Tech using glass embellishments. All the fun is while you're making them. You need cardstock and some flower punch stamps along with some other materials. Everyone will love what you created.

Materials:
- Golden Yellow, Mint Green, Periwinkle and
- Hot Pink Card Stock
- DCWV, “The Stack 5” (sand print paper)
- Pop Dots™Stampin’ Up! ™
- Flower Punch Stampin’ Up! ™
- 1” Circle Punch Stampin’ Up! ™
- Polka Dot Punches Stamp Set Stampin’ Up! ™
- Transparent Yellow Fuseworks™ Sheet Glass
- Opalescent Blue Fuseworks™ Sheet Glass
- Fuseworks™ Kiln
- Kiln Paper
- Microwave
- Fuseworks™ Glass Cutter
- Orange Ink Stampin’ Up! ™
- Ultra Fine Green Glitter Stampin’ Up! ™
- Scalloped Stencil
- Hot Glue
- Glue stick
- Note: To purchase Stampin’ Up! ™ products contact EMHAR720@verison.net
- Fuseworks™ Running Pliers
- Marker
- Scissors
- Pin Back
- E6000
Steps:
Transparent Yellow Opalescent Blue
1 1/2” x 1 1/8”
Card
- Use orange ink with the Stampin’ Up!™ Polka-Dot Punches Stamp Set and stamp one side of golden yellow card stock. Cut card stock into a 5 ½” x 11” rectangle; score and fold in half.
- Using a Stampin’ Up!™ 1” circle punch, punch two circles from mint green card stock.
- Next, cut a 4” x 6” rectangle from hot pink card stock. Use a small scallop stencil and create a scalloped edge around the perimeter of the rectangle.
- Using a Stampin’ Up!™ flower punch, cut two flowers from periwinkle card stock.
- Cut a 2 ½” x 3” rectangle from sand print paper.
- Center the scalloped edged hot pink paper on top of folded yellow paper. Glue into place with a glue stick.
- Measure one inch down from the top of the scalloped edge of the hot pink card stock and lightly draw a 2 ¼” x 2” rectangle. Open the card and lay flat. Use a craft knife and cut an opening along the outline of the rectangle. This will create a window in the front of the card.
- Glue the sand printed paper to the inside of the card so that it appears centered inside the window.
- Place a dollop of hot glue in the center of the mint green circles and sprinkle with ultra fine green glitter, cool and dry.
- To assemble flower, adhere a mint green circle to the center of the periwinkle flower, using a Stampin’ Up!™ Pop Dot™, make two.
- Apply assembled flowers to the card with Pop Dots™ just below the window.
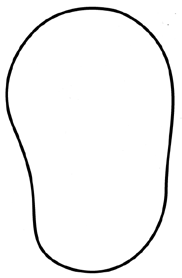
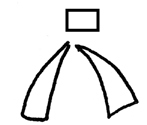
Flip Flops
- Make photocopies of the above patterns. Using scissors, cut-out pattern pieces, staying on the inside of the pattern outline.
- Place pattern pieces on the colored sheet glass indicated above. Trace around the outside edge of the pattern using a Sharpie® Marker.
- To cut glass, start at one edge of the glass; place the cutter perpendicular to the glass.
- Glass likes to be cut from edge to edge. Apply consistent medium pressure and push the cutter across the glass, following the pattern line to the opposite glass edge, this is called a score. A good score appears as a continuous scratch on the surface. Break/run score with running pliers. Continue to score and break the glass until the pattern is completely cut. Clean glass using paper towel moistened with water. Completely dry the surface of the glass with a lint free cloth. NOTE: More cutting tips can be found on www.diamondtechcrafts.com.
- Next, cut a 2” X 2” piece of kiln paper. Remove the lid from the Fuseworks™ Kiln. Place the kiln paper on the kiln base.
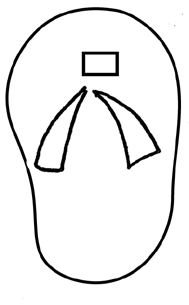
- Layer the glass on the kiln paper, transparent yellow first; embellished with the blue opalescent glass, creating the flip flop straps (see FIG. 2).
- Carefully set the base with glass inside the microwave. Cover with kiln lid.
- Fuse, in a 1200 WATT microwave at 100% power for 2 minutes. PLEASE NOTE: All microwave and kiln combinations will have different firing patterns. Be sure to take careful notes and log all fusing times for future use. For lower WATT microwaves, increase time by one minute.
- After time is up, open microwave and, using Hot Mitts, carefully lift the lid enough to inspect the fusing process. Glass should have nicely rounded edges. Add additional time in 15-30 second increments until desired results are achieved.
- Remove kiln from microwave using the Hot Mitts and place on a heat resistant surface.
- Cool the kiln for at least 30 minutes WITHOUT REMOVING LID. PLEASE NOTE: Removing the lid or peeking under the lid during the cooling will result in your piece cracking. Glass remains hot for a long time and should be handled with great caution.
- Once cooled, use E6000 to glue a pin back on the back side and allow drying according to the manufacturer’s recommendations.
- Place the pin in the window of the card, mark with a pencil and use a safety pin to create two holes for the pin back to go through.
CAUTION
- Wear safety goggles when using glass crafting tools.
- Always read and follow kiln safety rules and warnings before beginning this project.
Read NextEasy Bookmarks