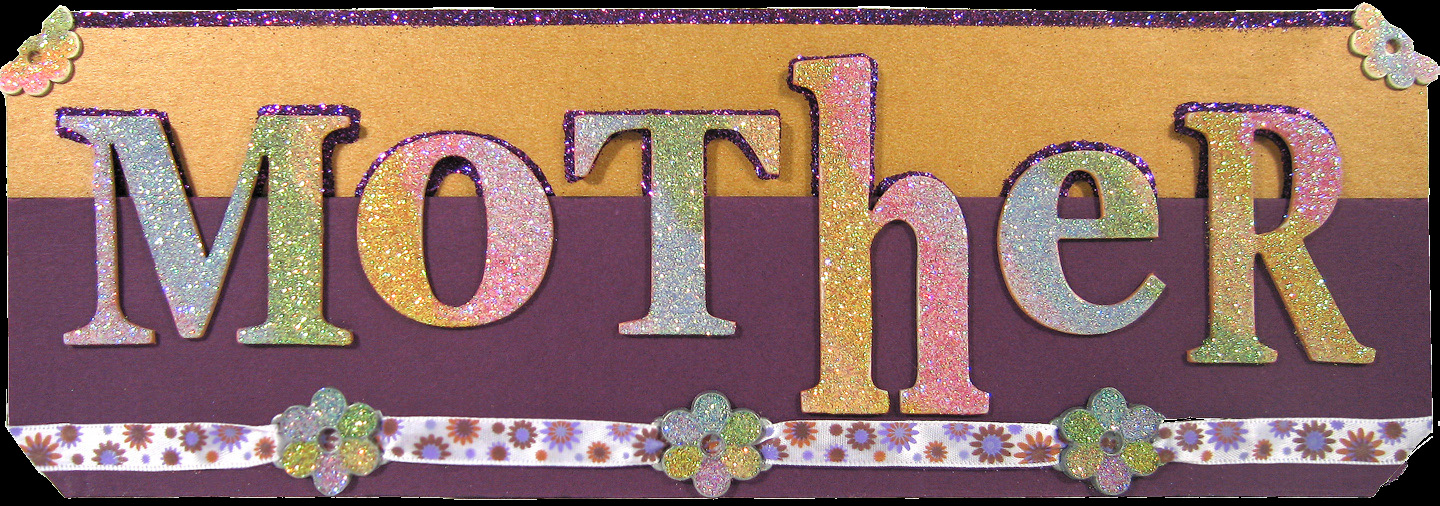
Rainbow Glittered Nameplate
Fill someone special's name full of rainbows and sunshine with this cool nameplate idea from Art Glitter that is great for a desk or home office.
Materials:
- Art Glitter Ultrafine Opaque Glitter: #256 Purple Passion
- Art Glitter Ultrafine Transparent Glitter: #149 Azure, #97 Nirvana, #295 Ensalada, #214 Sorbet, #91 Orange Crush, #268 Pink Smoothie
- Designer Dries Clear Adhesive with Metal Tip attached
- Permanent Markers: black, pale pink
- Mat board: 2 colors (gold, purple) approximately 12” x 2 1/2”
- 3/8” Ribbon
- 1/8” Sticky Tape
- Chipboard: Letters, button
- Scissors
- Utility Knife
- 3 Naked Blossom Slides
- Ruler
- Pencil
Instructions
-
Ink edges of letters with pink marker. Arrange letters on purple mat board, sitting slightly above top of mat board. Measure width of mat board needed and cut off excess with utility blade also cut the bottom corners off. Bottom of purple board should extend longest letter 3/4". Cut gold board to same width cut off the top corners too. Mark all edges with black marker. When letters are in place again, glue down. Lay on top of gold mat board allowing gold to sit about 1/2” above tallest letter. Holding the two boards together, trace onto gold board the top of letters that hang over the purple board with pencil, including the line along the purple board. Allow your outline to be slightly larger than the chipboard letters.
-
Fill in letter outlines on gold board with adhesive. Sprinkle with Purple Passion glitter while the glue is wet, white and shiny. Lay strip of sticky tape along top edge of gold board. Smooth into a straight line and remove red protective cover. Sprinkle with Purple Passion glitter. Set aside to dry.
-
Fill in one petal of naked blossom slide with adhesive. Spoon on one of the transparent glitter colors. Fill in next petal with glue and glitter until all petals are done in a different color. Glitter two other blossoms in same manner. Set aside.
-
Place transparent glitter in a row, like a rainbow: pink, orange, yellow/gold, green, blue and purple. Draw a thick layer of adhesive onto last letter. Starting with purple spoon on a line of glitter across the edge of the letter at a slight angle and tap off excess away from open adhesive. Then spoon on a line of blue glitter next to and overlapping the purple line, slightly. Tap off excess away from open adhesive. Continue with next color until letter is done. This is called “Rainbow Glittering”. Finish rest of letters with same technique.
-
Slice button chipboard in half. Glue each half onto gold board corners. Fill in with adhesive and Rainbow glitter each side with three transparent colors.
-
Cut ribbon about half an inch longer than board width. Run ribbon through the three slides, positioning them at even intervals. Place below name and glue down behind blossoms and at edges of board. Cut off excess ribbon.
- Position purple board on top of gold board with the opaque purple letters shadowing the rainbow letters above and glue down, weighted for a couple of hours. Make a homemade stand by slicing half way through some scrap mat board. Bend board away from slice and glue top bend to center back of nameplate.