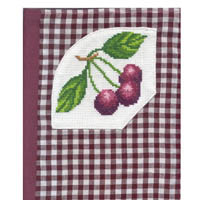
Cherries Cross Stitch Recipe Book Cover
Create a lovely recipe book cover adorned with a cherries cross-stitch motif, made with the help of a chart from DMC Threads. You can admire your cross stitch work every time you open the book for a recipe.
Materials:
- Cherries Cross-stitch motif on Aida fabric measuring 35 cm x 35 cm.
- Maroon gingham 30 cm x 40 cm.
- Maroon ottoman fabric 35 cm x 35 cm.
- A piece of fusible fabric 50 cm x 30 cm.
- A spool of white and maroon thread
- A sewing machine
Size of the recipe-book cover: 18 cm x 25 cm.
How to prepare the cross-stitch motif
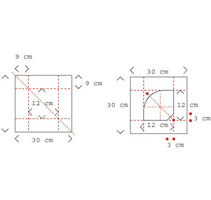
Cut a square of 30 cm x 30 cm out of the Aida fabric, making sure the cross-stitch motif is well centred.
Place the motif on the face and baste diagonally, starting from the top left corner and working down to the bottom right corner (the basting should pass through the middle of the cross-stitch motif).
Baste on each side 9 cm from the edge to obtain a square measuring 12 cm x 12 cm in which the motif is centred (see diagram on the left).
Fold at a bias the bottom right corner of the square you have just formed, mark it with an erasable felt-tip pen 3 cm from the height and 3 cm from the width, and press the pleat with an iron.
Round off the top left corner with the help of a compass (see diagram on the right).
How to make the application
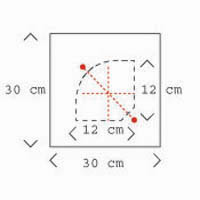
Baste along the pleat of the bottom right corner, the sides and the curve to obtain the shape of a small fan (see diagram).
How to mount the application
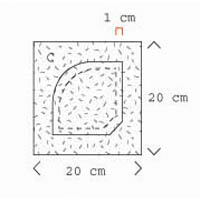
Cut the Aida fabric 1 cm from the basting all around the shape obtained.
Mount the entire surface by placing a square 20 x 20 cm on the back of the cross-stitch motif and applying the fusible fabric with an iron (see diagram).
How to prepare the front of the cover. Part A

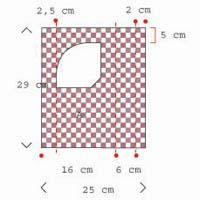
Cut a rectangle measuring 25 cm x 29 cm out of the gingham.
Baste along the height 1 cm from the edge and baste two lines on the other side: the first one 8 cm from the edge and the second one 2 cm from the same edge (see diagram).
How to apply the cross-stitch motif
Position your fabric by aligning the lines previously basted 8 and 2 cm from the right edge.
Place the motif in the top left part 2.5 cm from the left edge and about 5 cm from the upper edge. Pin and fix by machine sewing a straight seam around the application (see diagram).
How to prepare the back of the cover. Part B
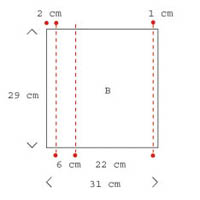
Cut a rectangle measuring 31 cm x 29 cm out of the maroon ottoman fabric.
As for part A, baste along the height on one side 1 cm from the edge and baste 2 lines on the other side: the first one 8 cm from the edge and the second one 2 cm from the same edge (see diagram).
How to assemble parts A and B
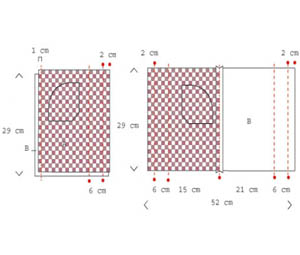
Place part B by aligning the two basted lines towards the right, then place part A on the back, making sure that the cross-stitch motif is facing the front when opening the cover. The basted lines 1 cm from the edge must be placed one over the other because this is the seam line for assembling the cover. Pin and machine stitch a seam 1 cm from the edge. (diagram on the left). Flatten the seam at the back with an iron (diagram on the right ).
How to apply the fusible fabric
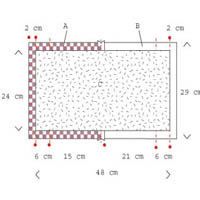
Work on the back.
Cut a piece of fusible fabric measuring 24 cm x 48 cm (Part C). Apply it to the back of parts A and B with the help of an iron, leaving a margin of 2.5 cm at the top and bottom, and a margin of 2 cm on the sides, corresponding to the basting already sewn (see diagram).
How to make the hems on the edges
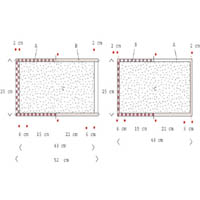
Work on the back. On the margins left on the top and bottom, sew a double hem of 1.3 cm, pin and machine stitch all along (see diagram on the left).
On the margins left on the sides, sew a double hem of 1 cm, pin and machine stitch along the heights (see diagram on the right)
How to make the side flaps
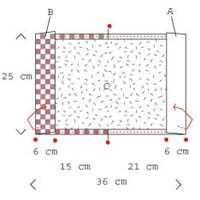
Work on the back.
Fold each side over the fusible fabric along the 6 cm marked by basting at the beginning. Place the upper and lower borders carefully and pin (see diagram).
How to finish the side flaps
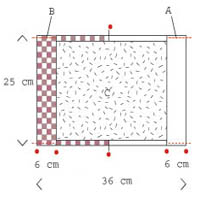
Fix each flap at the top and bottom with a straight machine-stitched seam 3 mm from the edge (see diagram ).
How to finish the cover
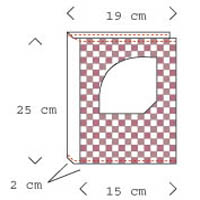
Iron the cover, making sure to flatten the pleats. Stop and tuck in the threads (see diagram).
Your Recently Viewed Projects

Thanks for your comment. Don't forget to share!
Report Inappropriate Comment
Are you sure you would like to report this comment? It will be flagged for our moderators to take action.
Thank you for taking the time to improve the content on our site.