Beaded Vellum Jewelry Pendant
Who doesn't love jewelry? What's even better is making your own jewelry out of personal treasures. Visit the craft store and pick up basic jewelry making materials like wire, beads, and Kreinik double-sided red-liner tape, and you can make this pendant project. The technique is easy to do if you want to make multiple designs and sell them or give as gifts.
Materials:
- Metal-edged tag (1 1/2 X 2 5/8)
- Paper: yellow stripe, blue dot, gold sand
- Very Fine #4 Braid in 1432 Blue
- 22-gauge silver wire
- Blue beads (we used handmade beads, made of sculpey and glazed)
- Photo or stamp
- Stamp punch (Mcgill Craftivity; www.mcgillinc.com)
- 4"X6" sheet Treasure Tape
- Diamond Beadlets®
- Yellow eyelets
Instructions:
-
If your tag has a string hanger, remove it. Measure the size of your tag inside the metal edges and cut a piece of tape that size. Peel the white back off the tape and apply it to your tag.
-
Using the white backer as a guide, cut out rectangles from your blue and gold paper. Trim the gold paper to 1/4 the length of your tag. Punch a square from your yellow paper and trim it to the same width and 1/4 the length of your tag.
-
Peel back your red liner from the tag and adhere your blue paper, centered on the tape. Using pieces of the tape, attach your yellow paper to the top of the tag (allow the tape to overlap beyond the die-cut edge) and attach the gold paper to the bottom.
-
Measure and mark dots for three holes at the bottom of your tag and mark the hole in the top of the tag. Punch holes with a small punch and set eyelets in each hole.
-
Peel back red liner on remaining tape and place your image face up on the sticky surface of the tape. Cut out your image and peel back the white liner. Replace the liner so it covers half of the exposed tape, and make loops with your thread around the edges of your image. Move the liner when necessary to finish your loops. Remove the liner and place the image in the center of your tag.
-
Place your tag in a Ziploc® bag and pour beadlets over the exposed tape areas. Press to firmly adhere the beads and then tap to remove the excess.
- To create the bead charms for the bottom of your tag, begin by cutting an 8" length of wire and making a small loop through the first eyelet with the end. Bring the end of the wire down and wrap it around to form a hanger and trim the end even. Slide one bead onto the other end of the wire, so that it rests against the hanger. Hold the wire just below the bead and make a loop. Wrap around the loop and keep wrapping upward, spiraling around the bead. Wrap around the hanger twice and trim the excess wire. Repeat this process for the other two charms.
Kreinik threads available through needlework stores or www.kreinik.com.
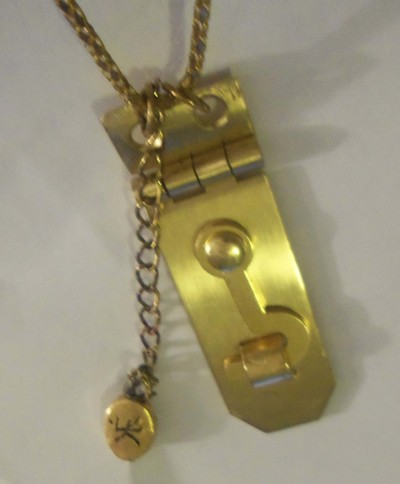
Read NextBrass Hardware Eternity Pendant
Your Recently Viewed Projects

Thanks for your comment. Don't forget to share!
luanne613 9674337
Dec 14, 2010
I see his more as a bookmark or keychain than a necklace, but it's an interesting idea! Thanks!
Report Inappropriate Comment
Are you sure you would like to report this comment? It will be flagged for our moderators to take action.
Thank you for taking the time to improve the content on our site.