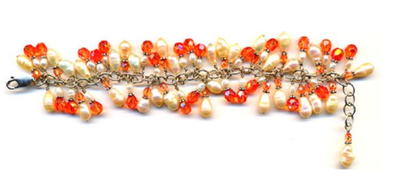
Strawberry Patch Bracelet
This bracelet is a study in dimension and color, inspired by vintage jewelry. The basic ideas can be utilized with any combination of beads and colors that appeal to your sensibilities.
Materials:
- 20 gauge ColourCraft wire, green
- 24 gauge ColourCraft wire, silver
- 5 - .75 in. (1.9cm) Large raspberry pink teardrop beads, hole drilled through top
- 6 - .5 in. (1.27cm) Striated green Czech glass windowpane beads
- 6 - 4mm Hot pink metallic Czech glass faceted round beads
- 1 - 3x14mm Magnetic tube clasp, silver plated
- 7 - 4mm Jum rings, silver plated
- Designer round nose pliers
- Designer chain nose pliers
- Designer flush cutter
- Safety glasses
Instructions:
-
Strawberries: Cut a 6 in. (15.25cm) length of 20 gauge ColourCraft green wire, keeping the flush side to the good. Remember, glass beads can be delicate: take your time, wear safety glasses, and have a few extra beads on hand.
-
Begin Wrapping: Place one end of the wire flush to the flat side of your bead, approximately 1/8 in. (.32cm) from the top. Thread the other end through the hole, wrapping away from and then back towards yourself. Leave a 1/8 in. (.32cm) loop at the top of the bead.
-
Wrap It: Wrap the end over the bead from the top working down approximately six times with tension. Take your time here; this is where beads most often break. It takes practice to develop a deft touch. Bring the wire around to the faceted side of the teardrop just over half way across.
-
Finishing Touches: Trim excess wire. Use round nose pliers to tighten the wire in a small loop facing down from top of the bead.
-
Repeat steps 1 - 4 to create five "strawberries."
-
Green Leaves: Cut a 2 in. (5cm) length of 24 gauge Colourcraft silver wire. Thread on a windowpane bead. Make an earring style coil: loop on both ends of the bead. Trim excess wire and tuck the end under using chain nose pliers.
-
Add Rounds: Cut another 2 in. (5cm) length of the 24 gauge wire. Wrap it around one earring coil from top to bottom. Thread with one faceted Czech glass round. Coil with tension around the opposite ear wire coil on the windowpane bead diagonally across the top. Trim excess wire and tuck tail under. With round nose pliers, twist the wire on one side of the faceted round clockwise. Flip the bead over and repeat, continue to tighten the wire in this fashion to secure the center bead.
- Repeat steps 6 - 7 to create six "leaves."
Note: To complete this project, you will need to be familiar with wire wrapping, ear wire coiling, and working with wire and glass.
Construct the Bracelet
-
Connect the beads using jump rings. If you prefer, you can create your own jump rings using the green ColourCraft wire. Open a jump ring and attach a leaf, a strawberry and another leaf in this order. Close the jump ring using chain nose pliers.
- Repeat the same pattern and attach the clasp to both ends when finished. A magnetic clasp makes this bracelet easy to wear.
Variations: Use other bead shapes and colors for variety. Add a fancy toggle clasp with a faceted round on eye pin attached for a designer extra touch. Reimagine your strawberries and leaves as maraschino cherries and olives and make "martini" glasses with ColourCraft wire for your dangles for a fun "cocktail" look! Have fun playing with these techniques and happy beading!
Read NextCluster Drop Earrings
Your Recently Viewed Projects


Thanks for your comment. Don't forget to share!
Report Inappropriate Comment
Are you sure you would like to report this comment? It will be flagged for our moderators to take action.
Thank you for taking the time to improve the content on our site.