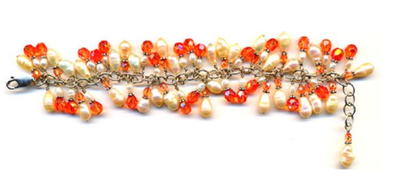
Retro 60's Ladder Choker, Bracelet and Earrings
This jewelry set is inspired by the 1960s Palm Beach colors that have recently returned to favor in fashion. It involves a modern design with elements of retro costume jewelry and a touch of elegance achieved in using faceted and reflective cat’s eye beads.The fun is in putting a modern spin on a classic idea.
Materials:
- Elonga 0.70 mm (.028”) (Approximately 58” total)
- Two Beadalon SP French Wires Dapped
- Two Beadalon SP Head Pins 2”
- Four Beadalon SP Eye Pins 2”
- Two 10mm Pink Cat’s Eye Faceted Beadalon Beads
- Two 8mm Yellow Cat’s Eye Faceted Beadalon Beads
- 102 - 6mm Orange Round Glass Beadalon Beads
- Fifty 8mm Pink Cat’s Eye Faceted Beadalon Beads
- 25 - 10mm Yellow Cat’s Eye Faceted Beadalon Beads
- BeadFix, Hypo Cement Adhesive
- Bead Board
- Beadalon Designer Series Chain Nose Pliers
- Beadalon Designer Series Round Nose Pliers
- Beadalon Nipper Tool
Technique: You will need to be familiar with turning a looped head pin and attaching a series of looped head pins together. You should also have some experience working with woven stretch strand. There are no spacer beads involved, so the emphasis is on color and shape.
Steps:
Bracelet: (Approximately 7” in length before stretching-should fit from 7-8.5” wrist)
- Assemble the materials and beads on the bead board.
- Cut off a 22” length of Elonga to make the bracelet. String one 10mm yellow cat’s eye bead down to the center of the strand. There will be two working strands. String an orange 6mm, pink 8mm and orange 6mm on each strand down to the center yellow bead.
- Take one strand and thread it through a 10mm yellow bead. Now take the other strand and thread it through the opposite side. Grasp both ends and tighten them so that there is no exposed strand under the 10mm yellow bead. Don’t over tighten the strand.
- Repeat this process working until there are eight 10mm yellow beads. Add on one last grouping of orange and pink beads and thread the ends through the first bead in your design. When threading the final strand through, tighten down the other three strands by pulling them down in order to facilitate the final strand in threading through the bead hole.
- Take the two strands and knot them over the back of the final 10mm yellow bead using this knotting technique:
A. Take both ends and loop them over and under one another as though tying a shoelace.
B. Repeat this process but this time loop the ends over and under twice.
C. Tighten the knot and repeat the first two steps making a second knot for extra strength. Trim the excess material leaving a small amount of strand on each end (approximately 1/8”.)
D. Dab a small amount of BeadFix or Hypo Cement on the knot for extra strength if desired.
Choker: (Approximately 15.5” in length before stretching-should fit from 14-16.5” neck)
- Assemble the materials and beads on the bead board.
- Cut off a 36” length of Elonga to make the choker. Repeat the stringing process as described above.
- Thread 17 10mm yellow beads on the strands adding the last grouping of orange and pink beads before finishing off the choker. Repeat the knotting technique described above.
Earrings:
- Assemble the tools and materials on the bead board.
- Thread two head pins each with one 10mm pink cat’s eye beads. Use the round nose pliers to make a finished loop flush to the top of the bead and cut off excess wire with the nipper tool.
- Thread two eye pins each with one 8mm yellow cat’s eye bead. Create a finished loop using round nose pliers at the top of each eye pin flush to the top of the bead-this loop should be turned in opposition (45 degrees) of the existing loop on the pin. Cut off excess wire using the nipper tool. Repeat this process with the remaining two eye pins and two 6mm orange round beads.
- Attach the beaded head pins to each other in this order: bottom bead 10mm pink, second bead 8mm yellow and top bead 6mm orange. Use your chain nose pliers to open and close the loops securely opening each loop to the side to prevent stressing the head pin loop wires.
- Finish the earrings by attaching the top bead to the French wires, again making certain that the loops are securely closed.
Read NextCluster Drop Earrings
Your Recently Viewed Projects

Thanks for your comment. Don't forget to share!
Kris Gill
Jul 01, 2012
This is the wrong necklace this the retro 60 instructions, I like it but it is not the paper bead necklace the title calls it. or pic shows.
Report Inappropriate Comment
Are you sure you would like to report this comment? It will be flagged for our moderators to take action.
Thank you for taking the time to improve the content on our site.