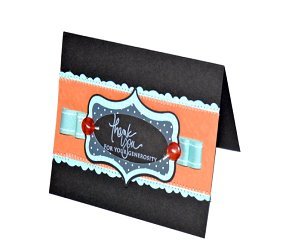
Ribbon Framed Thank You Card
Use ribbon and buttons to add charm to this multi-layer thank you card from Craftwell. Handmade cards always make loved ones smile.

Materials:
- eCraft machine
- 5 ½” x 8 ½” piece of cardstock for card base, Papertrey Ink Smokey Shadow
- 5 ½” x 2” cardstock for panel, Papertrey Ink Melon Berry
- 5” x 4” piece of cardstock for back layer of frame, Papertrey Ink Smokey Shadow
- Coordinating patterned papers for die cuts, Papertrey Ink Bitty Box in Aqua Mist and Bitty Dot in Smokey Shadow
- Impression plate or embossing folder (optional), Papertrey Ink Background Basics: Diamond
- Sewing machine and thread
- Lettering Delights Scalloped Border Set (Border #5)
- Lettering Delights Felt Owl Right SVG set (Frame #1)
- Sentiment Stamp and ink, Papertrey Ink Signature Greetings and white pigment ink
- Ribbon, Papertrey Ink Aqua Mist in Saddle Stitch
- 2 buttons, Papertrey Ink Melon Berry
- Twine, Papertrey Ink Rustic Cream Button Twine
Instructions:
- Import the Border SVG and size so that the border is longer than 5 ½” long. Make it longer than your card which will allow you to trim off the excess for a nice clean fit.
- Cut two of those borders in one of your patterned papers with the eCraft and set aside.
- Next take your panel cardstock and impress or emboss it with the design of your choice. Sew the borders onto the panel using a zig zag stitch.
- Attach the panel to the card base with a strong adhesive and trim off the ends if necessary.
- Import the Felt Owl Right Frame into the eCraftshop software. There are two layers to this SVG, but a third layer is needed for the sentiment. To create, select the bottom layer and create a Blackout Shadow with the software. Cut that layer out of your cardstock.
- Cut the two original layers in the patterned papers. Place the original bottom layer on top of the cardstock blackout layer. Line up the sentiment stamp and stamp the sentiment. Adhere all of the layers together and set aside.
- To create the ribbon loops it helps to think of the old fashioned ribbon candy. To start the ribbon loops, adhere the end of your ribbon with a glue dot or Scor Tape in the middle of your card panel.
- Bring the ribbon over to one side and select the point where you want the end of your loop. Adhere it with a glue dot or Scor Tape.
- Loop the ribbon up and bring it back to the center. Adhere in the center with another glue dot or Scor Tape.
- Bring the ribbon out to the opposite side and check to make sure that the loop is approximately the same distance from the end. Adhere it to the card panel with a glue dot or Scor Tape.
- Bring the ribbon up and back to the center to form the loop. Adhere in the center with a glue dot or Scor Tape. Repeat this process to create a second layer of shorter loops. Once complete, cut the ribbon to bring the end into the center.
- Attach the frame to the shadowed frame by using foam adhesive. This will give the ribbon a hole in the middle to slide through. Adhere frame to the card panel.
- To finish off the card, thread some twine through small buttons and adher onto each end of the frame directly above the ribbon loops.
Read NextLovely Miracle Card