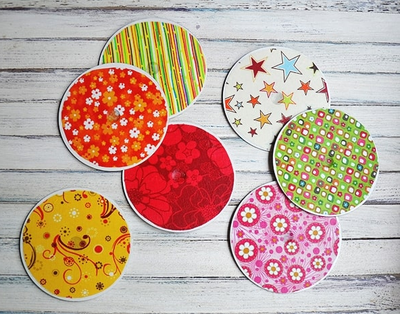
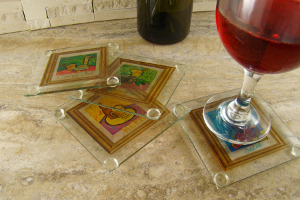
Drink Inspired Glass Coasters
These Drink Inspired Glass Coasters from Diamond Tech highlight all the best drinks, including wine, coffee, and beer! Make a set of these handmade glass coasters for your next housewarming party or make a set for your best friend! Don't forget the wine!
Materials:
- Laser Color Printer
- KraftyBlok Image Art Transfer Paper™
- 4 - 4” X 4” Glass Bevels
- Paper Towels
- Bowl for water
- Scissors
- 16 - Small Clear Self-Adhesive Rubber Feet Bumpers
- Conventional Oven
- Image 1
- Image 2
- Image 3
- Image 4
Instructions:
- Set your laser printer following the instructions on the KraftyBlok™ Image Art™ package. Copy and save the drink images to your computer. Print images using your available image software. Allow transfers to set 10 to 15 minutes to dry. Trim to size with scissors.
- Clean bevels with a glass cleaner and lint free cloth.
- Place transfer in a bowl of water and wait approximately 1 minute.
- Place one 4” x 4” glass bevel face down on a work surface. Slightly moisten the bevel with a wet paper towel.
- Position the transfer in the center of the bevel. Roll a ½” of the backing paper away from the top of the Image Art™ transfer™ (the decal). Place the transfer on the surface of the bevel so it is parallel with the top edge. Take extra care when sliding the decal as they are delicate and can tear easily. Gently slide the Image Art™ full transfer from the backing paper onto the surface. Use a finger to smooth the transfer as you peel away from the backing paper.
- Gently pat and smooth the Image Art™ transfer with a moist paper towel eliminating air pockets and wrinkles.
- Repeat this process (steps 2 – 5) for the remaining 3 bevels.
- Allow to dry overnight.
- Preheat conventional oven to 425°. Place the bevels on a baking rack Image Art™ transfer facing up. Bake for 10 minutes. Turn off oven. Allow the coasters and the oven to completely cool.
- When cool, remove from oven. Clean the bevels with glass cleaner and a lint free cloth. Attach one small clear self-adhesive rubber bumpers to the decal side of the coaster to each corner.
- Your coasters are ready to use. Hand wash with mild soap and water.