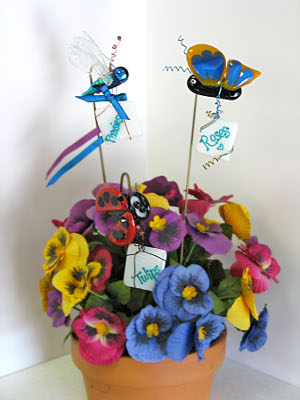
Cute Garden Stakes
Bring some cute bugs into your garden for a change with these Cute Garden Stakes from Diamond Tech. A butterfly, a dragonfly, and a ladybug are included in this set of glass garden stakes. Use them to help identify your plants!
Materials:
Lady Bug
- 1 pc Fuseworks™ Red Glass
- 1 pc Fuseworks™ White Glass
- 1 pc Fuseworks™ Black Glass
Butterfly
- 1 pc Fuseworks™ Blue Glass
- 1 pc Fuseworks™ White Glass
- 1 pc Fuseworks™ Purple Glass
- 1 pc Fuseworks™ Yellow Glass
Dragonfly
- 1 pc Fuseworks™ Dichroic Blue Glass
- 1 pc Fuseworks™ Dichroic Green Glass
- 1 pc Fuseworks™ Dichroic Clear Glass
- 1 pc Fuseworks™ White Glass
- Fuseworks™ Kiln Paper
- Fuseworks™ Microwave Kiln
- Fuseworks™ Glass Cutter
- Fuseworks Lightweight Running Pliers
- Fun Wire™ by Toner approximately 18 inches per each stake
- Miscellaneous beads for embellishments
- White school glue
- Silver Sharpie™ Marker
- E-6000® or other glass glue
- Wire Clothes Hanger
- Wire Cutters
Instructions:
- Cut glass to designated sizes as indicated in the projects below. Start at an edge placing the cutter perpendicular to the glass. Apply consistent medium pressure while pushing the cutter across the glass. A good score appears as a continuous scratch on the surface. A furrow of glass that looks like sand indicates too much pressure. Break each score with running pliers as you make it. Clean glass using paper towel moistened with water. Completely dry the surface of the glass with a lint free cloth.
- Next, cut a 2” X 2” piece of kiln paper. Remove the lid from the Fuseworks™ Kiln. Place the kiln paper on the kiln base. Kiln paper should only be used for one firing.
- Layer the glass on the kiln paper per the specific project directions.
- HOT TIP: If you are experiencing your dichroic glass turning dark, decrease your fusing time. If your piece shatters, reduce your power to fuse your piece more slowly. You may need to increase the length of time when you reduce the power.
- Carefully set the base with glass inside the microwave. Cover base and glass with kiln lid. Fuse using the schedules listed for each individual projects below. PLEASE NOTE: All microwave and kiln combinations will have different firing patterns. Be sure to take careful notes and log all fusing times for future use.
- Remove kiln from microwave using the Hot Mitts and place on a heat resistant surface. Cool the kiln on a heat resistant surface for at least 40 minutes with the lid on. Removing the lid or peeking under the lid during the cooling will result in your piece cracking. Glass remains hot for a long time and should be handled with great caution. Cool your kiln completely.
- Once the pieces are fused and cooled; glue them together with E 6000 glue. Use folded paper to prop-up the parts in place until the glue has dried. Once the glue has dried, wrap the insect and the white plant tag with Fun Wire™ to connect the two pieces. Write the seed or plant name on the white tag with a permanent marker. Cut a wire hanger with wire cutters to a 14” length. Using a plier, bend the hanger to create an “S” on one end, this will act as a hook. Attach the Garden Cutie to the “S” hook by slipping the back wire of the Cutie onto the hook. Push garden stake into a pot or your garden to make them cutesier!
DIRECTIONS – Plant Name Tag
- Follow STEP 1 and cut three 1 ½” X 1 ¼” glass squares from white glass. Follow STEPS 2-5 and fuse each tag separately. Fuse at 70% for 2:30 minutes. Add additional time in 15 second increments, if needed until desired results are achieved.
DIRECTIONS - Ladybug
- Using a silver Sharpie™, mark off eight 3/8” squares on a sheet of black glass and two 5/8” squares on a sheet of white glass; follow STEP 1 to score and break glass.
- Follow STEPS 2-5. Place five squares at a time on the base, cover and fuse for 2 minutes at 100% power. Continue to fuse squares until all 10 squares have been fused and form small circles.
- Next, cut-out pattern pieces for the body and wings, place the body pattern on a sheet of black glass, using a silver Sharpie™ trace around pattern. Follow this same procedure for tracing the wings on a sheet of red glass. Following STEP1, cut two of head and body.
- Arrange the glass for the body and head on the kiln base, stack the second piece on top of the base glass. Dilute one drop of white school glue with three drops of water; using a toothpick or small paint brush put a tiny amount of glue on the back of the fused white dots. Place white dot on head portion of the ladybug, these will become the eyes. Next, place a dot of glue to the back of two black dots and place them on top of the white dots, these will act as the pupils. Allow the glue to dry thoroughly before fusing.
- Follow STEPS 1-5 and fuse body and head at 50% power for 2 minutes, then at 100% for 1 minute 30 seconds.
- Follow STEP 1, score and cut the red glass circle as show in the diagram. Cut the circle in half, this will form the ladybug wings. Place a piece of kiln paper on the kiln base to cover. Place one wing on the base and using the diluted glue, place a tiny amount of glue on the back of three of the previously fused black dots. Randomly place them on the wing and allow glue to thoroughly dry. Cover kiln and fuse wing for 2 minutes at 70% power. Using Hot Mitts, lift lid slightly to check glass. If glass has not rounded off add additional time in 15 second increments until desired results are achieved. Remove from microwave and allow cooling for 40 minutes. Repeat process for second wing.
- To complete ladybug, follow STEP 6.
DIRECTIONS - Dragon Fly
- Cut-out pattern pieces for the head, body (2 pc) and wings (4pc). Place the wing pattern pieces on a sheet of Clear Dichroic glass and using a silver Sharpie™ trace around pattern. Follow this same procedure for tracing pattern for the head and body placing the head on a piece of Clear and Blue Dichroic and the lower part of the on a sheet of Clear and top base of the body on Blue Dichroic cut following STEP 1. Cut an additional 3/8” square of Blue Dichroic.
- Follow STEP 2-5. Fan one set of wings on the base of the kiln so that they overlap. Fuse at 50% for 1 minute. Then fuse at 2 minutes at 80%. Add additional time in 15 second increments until desired results are achieved. Allow to cool completely approximately 30 minutes. Repeat the same process for the second set of wings.
- Next, fuse the Dragonfly body following STEPS 2-5. Place the Blue Dichroic body on the kiln base, place the small strip of clear on the lower half of the body. Fuse at 50% for 1 minute and 2 minutes at 80%. Add additional time in 15 second increments until desired results are achieved.
- Fuse the Dragonfly head following STEPS 2-5. Cut an additional 3/8” square of Dichroic Blue. Layer the Blue Dichroic circle on the kiln paper, next add the clear circle, and finish with the 3/8” square of Dichroic Blue. Fuse at 70% for 2 minutes and 30 seconds. Add additional time in 15 second increments until desired results are achieved.
- Fuse the 3/8” square, the eye following STEP 2-5. Fuse for 2 minutes at 70%. Add additional time in 15 second increments until desired results are achieved.
- Finish project following STEP 6.
DIRECTIONS - Butterfly
- Next, cut-out pattern pieces for the body, wings and decorative wing inserts, place the body pattern on a sheet of black glass and using a silver Sharpie™ trace around pattern, do this twice. Follow this same procedure for the wings tracing them a sheet of Yellow glass and the decorative inserts on Blue glass. Cut following STEP 1.
- Layer the two pieces of Black glass on the kiln base. Fuse following STEPS 1-5 at 50% for 2 minute, then again at 80% power for 2 minutes.
- Fuse one wing at a time, place the yellow glass on the kiln base arrange the decorative Blue glass inserts on top of glass, follow STEPS 2-5, fuse at 50% for 2 minute and then again at 80% for at 2 minutes. Add additional time in 15 second increments until desired results are achieved.
- To complete butterfly, follow STEP 6.
Read Next"Grow Up" Herb Garden