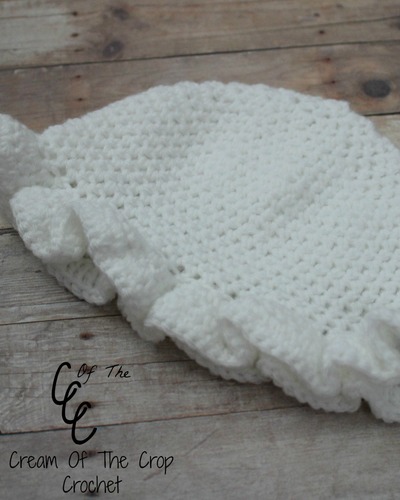
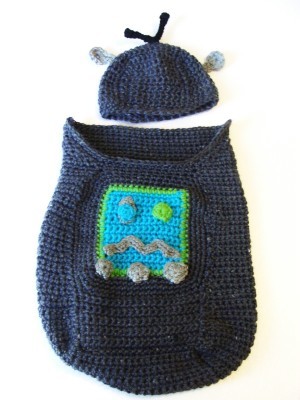
Robot Baby Cocoon and Hat
Crochet an adorable little robot cocoon and matching hat to keep the new baby warm and snug. Infants love to be cocooned in this way and the simple construction makes for an easy crochet pattern. This project makes a great gift for a new little one and you will have so much fun making it! Though it looks like it would be great for a little boy, you can easily make this for a little girl by using a lighter pink yarn rather than blue or green. This simple beginner pattern works up quickly and is the perfect way to keep baby nice and warm throughout the cold months!

Materials:
- 1 skein Caron's Simply Soft Worsted yarn in Charcoal
- 1 skein Caron's Simply Soft Worsted yarn in Grey Heather
- 1 skein Caron's Simply Soft Worsted yarn in Spring Green
- 1 skein Caron's Simply Soft Worsted yarn in Turquoise
- 1 skein Caron's Simply Soft Worsted yarn in Black
- D and G crochet hooks
- Yarn Needle
Gauge: 4sc’s rows =2"s, 4sc’s =1"
Instructions:
Hat
Top of Hat
- Row 1: With G hook and Charcoal color, ch11, 1sc in 2nd ch from hook, 1sc in remaining chs. Ch1,turn. (10sc)
- Row 2: 1sc in each sc across. Ch1,turn. (10sc)
- Rows 3-11: 1sc in each sc across. Ch1, turn. (10sc)
- Row 12: 1sc in each sc across. Ch1. Do not turn. (10sc)
First Side
- Row 1: Now turn piece and working on the side of the rows, 1sc in each of the nex10 rows..skipping 2ends of rows anywhere so that you can fit in 10sc’s..Ch1, turn.
- Row2-10: 1sc in each of the next 10sc’s. Ch1,turn. (10sc)
- Fasten off and attach charcoal yarn to second side of square.
Second Side
- Row 1: Work 1sc in each st across. Ch1,turn. (10sc’s)
- Rows 2-10: 1sc in each of the next 10sc’s. Slst st in the next sc. Ch1, turn. (10sc) Fasten off and attach to 3rd side of hat.
Third and Fourth Sides
- Repeat Rows 1-10 for 3rd and 4th sides.
- Fasten off and sew up all four side seams to form hat.
- Then attach charcoal yarn anywhere on hat and work 3 rows of sc, decreasing 8sc’s anywhere on the first row of sc’s.
- Fasten off.
Embellishments for Beanie
- Ear Screws -make 2: Rnd 1: With grey heather or silver color and G hook, ch2, 6sc’s in 2nd ch from hook. Slst to join. Ch1. (6sc)
- Rnd 2: Working over the whole sc on rnd 1, work 8sc’s. Slst to join. Ch 4
- Rnd 3: 1sc in 2nd ch from hook, 1sc in each of the next 2sc’s, slst around the circle from rnd2, slst on the opposite side of the ch4 that you made on rnd 2. Slst to join. Fasten off leaving a tail to sew and sew the screw onto the side of hat, approx. between rows 8-10.
- Antenna: With black and D hook, ch13, dc in 3rd ch from hook, 1sc in next ch, 1slst in each of the remaining chs, ch13, dc in 3rd ch from hook, 1sc in next ch, 1slst in each of the remaining chs. Slst to join. Fasten off leaving a tail to sew with and attach antenna to top of hat.
Cocoon
Front Panel
- Row 1: With G hook and turquoise, ch15 , 1sc in 2nd ch from hook and in each remaining ch. Ch1, turn. ( 14sc’s)
- Rows 2-16: 1sc in each sc across. Ch1,turn. (14sc’) end of row 16-fasten off turquoise.
- Rnd 1: With G hook and lime green, attach lime green anywhere on turquoise. 1sc in each sc and each end of rows, and working 2sc’s in each corner, around. Slst to join. Fasten off lime green.
- Rnd 2-5: Attach grey and work 1sc in each st around, working 2sc’s in each corner. Ch1,turn.
- Rows 1-11: 1sc in each sc across. Ch1,turn. (20sc’s) fasten off and put aside for now.
Bottom Panel
- Row 1: With grey and G hook, ch21, 1sc in 2nd ch from hook, and in each remaining ch. Ch1,turn. (20sc’s)
- Rows 2-20: 1sc in each sc across. Ch1, turn. (20sc’s)
- Row 21: Now holding front panel and bottom panel together, with right sides facing each other, sc row 11 from front panel to row 20 of bottom panel. Fasten off.
Second Panel
- Row 1: Attach grey to second side of bottom panel. 1sc in each st across. Ch1, turn. (20sc’s)
- Rows 2-4: 1sc in each sc across. Ch1,turn. (20sc’s)
- Row 5: 1sc in first sc, dec next 2sc’s tog, 1sc across to last 3sc’s, dec next 2sc’s tog, 1sc in last sc. Ch1,turn. (18sc’s)
- Rows 6-8: 1sc in each sc across. Ch1,turn. (18sc’s)
- Row 9: 1sc in first sc, dec next 2sc’s tog, 1sc across to last 3sc’s, dec next 2sc’s tog, 1sc in last sc. Ch1,turn. (16sc’s)
- Rows 10-13: 1sc in each sc across. Ch1,turn. (16sc’s)
- Row 14: 1sc in first sc, dec next 2sc’s tog, 1sc across to last 3sc’s, dec next 2sc’s tog, 1sc in last sc. Ch1,turn. (14sc’s)
- Rows 15-20: 1sc in each sc across. Ch1, turn. (14sc’s) end of row 20 fasten off.
Third and Fourth Panels
- Repeat rows 1-20 on Second Panel
- sew up the 4 sides of the cocoon
- Now continue on with G hook and attaching grey to the front panel’s right seam. If cocoon does not measure 13"s, then work around in sc’s until the cocoon measures 13"s. Stop at the right side of the front panel and ch1 and turn.
- Row1: 1sc in first sc, dec next 2sc’s tog, 1sc in each sc to last 3sc’s, dec next 2sc’s tog, 1sc in last sc. Ch1,turn. (42sc’s)
- Rows 2-5: 1sc in first sc, dec next 2sc’s tog, 1sc across to last 3sc’s, dec next 2sc’s tog, 1sc in last sc. Ch1,turn. (34sc’s)
- Rows 6-12: 1sc in each sc across. Ch1, turn. (34sc’s) or until top piece measures 3"s tall.
Border
- Rnds 1-2: 1sc in each sc and around the front of the cocoon. Fasten off and tie in ends.
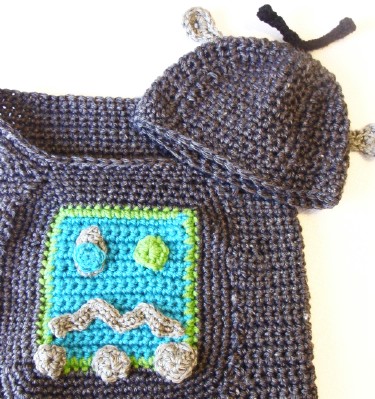
Embellishments for Cocoon
- Knobs: First knob: With G hook and grey heather, ch2, 8sc’s in 2nd ch from hook. Slst to join. Fasten off leaving a tail to sew with and sew circle onto front of cocoon as shown in pictures.
- Second knob: With G hook and grey heather, ch2, 8 hdc’s in 2nd ch from hook. Slst to join. Fasten off leaving a tail to sew with and sew circle onto front of cocoon as shown in pictures.
- Third Knob: With G hook and grey heather, ch3, 8 dc’s in 3nd ch from hook. Slst to join. Fasten off leaving a tail to sew with and sew circle onto front of cocoon as shown in pictures.
- Squiggle Line: With D hook and grey heather, ch 32, 1sc in 2nd ch from hook, 1sc in each of the next 2sc’s, skip 2chs, 1sc in each of the next 3sc’s, 3sc’s in the next sc, 1sc in each of the next 3sc’s skip 2chs, 1sc in each of the next 3sc’s, 3sc’s in the next sc, 1 sc in each of the next 3sc’s skip 2 chs 1sc in each of the last 3sc’s.
- Fasten off leaving a tail to sew with and sew this squiggly line to front of cocoon as shown in pictures.
- Left Eye: With Grey Heather and D hook, ch5, 2sc’s in 2nd ch from hook, 1sc in each of the next 2ch’s, 3sc’s in last ch. Now working on opposite side of ch, 1sc in each of the next 2ch;s, 1sc in the last ch. Slst to join. Fasten off leaving a tail to sew with. Put aside for now.
- With Turquoise and D hook, ch2, 6sc’s in 2nd ch from hook, slst to join. Fasten off leaving a tail to sew with and attach this turquoise circle to front of grey heather piece. Attach to front of cocoon as shown in pictures.
- Right Eye: With Lime Green and D hook, ch2, 8sc’s in 2nd ch from hook, slst to join. Fasten off leaving a tail to sew with and attach to front of cocoon.
Read NextElephant Hat Crochet Pattern

Thanks for your comment. Don't forget to share!
decab1966 6044683
Sep 17, 2013
I am trying to do this cocoon and gauge is off. I tried using a different hook up to I and still cant get gauge to equal 4sc=2inches. Please help
plainjane2121
Sep 30, 2010
help!!! my gauge is good but even though i have moved up to an H hook, the end resulting cocoon looks premie-sized. is it made to stretch or how can i enlarge it just a bit. any info will be appreciated. answers can be sent to sunnygirl122061@hotmail.com
Report Inappropriate Comment
Are you sure you would like to report this comment? It will be flagged for our moderators to take action.
Thank you for taking the time to improve the content on our site.