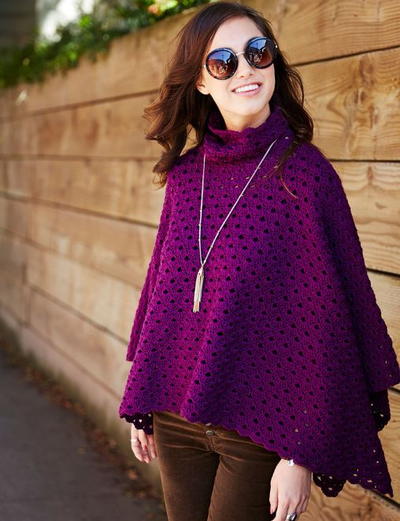
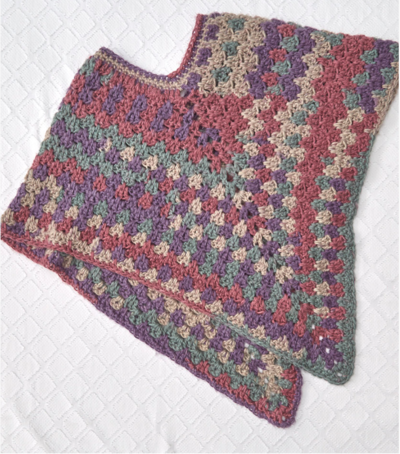
Deep V Flourish Sweater Jacket

This intermediate crochet pattern creates a sweater jacket with ruffles all around the hems. This crochet sweater jacket is lovely in a bright yarn color of sage. If you've never tried making a cardigan before, this is such a fun pattern to try. The color paired with the ruffles and frills makes this Deep V Flourish Sweater Jacket perfect for almost any season. Pair this with a floral dress for spring, or wear it with a long sleeved top and jeans in fall. You could wear this sweater jacket at bonfires, Christmas gatherings, New Years, and more. Add a gorgeous, versatile piece to your wardrobe that you'll be proud to show off by making this lovely pattern.

Crochet HookH/8 or 5 mm hook, I/9 or 5.5 mm hook
Yarn Weight(4) Medium Weight/Worsted Weight and Aran (16-20 stitches to 4 inches)
Crochet GaugeIn V-st pat, using US size H-9 (5.5 mm) hook, 4 V-st and 6 rows V-st= 4”/10cm.
Note: Fabric will grow in length and skinny out for finished measurements.
In Leaf patt, one rep= 2 1/2”/6.5cm.
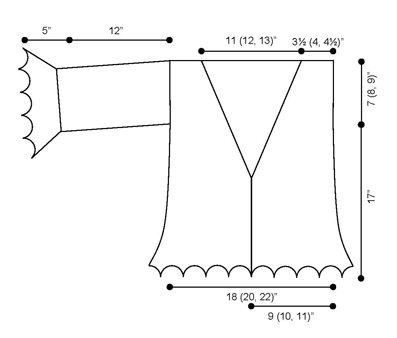
Finished SizeBust 36 (40, 44)” | Length 24 (25, 26)” | Sleeve Length 17”
Materials List
- Yarn: Caron International's Simply Soft (100% acrylic; 6 oz/170 g. 315 yds/288 m skein): #9705 Sage, 4 (4, 5) skeins
- Hooks: One crochet hook size US I-9 (5.5 mm), or size to obtain gauge, One crochet hook size US H-8 (5 mm) for buttons only
- Split ring markers or scraps of contrasting yarn for markers
- 2 plastic bone rings, 7/8” diam, for buttons
- Blunt yarn needle
Instructions
BODY
Note: Sweater is made from the neck down, with increases at four corners to create raglan-type shaping at the arm.
-
Base ch/sc 33 to measure approx 11” stretched.
-
Row 1: Ch 5, dc in first sc, [sk next sc, V in next sc] 16 times, turn – 17 Vs.
-
Row 2 (inc): Ch 5, (dc, ch 2, V) in first ch-sp for corner, V in each of next 3 Vs, (V, ch 2, V) in next V for corner, V in each of next 7 Vs, (V, ch 2, V) in next V for corner, V in each of next 3 V’s, (V, ch 2, V) in tch sp for corner, turn.
Mark ch-2 sp at center of each inc for corner, move or wrap markers up as you go. -
For Size M and L only: Row 2a (inc): Ch 5, dc in first ch-sp, *(V, ch 2, V) in next corner ch-2 sp, V in each of next V to next corner; repeat from * 2 times, (V, ch 2, V) in last corner ch-2 sp, end with dc in tch sp, ch 2, dc in 3rd ch of tch, turn.
-
For size L only: Row 2b (inc): Ch 5, dc in first ch-sp, V in next V, *(V, ch 2, V) in next corner ch-2 sp, V in each of next V to next corner; repeat from * 2 times, (V, ch 2, V) in last corner ch-2 sp, V in next V, end with dc in tch sp, ch 2, dc in 3rd ch of tch, turn.
-
Row 3: Ch 5, dc in first ch-sp, V in each V and corner ch-2 sp across, end with dc in tch sp, ch 2, dc in 3rd ch of tch, turn – 25 (33, 41) Vs.
-
Row 4 (inc): Ch 5, dc in first ch-sp, *V in next V to next corner V, (V, ch 2, V) in corner V; repeat from * 3 times, V in next V to end, end with dc in tch sp, ch 2, dc in 3rd ch of tch, turn.
-
Row 5: Repeat Row 3 – 33 (41, 49) Vs.
Inc at corners, shape neck edges, beg Leaf repeat at center of each arm and center of back. -
Row 6 (inc): Ch 5, V in first ch-sp, *V in each V to next corner V, (V, ch 2, V) in corner V*, V in next 3 (4, 5) V, make leaf repeat of [ch 3, CL, ch 2, dc, ch 2, CL, ch 3] in next V; repeat between * *, V in next 5 (6, 7) V, repeat between [ ] in next V; repeat between * *, V in next 3 (4, 5) V, repeat between [ ]; repeat between * *, V in next V to end, end with V in tch sp, ch 2, dc in 3rd ch of tch, turn.
-
Row 7: Ch 5, dc in first ch-sp, *V in each V and corner ch-2 sp to next leaf, make Leaf over leaf by: [ch 3, sk ch-3 sp, CL in next ch-2 sp, ch 2, dc in dc, ch 2, CL in next ch-2 sp, ch 3, sk ch-3 sp]; repeat from * 2 times, V in each V and corner ch-2 sp to end, end with ch 2, dc in tch sp, dc in 3rd ch of tch, turn.
-
Row 8: Repeat Row 7.
Inc at corners, shape neck edges. -
Row 9: Ch 5, V in first ch-sp, *[V in each V to next corner V, (V, ch 2, V) in corner V], V in each V to next leaf, make Leaf over leaf; repeat from * 2 times; repeat between [ ], V in each V to end, end with V in tch sp, ch 2, dc in 3rd ch of tch, turn.
-
Row 10: Repeat Row 7.
Join fronts and back with additional sts at underarms. -
Row 11: Ch 5, V in 1st ch-sp, V in next 5 (6, 7) V, *V in next corner V, base ch/sc 5 for underarm, sk sts of armhole, V in next corner V*, V in next 7 (8, 9) V to Leaf, make Leaf over leaf, V in next 7 (8, 9) V to next corner V; repeat between * * for underarm, V in next 5 (6, 7) V, end with V in tch sp, ch 2, dc in 3rd ch of tch, turn.
Finish neck shaping (beg 2 additional Leaf repeats at back). -
Row 12: Ch 5, V in first ch-sp, *V in next 6 (7, 8) V to underarm, sk next 2 sc, V in next sc, sk next 2 sc*, V in next 6 (7, 8) V, make Leaf by [ch 3, CL, ch 2, dc, ch 2, CL, ch 3] in next V, V in next V, make Leaf in next leaf, V in next V, make Leaf in next V; repeat between * *, V in next 6 (7, 8) V, end with V in tch sp, ch 2, dc in 3rd ch of tch, turn.
-
Row 13: Ch 5, dc in 1st ch-sp, V in next 14 (16, 18) V to next leaf, *make Leaf in next leaf, V in next V, repeat from * 2 times, V in each V to end, end with dc in tch sp, ch 2, dc in 3rd ch of tch, turn.
-
Row 14-17: Repeat Row 13.
Make 2 additional Leaf repeats at back. -
Row 18: Ch 5, dc in first ch-sp, V in next 12 (14, 16) V, make Leaf in next V, [V in next V, Leaf in next leaf] 3 times, V in next V, make Leaf in next V, V in next 12 (14, 16) V, dc in tch sp, ch 2, dc in 3rd ch of tch, turn.
-
Row 19: Ch 5, dc in first ch-sp, V in each V to next leaf, [Leaf in next leaf, V in next V] 5 times, V in each V to end, end with dc in tch sp, ch 2, dc in 3rd ch of tch, turn.
-
Row 20-22: Repeat Row 19.
-
Row 23: Ch 5, sk first ch-sp, work in patt as established, end with sk tch sp, dtr in 3rd ch of tch, do not turn.
Edging and Collar
With RS now facing, rotate and cont with sc around entire front edge of jacket making short rows for back collar.
-
Short Row 1 (RS): 5 sc in dtr row edge for lower corner, 2 sc in next 22 (23, 24) dc row edges of right front, sc in next 23 base ch of neck, sl st in next ch, turn.
-
Short Row 2: Sk sl st, sc in next 15 sc, sl st in next sc, turn.
-
Short Row 3: Sk sl st, sc in next 15 sc, sc in same base ch as sl st, sc in next 6 base ch, sl st in next base ch, turn.
-
Short Row 4: Sk sl st, sc in next 22 sc, sc in same sc as sl st, sc in next 6 sc, sl st in next sc, turn.
-
Short Row 5 (RS): Sk sl st, sc in next 29 sc, sc in same base ch as sl st, sc in last 2 base ch, 2 sc in next 22 (23, 24) dc row edges of left front, 5 sc in beg ch-5 sp for lower corner, sl st in next dc, fasten off – 131 (135, 139) sc.
Ruffle Trim
Turn. With WS now facing, join with sl st in dc in middle of leaf at center back. Maintain 5 leaf repeats at back, make Vs around entire edge, adjusting stitch count over sc for sizes M and L.
-
Rnd 1 (WS): Ch 5, CL in next ch-2 sp, ch 3, (V in next V, make Leaf in next leaf) 2 times, V in next 12 (14, 16) V, [V in next sc at lower corner, sk next 0 (1, 0) sc] 2 times, V in next sc, [sk next 2 (2, 1) sc, V in next sc] 2 times, [sk next 2 sc, V in next sc] 38 (38, 42) times, [sk next 2 (2, 1) sc, V in next sc] 2 times, [sk next 0 (1, 0) sc, V in next sc] 2 times, V in next 12 (14, 16) V, [make Leaf in next leaf, V in next V] 2 times, ch 3, CL in next ch-2 sp of same leaf as beg, ch 2, sl st in 3rd ch of beg ch, turn – 71 (75, 83) Vs plus 5 leaf repeats.
-
Rnd 2: Ch 5, CL in next ch-2 sp, ch 3, [V in next V, make Leaf in next leaf] 2 times, [V in next V, make Leaf in next V] 35 (37, 41) times, V in next V, [make Leaf in next leaf, V in next V] 2 times, ch 3, CL in next ch-2 sp of same leaf as beg, ch 2, sl st in 3rd ch of beg ch, turn – 40 (42, 46) leaf repeats.
-
Rnd 3: Ch 5, CL in next ch-2 sp, ch 3, [V in next V, make Leaf in next leaf] 39, 41, 45 times, V in next V, ch 3, CL in next ch-2 sp of same leaf as beg, ch 2, sl st in 3rd ch of beg ch, turn.
-
Rnds 4-6: Repeat Rnd 3.
-
Rnd 7: Ch 2, dc3tog in same st for beg cluster, *ch 3, sl st in top of cluster just made for picot, ch 4, sc in next cluster, ch 4, (sc, ch 3, sc) in next V, ch 4, sc in next cluster, ch 4, CL in dc at center of leaf; repeat from * around, omit last CL, instead sl st in top of beg cluster, fasten off.
SLEEVES
With RS facing, join with sl st in 3rd ch at middle of one underarm.
-
Rnd 1 (RS): Ch 3, dc in ch-sp of same corner V as joined for underarm, V in next 5 (6, 7) V, make Leaf in next leaf, V in next 5 (6, 7) V, dc in ch-sp of same corner V as joined for underarm, dc in same ch as beg, hdc in top of beg ch, turn.
-
Rnd 2: Ch 3, sk extra dc, V in next 5 (6, 7) V, make Leaf in leaf, V in next 5 (6, 7) V, sk extra dc, dc in same ch-sp as beg, hdc in top of beg ch, turn.
-
Rnd 3: Ch 3, V in next 5 (6, 7) V, make Leaf in leaf, V in next 5 (6, 7) V, dc in same ch-sp as beg, hdc in top of beg ch, turn – 11 (13, 15) Vs plus leaf.
-
Rnds 4-17: Repeat Rnd 3. Size M only, omit last hdc, instead ch 2, sl st in top of beg ch, sl st in next dc, sl st in next ch-sp, turn.
Ruffle Trim
Beg leaf repeats all around sleeve, 6 (7, 8) repeats total.
-
Rnd 18: Ch 5, CL in same ch-sp, ch 3, V in next V, [make Leaf in next V, V in next V] to next leaf, make Leaf in leaf, V in next V, [make leaf in next V, V in next V] to end, ch 3, CL in same ch-sp as beg, ch 2, sl st in 3rd ch of beg ch, turn.
-
Rnd 19: Ch 5, CL in next ch-2 sp, ch 3, [V in next V, make Leaf in next leaf] 5 (6, 7) times, V in next V, ch 3, CL in next ch-2 sp of same leaf as beg, ch 2, sl st in 3rd ch of beg ch, turn.
-
Rnd 20-22: Repeat Rnd 19.
-
Rnd 23: Work same as body Ruffle Trim Rnd 7, fasten off.
-
Make sleeve on other armhole same way.
-
Weave ends. Lightly steam block.
FINISHING
Make a double-button link for front closure.
Note: To crochet over a bone ring, make sc by inserting hook in next sc and into center of ring each time.
Button (1 1/4” diam, make 2)
-
Rnd 1 (RS): Using H-8 smaller hook, leaving several inches tail, ch 2, 6 sc in 2nd ch from hook, sl st in beg sc, bringing tail to RS of work – 6 sc.
-
Rnd 2: With RS still facing, hold a 7/8” bone ring in back of work, ch 1, 3 sc in each sc, working over bone ring each time, sl st in beg sc, fasten off, leaving several inches tail – 18 sc.
RS of work is back of button. Thread ending tail on blunt yarn needle, stitch into center of button, knot two tails tog tightly. -
To connect 2 buttons for double-button link: Using one tail from one button, ch 6, using one tail from a second button, sl st back in each ch, knot tog 2 tails at back of each button. Weave ends into WS center of each button. Use corresponding ch-sps in left and right fronts as buttonholes, positioning closure high or low as desired.
Abbreviations
- Base ch/sc:
- Start with a slip knot, ch 2, insert hook in 2nd ch from hook, draw up a lp, YO and draw through one lp (the "chain"), YO and draw through 2 lps (the "sc"). The following st is worked under the forward 2 lps of the stem of the prev st (into the "chain"). Insert hook into the face of the “chain” and under the nub at the back of the “chain”, draw up a lp, YO and draw through one lp (the "chain"), YO and draw through 2 lps (the "sc"). Repeat for the length of foundation.
- To add stitches with base ch/sc:
- At end of a row, do not turn; ch 1, insert hook under 2 strands of stem of st just made, YO and draw up a lp, YO and draw through one lp on hook, YO and draw through 2 lps on hook; make addl base ch/sc as needed.
- V st:
- (dc, ch 2, dc) in same st or sp
- V in V:
- V in ch-2 sp of next V
- CL (dc 4 tog cluster):
- [YO, insert hook, YO and draw up a lp, YO and draw through 2 lps on hook] 4 times in same place, YO and draw through 5 lps on hook
- One Leaf repeat:
- [ch 3, CL, ch 2, dc, ch 2, CL, ch 3].
Read NextCupcake Tee Crochet Shirt
Your Recently Viewed Projects
Thanks for your comment. Don't forget to share!
Morehouse17
Sep 01, 2017
This is one of the most girly pattern I have come across. I like it so much I would love to have more than one, Maybe one in every color of the rainbow. There are flounces to cover imperfections in all the right places. I am not really at the intermediate phase yet but I think this will be my next "winter" project.
Delphine Bryant
Apr 29, 2017
This Deep V Flourish Sweater Jacket pattern is stunning. I love the shade of green selected to crochet this article with. Unfortunately, I am still relatively new to the art of crochet and I do not feel like I can manage this pattern at this time. Any wise words from anyone that has taken on this product. Should I attempt this?
ireneiepiyu 056403 6
Jan 18, 2017
I'm trying to crochet yourV Flourish Sweater Jacket", but I've some problems (I'm Spanish) with the meaning of some symbols, for instance "sp". Could you help me? It would be of great value, also, to have a stitch diagram. Thanks, and congratulations for your website!!
Editor Dana
Jan 18, 2017
Hi there! sp stands for space. Please let me know if there are any other symbols I can help with! Unfortunately we don't have a stitch diagram for this pattern, but you could try contacting Caron Yarn (now owned by Yarnspirations) directly. I hope that helps! -Dana from FaveCrafts
Zeemer
May 29, 2016
This is a lovely blouse that will look great on tall girls. Thanks fpr having the pattern right on the front page. Nice color used for this particular style.
Member 9016733
Feb 27, 2016
For those who were asking about the original pattern from Caron. Here is the link for that pattern. http//www.yarnspirations.com/patterns/soft-sage-ci == rcle-jacket.html
Kaylee
Feb 29, 2016
Awesome! Thanks so much for proving the link. -Kaylee, Editor of FaveCrafts.com
ejcostianes 580156 2
May 03, 2015
What a beautiful sweater! I would love to make one for my daughter and one for myself. I read through the directions, then the comments section. I see I am not alone in trying to figure out these directions. This surprised me. I have been crocheting for almost 50 years and this is the first pattern I have ever come across that I can't follow. As a few other people have asked, do you have a copy of directions that can be more easily understood? I really hope you do, because I really would like to make this sweater as it is so beautiful, and different. For this reason I have given this pattern only a 2. Please respond. Thank you very much.
FaveCrafts Editor JL
May 04, 2015
Hi there, This is an original pattern from Caron Yarns - we suggest contacting them directly via their website or social media pages for a response. Thanks! - Julia from FaveCrafts
Member 1206050
May 03, 2015
Hello! This is a lovely sweater! And that's just putting it lightly. I've only just not long ago learned to read the basics in crochet speak, and would like to know if you have an easier pattern explanation? Are you able to write (or do you already have) this pattern in a more easily understood pattern? Oh if you do, and could send it I'd be forever grateful! I'll be looking out for a reply and checking message. Thank you!
ab43ab 6628076
Apr 04, 2015
I have come across this pattern,and thinking of trying it..until that is I read the instructions.. Surely there is an easier way to explain the instructions.. It may as well be written in Greek..do you not want anyone to recreate this lovely jacket? I wonder! I've only given 2stars to reflect this.
sharilynne61 15345 94
Aug 31, 2013
Is there a tutorial.... I am more of a visual learner and I cannot make sense of the instructions for some of the stitches involved? Thanks.
Gypsywind
Jul 05, 2015
I just finished this after many false starts. My suggestion to others is to figure out what the directions are trying to accomplish and go from there. This pattern makes this harder than it should be. Read the instructions before the actual row/round.
scubasandi64 48799 41
Oct 04, 2015
Hi there. I'm working on this pattern, is there any help you can offer, I seam to be stuck on row 6 and 7
msmerricat 3526491
Dec 05, 2012
I made this 4 years ago. It has lovely drape and is very soft and I really ought to make another as it is one of my favorite sweaters. I love the old fashioned Victorian feel it gives to jeans or skirts. I think I made a large at the time and I am a 48 bust so it fits and still has room so is not tight.
somethinupmysleeve fuzzys 1585501
Oct 27, 2012
I have given up on trying to find attractive clothes in my size. I have a very large bust and not all of the patterns are calculated to my bust size which is about 55". Can someone tell me how to calculate the stitches to increase to make it in my size?
Christine90
Nov 25, 2012
THE LACY RUFFLE CARDIGAN INCLUDES YOUR SIZE. FOR INFORMATION ABOUT CHANGING PATTERNS TO FIT YOU, CHECK THE WEBSITE FOR THE CROCHET GUILD OF AMERICA (www.crochet.org/).
msmerricat 3526491
Dec 05, 2012
I think the pattern comes in that size. I am a 48 bust and I think my sweater is a large. Try using a bigger hook and keep your tension a little loose. I find this yarn (Caron) stretches a bit when you hang the garment. I have also washed and dried mine with no issues. :)
ipilot4u 7423393
Apr 17, 2012
You could either do that or use a larger hook so Is a bigger gauge
mmcooper1 2148055
Nov 09, 2010
I was wondering if I did a 4th row 2 it would still work as an X large... It looks like only 2 people have even made a comment though so I may get no help at all...
grammax17
Oct 07, 2010
This sweater looks to light and lacy in picture but when it is made up it is very heavy. I made it with Simply Soft, but it is bulky and am taking it apart to try something else. I was making this for one of my granddaughters. I had it almost finished, just needed to do last sleeve, but just didn't like it.
Report Inappropriate Comment
Are you sure you would like to report this comment? It will be flagged for our moderators to take action.
Thank you for taking the time to improve the content on our site.