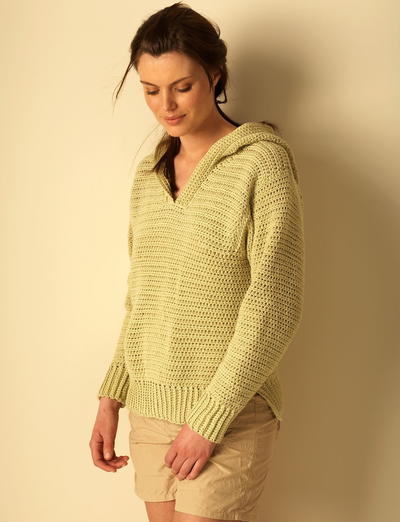
Casual Chunky Sweatshirt

A v-neck sweatshirt can also be made into a nice hoodie. Crochet yourself a casual and chunky sweatshirt. This free crochet pattern from Bernat Yarns is great for yourself or a friend. The Casual Chunky Sweatshirt is perfect for any occasion. Wear it Christmas morning as you open presents, in the fall at a bonfire, or in early spring when the air is still crisp. This is the perfect sweater to snuggle up in, and the pattern is very forgiving. V-neck tops are so comfortable because they don't sit right at your neck! This sweater couldn't be cozier, and it's yours for the making when you explore this free pattern.

Yarn Weight(5) Bulky/Chunky (12-15 stitches for 4 inches)
Crochet Gauge14 sts and 16 rows = 4 ins [10 cm] in pat.
Materials List
- Bernat® Chunky (Ombres: 300 g / 10.5 oz): 3 (3-3-4-4-4) balls
- Size 6 mm (U.S. J or 10) crochet hook or size needed to obtain gauge.
INSTRUCTIONS
The instructions are written for smallest size. If changes are necessary for larger sizes the instructions will be written thus ( ).
To fit bust measurement: XS/S (M-L-XL-2/3XL-4/5XL): 28/34 (36/38-40/42-44/46-48/54-56/62) ins [71/86.5 (91.5/96.5-101.5/106.5-112/117-122/137-142/157.5) cm].
Finished bust: 38 (42-46-50-60-68) ins [96.5 (106.5-117-127-152.5-173) cm.
BACK
**Ch 68 (74-82-88-106-120).
1st Row: (RS). 1 sc in 2nd ch from hook. *Ch 1. Miss next ch. 1 sc in next ch. Rep from * to end of ch. Turn. 67 (73-81-87- 105-119) sts.
2nd Row: Ch 1. 1 sc in first sc. 1 sc in next ch-1 sp. *Ch 1. 1 sc in next ch-1 sp.
Rep from * to last sc. 1 sc in last sc. Turn.
3rd Row: Ch 1. 1 sc in first sc. *Ch 1. 1 sc in next ch-1 sp. Rep from * to last sc. 1 sc in last sc. Turn.
Rep last 2 rows of pat for 5 ins [12.5 cm], ending with 3rd row. Place marker at each end of last row.
Cont in pat for total length of 15 ins [38 cm], ending with 2nd row. Fasten off.
Shape Armholes
Next Row: (RS). Miss first 8 (8-10-12-20-26) sts. Join yarn with sl st in next ch-1 sp. Ch 1. 1 sc in same sp as last sl st. Pat to last 8 (8-10-12-20-26) sts. Turn. Leave rem sts unworked. 51 (57- 61-63-65-67) sts.**
Cont even in pat until armholes measure 9 (9½-10-10½-11-12) ins [23 (24-25.5- 26.5-28-30.5) cm], ending with a 2nd row. Fasten off.
FRONT
Work from ** to ** as given for Back.
Cont even in pat until armholes measure 3 ins [7.5 cm], ending with a 2nd row.
Divide for front opening: Next row: Pat across 25 (28-30-31-32-33) sts.
Turn. Leave rem sts unworked. Cont even until armhole measures 12 rows less than Back to shoulder, ending with a 2nd row.
Shape Neck
Next Row: (RS). Pat across 20 (22-23-23-24-24) sts. Draw up a loop in each of next 2 sts. Yoh and draw through all 3 loops on hook – sc2tog made. Turn. 21 (23-24-24-25-25) sts.
Next Row: Ch 1. Sc2tog over first 2 sts. Pat to end of row. Turn.
Next Row: Ch 1. Pat to last 2 sts. Sc2tog over last 2 sts. Turn.
Rep last 2 rows once more. 17 (19-20- 20-21-21) sts.
Next Row: Ch 1. Pat to end of row. Turn.
Next Row: Ch 1. Pat to last 2 sts. Sc2tog over last 2 sts. Turn.
Rep last 2 rows twice more. 14 (16-17- 17-18-18) sts.
Work 1 row even. Fasten off.
With RS of work facing, miss center st. Join yarn with sl st to next st and pat to end of row.
Work as given for left side, reversing neck shaping.
SLEEVES
Ch 36 (36-38-38-40-42).
Proceed in pat as given for Back for 4 rows. 35 (35-37-37-39-41) sts.
Next Row: (RS). (Increase row). Ch 1. 2 sc in first st. Pat to last st. 2 sc in last st. Turn.
Work 3 (3-2-2-2-2) rows even.
Rep last 4 (4-3-3-3-3) rows 12 (14-15-16-17-19) times more, then Increase row once. 63 (67-71-73-77-83) sts.
Cont even until work from beg measures 17½ (18-18-17½-17-16½) ins [44.5(45.5-45.5-44.5-43-42) cm], ending with 2nd row. Place marker at each end of last row.
Work 9 (9-11-14-23-30) rows even.
Fasten off.
HOOD
Ch 98.
Proceed in pat as given for Back for 4 (5-6-7-7-8) rows. 97 sts.
Next 5 Rows: Ch 1. Sc2tog over first 2 sts. Pat to last 2 sts. Sc2tog over last 2 sts. Turn.
Next Row: Ch 1. Pat to end of row. Turn.
Next 3 Rows: Ch 1. Sc2tog over first 2 sts. Pat to last 2 sts. Sc2tog over last 2 sts. Turn. 81 sts at end of last row.
Work 13 (14-15-17-17-18) rows even.
Place marker at each end of last row.
Shape Back
Next 8 Rows: Sl st in each of first 3 sts. Pat to last 3 sts. Turn. Leave rem sts unworked. 33 sts at end of last row. Fasten off.
Fold Hood in half, matching markers. Sew back seam from fold to markers.
FINISHING
Sew shoulder seams. Sew in Sleeves, placing rows above markers against missed sts of Front and Back to form square armholes. Sew side and sleeve seams, leaving sides open below markers for side slits. Pin Hood to neck edge, aligning back seam with center back neck and foundation ch with edges of front opening. Sew Hood in position.
Read NextWrapture Free Crochet Shawl Pattern
Your Recently Viewed Projects
Thanks for your comment. Don't forget to share!
achumley0003 31706 34
Nov 20, 2017
My daughter loves comfortable hoodies. She wears them all the time. She usually wears one to school because she says she gets cold in there. I would like to make this for her and I think it would keep her warm. I may try double stranding a worsted weight first and see if I can get gauge and if not then I will go from there.
Chippy
Jan 08, 2015
I am at the point of shaping the neck but would really like to see a diagram of what the separate pieces are supposed to look like. Is there one for this written pattern?
FaveCrafts Editor JL
Jan 09, 2015
Hi there, Unfortunately the pattern designer, Bernat, did not include any additional diagrams. - Julia from FaveCrafts
ladyemt101 8537312
Apr 06, 2014
. Can someone explain this step to me? "Cont even until armhole measures 12 rows less than Back to shoulder,"
FaveCrafts Editor JL
Apr 07, 2014
Hi there, For specific pattern-related questions, I suggest contacting the pattern creator directly (via their designer profile) or posting your question on our Facebook wall. Thanks!
littleone36 010023 6
Feb 08, 2014
This is my first sweater and if someone could please explain how to work the even rows between the increase row on the sleeves any tips or advice is welcome
heavenlyfitness 05 98736
Feb 01, 2014
I basted the hood to the sweater before I attached it to make sure it fits, but the instructions say to fold it in half and it's too small, has anyone else had this problem? I'm thinking of adding on more rows so the centre of the hood can be sewn together.
AKGRANNY1965 38148 55
Jan 31, 2014
Love these quick patterned they take as long or as quick as you what to make them great for kids as gifts for anytime of the year.
lizzydoxie 8323753
Oct 08, 2013
This pattern leaves a lot of detail out. As a 40+ year crocheter, I had difficulty following the directions. 1. The amount of yarn stated as needed to incorrect. I made this sweater to fit a misses size 12-14 and ended up using 10 skeins as opposed to the 4 stated in the pattern. 2. The first rows are questionable as the increase explained starts to spiral, but ripped it all out and started again. 3. There are no directions on how to attached the pieces together, therefore I used a large eyed needle and blanket stitched together. These are just a few issues of all whole list. When my project was complete, I was pleased with it but thank goodness I have experience to fall back on.
heavenlyfitness 05 98736
Feb 01, 2014
I am having problems with the hood, I crocheted it exactly as instructed, and I can't figure out why it seems so small? I'm adding one extra rows to make it work.
nuphilagal
Aug 18, 2012
i really do not understand written patterns. i am a visual learner and need to see hands on to u derstand what is goin on lol.. can mikey do a demo of this? maybe? pretty please with sugar? i have a nice fishermans 100% virgin watewr resistant yarn 2 1/2 large skeins for this project i would love to use for this winter... anyways all i see on youtube are baby sweaters.. ty
sjlindberg 8346572
May 27, 2012
I made the casual chunky sweatshirt and I love it, but I can't figure out how to put the hood on. It's the varigated pink one shown. Any ideas? I love the sweatshirt so far.
labfish
Apr 07, 2012
I am 2/3XL the ombre yarn in blue, natural, brown as the pink was not available. Everything going fine until after where you don't work the armholes on the back. The color pattern changed to blockish blobs instead of the long stretches of color!! I should have thought of this but why didn't bernat catch this!! Repeating yarns change in pattern when the number of stitches worked changes!! Not sure whether I will continue. Very disappointed. USE A SOLID COLOR!!
deechilds 4799275
Dec 31, 2011
I have tried repeatedly to print the casual chunky sweatshirt pattern but only get first and last pages. Can you please make a complete pattern available. Thanks
deechilds 4799275
Jan 01, 2012
I still have not recieved a complete pattern to print out. What is the problem. Please send a complete pattern .
jcasey721
Jan 17, 2012
I am confused about the 2nd row instructions. I cannot figure out if it instructs to SKIP 1 ch then do a ch1 as in row 1...in row 1 it indicates MISSING 1ch...doe anyone know if it should repeat in row 2 as in row 1????? I really want to make this...but it is very confusing!!!!
mleewebb 3360741
Jul 19, 2011
Terrible pattern. Instructions for the hood addition are not clear. I gave up after the second time I tried to make it.
tsmom62
Feb 18, 2011
I'm working on the sleeves right now. It says continue in the pattern for 18 inches and mark last row. Then work 9 rows even. So do I continue the pattern for nine rows or do single crochets for 9 rows?
Patti2
Dec 12, 2010
Sorry if this has been already addressed. What if we don't want the hoodie? Any instructions if neck area needs to be adjusted? Patti
shyslope
Oct 15, 2010
I am about half thru with making this. These instructions are extremely hard to understand. Working on the neck portion and not working out properly. Can anyone send a more reader friendly and more explanitory instructions on this. The directions to the arms and shoulders are almost ridiculous. I love the look of this sweater and really want to finish it. If anyone can send better instructions, would really appreciate it. You can fax them to me at 918-684-6367.
dork
Apr 12, 2010
This pattern is the same as "Easy Pullover Sweater" done with ombre instead of solid.
CSum
Feb 22, 2010
"Miss next ch" means to skip the next chain stitch. Depending on the size you're making, you will need 3 or 4 (300g10.5 oz) balls or skeins of Bernat Chunky Ombres yarn. This same pattern is called Hooded Sweater Crochet Pattern and calls for 3 or 4 balls of Bernat Chunky Solids (400 g14 oz). Solid yarns usually have a bit more yarn than ombres (same yarn brand and type).
jedawnsmom
Feb 04, 2010
I haven't made this project yet but I will soon. I read over any pattern once or more to help understand the diredctions. This pattern has the amount of yarn needed for each size. That is the number of balls, or skeins, to make the item. I always buy an extra one just in case. It also gives you the number of chain stitches to start each size.The size of hook to use is next, gauge is important for total number of stitches per inche. Too few it needs to be bigger, too many it needs to be smaller.
ohiojo1953
Dec 06, 2009
The pattern isn't clear to me. Does it take 300g (10.5 oz) TOTAL or 4-300g skeins? Sounds like alot. I'm kinda new at this so bear with me. -)
luv2crochet
Nov 21, 2009
My understanding is the pattern rows are rows 2 and 3. "Miss first" means to skip one single crochet--the chain one equates to the skipped single crochet stitch. Hope this helps.
mfre42day
Nov 17, 2009
ok,so is he pattern rows 2 and 3 of the front? Also does "Miss first" mean to skip however many stitches?
Report Inappropriate Comment
Are you sure you would like to report this comment? It will be flagged for our moderators to take action.
Thank you for taking the time to improve the content on our site.