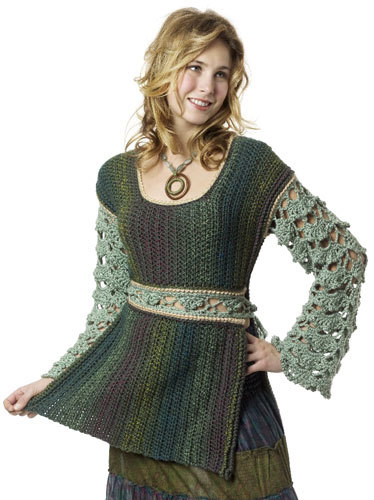
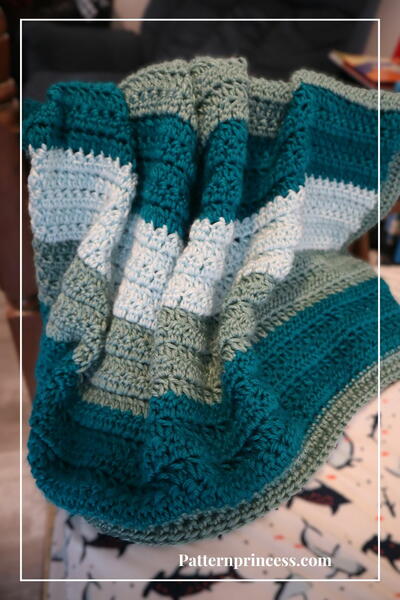
Avalon Top
The delicate, beautiful Avalon Top from Caron Yarns is great to throw on for a trip to the beach. You could also wear it for a night out with friends. This top is the perfect summer staple that you can easily wear for any reason. Hone your crochet skills with this free crochet summer top pattern that women of all ages and sizes are sure to love.
.jpg)
Materials:
- 4 (5, 5, 6, 6) skeins Naturally Caron Spa Yarn in Naturally
- US H-8 (5 mm) crochet hook, or size to obtain gauge
- Stitch markers
- Yarn needle
Gauge:
- In single crochet, 15 sts = 4"/10 cm;
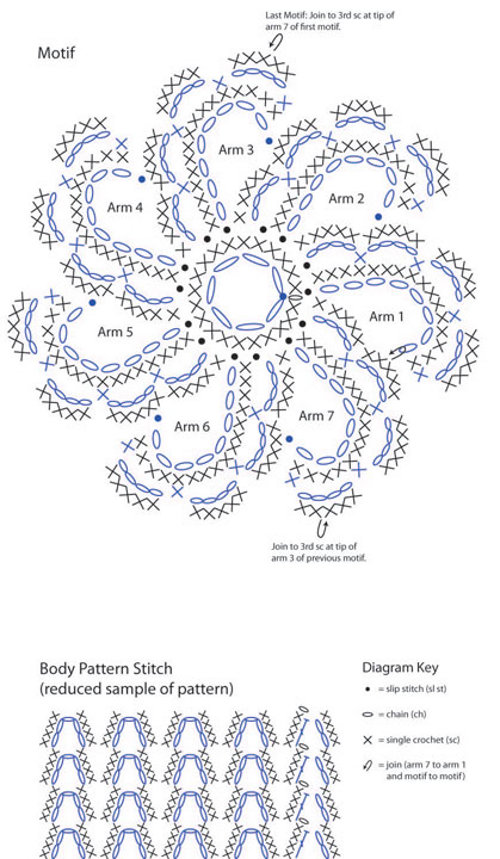
- One Motif = 5 1/2"/14 cm across at widest point;
- In body pattern stitch, 4 repeats = 4"/10 cm and 5 rows = 3 1/2"/9 cm;
- In body or sleeve trim, one trim arm repeat = 2 1/2"/6.5 cm wide x 3"/7.5 cm long.
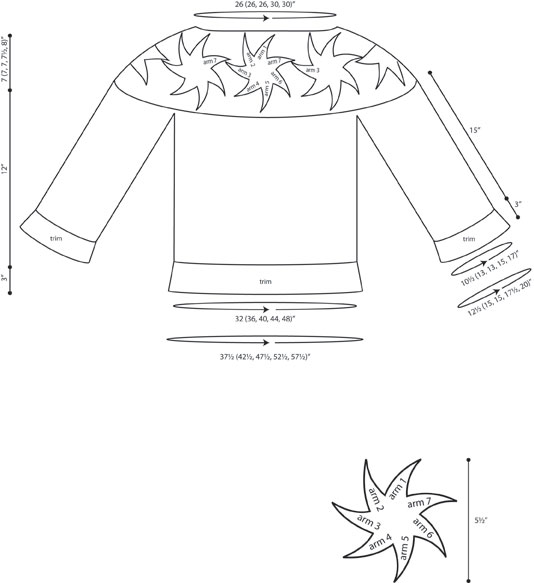
Finished Measurements:
- Bust: 32 (36, 40, 44, 48)"
- Length: 22 (22, 22, 22 1/2, 23)" measured from center back neck
Special Terms:
- Fsc: Foundation single crochet (In this design, Fsc is used to add stitches at the underarms) –
- Step 1:Ch 1 as directed, insert hook under the forward 2 loops of the stem of the previous stitch (2 strands just below the top loops of the sc) and draw up a loop, yarn over and draw through one loop on hook (the "chain"); yarn over and draw through 2 loops on hook (the "single crochet").
- Step 2:The following stitch is worked under the forward 2 loops of the stem of the previous stitch (into the "chain"). Insert hook into the face of the "chain" and under the nub at the back of the "chain", draw up a loop, yarn over and draw through one loop on hook (the "chain"), yarn over and draw through 2 loops on hook (the "single crochet"). Repeat for the length of underarm as directed.
- dtr2tog: Double treble crochet 2 together –[Yarn over 3 times, insert hook in next indicated st and draw up a loop, [yarn over and draw through 2 loops on hook] 3 times] twice, yarn over and draw through all 3 loops on hook.
- tr2tog: Triple treble crochet 2 together –[Yarn over 4 times, insert hook in next indicated st and draw up a loop, [yarn over and draw through 2 loops on hook] 4 times] twice, yarn over and draw through all 3 loops on hook.
Instructions:
Sizes: Small (Medium, Large, X-Large, XX-Large)
- Pattern Round: Ch 1, 4 sc in beginning ch-sp, (4 sc, ch 5, 4 sc) in each ch-5 sp around, 4 sc in same ch-sp as beginning; join with ch 2, dc in first sc (join counts as beginning ch-sp), do not turn. Pattern stitch will grow slightly in length and width, and will block to measurements. Garment provides generous amount of stretch when worn.
Yoke
- Yoke is a ring of 7 (7, 7, 8, 8) motifs that are joined to each other as work progresses. Each motif has seven arms that are crocheted and numbered counterclockwise (see diagram). Arms 1 and 2 form the neck edge, arms 3 and 7 are joined to neighboring motifs, arms 4–6 form the lower edge of the yoke.
- To keep the ring of motifs from twisting, use one long scrap of yarn to mark and stabilize the neck edge. After completing First Motif, loop and secure the yarn marker through arms 1 and 2. After joining Motif 2, loop end of yarn marker through arms 1 and 2, and so on.
First Motif
-
Ch 7; join with slip st in first ch to form a ring.
- Round 1: Ch 1, work 21 sc in ring; join with slip st in first sc.
Arm 1
-
Row 1: Ch 8, place marker in first ch from hook.
-
Row 2 (RS): Work 16 sc over the ch-8 just made, sk first sc of ring, slip st in next sc, turn.
-
Row 3: Sk slip st, [ch 4, sk next 3 sc of arm, sc in next sc of arm] 4 times, turn. Note: The last sc may be difficult to see because it is squashed; the top loops are just past the marker.
- Row 4 (RS): Do not ch 1, work 5 sc in each of the 4 ch-4 sps of arm, sk next sc of ring, slip st in next sc of ring, turn.
Arm 2
-
Row 1: Sk slip st, ch 8, sk next 6 sc of previous arm, sl st in next sc, turn.
-
Row 2 (RS):Do not ch 1, work 16 sc in ch-8 just made, slip st in next sc of ring, turn.
- Rows 3 and 4: Work same as Rows 3 and 4 of arm 1.
Arms 3–6
- Work as for arm 2 four more times.
Arm 7
-
Rows 1–3: Work same as Rows 1–3 of arm 2.
- Row 4 (close motif):Do not ch 1, work 5 sc in the next 2 ch-4 sps of arm, 3 sc in next ch-4 sp, insert hook from front to back in marked ch of arm 1, yarn over and draw through all loops on hook to close motif, 2 sc in same ch-4 sp, 5 sc in last ch-4 sp, sk next sc of ring; join with slip st in first sc of ring. Fasten off.
Motifs 2–6 (6, 6, 7, 7)
Motifs are joined to neighboring motifs at the tips of arms 3 and 7 while working the joining row (Row 4). Arrange and join motifs to neighboring motifs as shown in assembly diagram.
-
Ch 7; join with slip st in first ch to form a ring.
- Round 1: Ch 1, work 21 sc in ring; join with slip st in first sc.
Arms 1–6
- Work as for arms 1–6 of First Motif.
Arm 7
-
Rows 1–3: Work same as Rows 1–3 of arm 2 of First Motif.
- Row 4 (joining row):Do not ch 1, work 2 sc in first ch-4 sp, insert hook from front to back in 3rd sc at tip of arm 3 of previous motif, yarn over and draw through all loops on hook to join motifs, 3 sc in same ch-4 sp; 3 sc in next ch-4 sp, insert hook from front to back in marked ch of arm 1, yarn over and draw through all loops on hook to close motif, 2 sc in same ch-4 sp, 5 sc in last ch-4 sp, sk next sc of ring; join with slip st in first sc of ring. Fasten off.
Last Motif
-
Ch 7; join with slip st in first ch to form a ring.
- Round 1: Ch 1, work 21 sc in ring; join with slip st in first sc.
Arms 1 and 2
- Work as for arms 1 and 2 of First Motif.
Arm 3
-
Rows 1–3: Work same as Rows 1–3 of arm 2 of First Motif.
- Row 4 (joining row) and close motif: Work 2 sc in first ch-4 sp, insert hook from front to back in 3rd sc at tip of arm 7 of First Motif, yarn over and draw through all loops on hook to join motifs, 3 sc in same ch-4 sp; work 5 sc in remaining 3 ch-4 sps, sk next sc of ring; slip st in next sc of ring.
Arms 4–7
- Work as for arms 4–7 of Motif 6 (6, 6, 7, 7). Fasten off.
Yoke Neck Edge
Finishing the neck edge now makes Yoke more stable and allows you to try on and more accurately determine the body length as you crochet.
-
With RS of Yoke motif ring facing, join yarn with slip st in 3rd sc at tip of any arm 1.
-
Round 1 (RS): Ch 1, sc in same sc of arm 1, *ch 5, sk next 6 sc of arm 1, dc in next sc, ch 5; sc in 3rd sc at tip of arm 2, ch 1, dtr2tog over 7th sc following last sc made and 8th sc of arm 7 of next motif (8th sc following slip st join), ch 1; continuing on this motif, sc in 3rd sc at tip of arm 1; repeat from * around neck edge of remaining motifs omitting last sc; join with slip st in first sc.
-
Round 2: Ch 1, sc in same sc as join, *4 sc in next ch-5 sp, sc in next dc, 4 sc in next ch-5 sp, sc in next sc, sc in next ch-1 sp, sc in next dtr2tog, sc in next ch-1 sp, sc in next sc; repeat from * around omitting last sc; join with slip st in first sc—98 (98, 98, 112, 112) sc.
- Round 3: Ch 1, working in opposite direction, *rev sc in next sc, ch 1, sk next sc; repeat from * around; join with slip st in same sc as beginning. Fasten off.
Lower Yoke
To keep things neat, it is advisable to weave in all ends now.
-
With RS of Yoke motif ring facing, and beginning at the tip of any arm 4 (first free arm past motif join) of any motif, join yarn with slip st in 3rd sc at tip of arm 4.
-
Round 1 (RS): Ch 8 (counts as dc, ch 5), *sk next 6 sc of arm 4, dc in next sc, ch 5; sc in 3rd sc at tip of arm 5, ch 5, sk next 6 sc of arm 5, dc in next sc, ch 5, dc in 3rd sc at tip of arm 6, ch 5, trtr2tog over 7th sc following last dc made and 8th sc of arm 3 of next motif (8th sc following slip st join), ch 5; dc in 3rd sc at tip of arm 4; repeat from * around lower edge of remaining motifs omitting last dc; join with slip st in 3rd ch of beginning ch.
-
Round 2: Ch 1, 6 sc in each ch-5 sp around; join with slip st in first sc—252 (252, 252, 288, 288) sc. Fasten off.
- Mark Center Front: Place a marker in any arm 5, in the sc from Round 1 (between 6-sc groups).
Size Small Only:
-
With RS facing, beginning at center front marker, sk next 38 sc; join yarn with slip st in next sc.
- Round 3: Ch 1, sc in same sc as join, sc in next sc, [ch 5, sk next 4 sc, sc in next 2 sc] 41 times; join with ch 2, sk last 4 sc, dc in first sc (join counts as beginning ch-sp)—42 ch-sps.
Size Medium Only:
-
With RS facing, beginning at center front marker, sk next 38 sc; join yarn with slip st in next sc.
- Round 3: Ch 1, sc in same sc as join, sc in next sc, *[ch 5, sk next sc, sc in next 2 sc] twice, [ch 5, sk next 4 sc, sc in next 2 sc] 6 times, [ch 5, sk next sc, sc in next 2 sc] 4 times, [ch 5, sk next 4 sc, sc in next 2 sc] 11 times*, [ch 5, sk next sc, sc in next 2 sc] twice; repeat from * to * once more; ch 5, sk next sc, sc in next 2 sc; join with ch 2, sk last sc, dc in first sc (join counts as beginning ch-sp)—50 ch-sps.
Size Large Only:
-
With RS facing, beginning at center front marker, sk next 38 sc; join yarn with slip st in next sc.
- Round 3: Ch 1, sc in same sc as join, sc in next sc, **[ch 5, sk next sc, sc in next 2 sc] twice, [ch 5, sk next 4 sc, sc in next 2 sc] 6 times, [ch 5, sk next sc, sc in next 2 sc] 4 times, *[ch 5, sk next 4 sc, sc in next 2 sc] 3 times, [ch 5, sk next sc, sc in next 2 sc] twice; repeat from * once more; [ch 5, sk next 4 sc, sc in next 2 sc] 3 times**; [ch 5, sk next sc, sc in next 2 sc] twice; repeat from ** to ** once more; ch 5, sk next sc, sc in next 2 sc; join with ch 2, sk last sc, dc in first sc (join counts as beginning ch-sp)—54 ch-sps.
Size X-Large Only:
-
With RS facing, beginning at center front marker, sk next 44 sc; join yarn with slip st in next sc.
-
Round 3: Ch 1, sc in same sc as join, sc in next sc, *[ch 5, sk next sc, sc in next 2 sc] twice, [ch 5, sk next 4 sc, sc in next 2 sc] 7 times, [ch 5, sk next sc, sc in next 2 sc] 4 times, [ch 5, sk next 4 sc, sc in next 2 sc] 6 times, [ch 5, sk next sc, sc in next 2 sc] twice. [ch 5, sk next 4 sc, sc in next 2 sc] 6 times*; [ch 5, sk next sc, sc in next 2 sc] twice; repeat from * to * once more; ch 5, sk next sc, sc in next 2 sc; join with ch 2, sk last sc, dc in first sc (join counts as beginning ch-sp)—58 ch-sps.
- Round 4: Work Pattern Round of Body Pattern Stitch.
Size XX-Large Only:
-
With RS facing, beginning at center front marker, sk next 44 sc; join yarn with slip st in next sc.
-
Round 3: Ch 1, sc in same sc as join, sc in next sc, *[ch 5, sk next sc, sc in next 2 sc] twice, [ch 5, sk next 4 sc, sc in next 2 sc] 7 times, [ch 5, sk next sc, sc in next 2 sc] 4 times, [ch 5, sk next 4 sc, sc in next 2 sc] 6 times, [ch 5, sk next sc, sc in next 2 sc] twice. [ch 5, sk next 4 sc, sc in next 2 sc] 6 times*; [ch 5, sk next sc, sc in next 2 sc] twice; repeat from * to * once more; ch 5, sk next sc, sc in next 2 sc; join with ch 4, sc in first sc (join counts as beginning ch-sp)—58 ch-sps.
- Round 4: Ch 1, 2 sc in beginning ch-sp, *2 sc in next ch-5 sp, [ch 5, 2 sc in same ch-5 sp] twice, (4 sc, ch 5, 4 sc) in next 9 ch-5 sps, **2 sc in next ch-5 sp, [ch 5, 2 sc in same ch-5 sp] twice; repeat from ** once more, (4 sc, ch 5, 4 sc) in next 16 ch-5 sps*, 2 sc in next ch-5 sp, [ch 5, 2 sc in same ch-5 sp] twice; repeat from * to * once more; (2 sc, ch 5, 2 sc) in same ch-sp as beginning; join with ch 2, dc in first sc (join counts as beginning ch-sp)—66 ch-sps.
Body (All Sizes)
Work continues in joined rounds with RS always facing.
Divide for Armholes
-
Round 1: Ch 1, 4 sc in beginning ch-sp, *ch 1, Fsc 8 (8, 8, 12, 12) for underarm, sk next 8 (10, 10, 11, 13) ch-5 sps for armhole*; (4 sc, ch 5, 4 sc) in next 13 (15, 17, 18, 20) ch-5 sps across back; rep from * to * once more for other underarm, (4 sc, ch 5, 4 sc) in next 12 (14, 16, 17, 19) ch-5 sps across front, 4 sc in same ch-sp as beginning; join with ch 2, dc in first sc.
-
Round 2: Ch 1, 4 dc in beginning ch-sp, *sc in first sc of underarm foundation, [ch 5, sk next 2 sc, sc in next 2 sc] 1 (1, 1, 2, 2) times, ch 5, sk next 2 sc, sc in last sc of underarm*, (4 sc, ch 5, 4 sc) in next 13 (15, 17, 18, 20) ch-5 sps; repeat from * to * once more across other underarm, (4 sc, ch 5, 4 sc) in next 12 (14, 16, 17, 19) ch-5 sps, 4 sc in same ch-sp as beginning; join with ch 2, dc in first sc—30 (34, 38, 42, 46) ch-sps.
- Rounds 3–17: Work Pattern Round of Body Pattern Stitch 15 times or for desired body length before trim.
Body Trim
Trim is similar to one arm of a motif, with repeats worked sideways around lower edge.
First Trim Arm
-
Row 1: Ch 1, 4 sc in beginning ch-sp, 4 sc in next ch-5 sp, ch 10, place marker in first ch from hook.
-
Row 2 (RS): Work 20 sc over ch-10 just made, 4 sc in same ch-5 sp of body, 4 sc in next ch-5 sp of body, turn.
-
Row 3: Ch 4, sk next 11 sc, sc in next sc, [ch 4, sk next 3 sc, sc in next sc] 4 times, turn.
- Row 4:Do not ch 1, 5 sc in next 5 ch-4 sps, 4 sc in same ch-5 sp of body, 4 sc in next ch-5 sp of body, turn.
Second Trim Arm
-
Row 1: Ch 10, sk next 15 sc, slip st in next sc, turn.
-
Rows 2–4: Work Rows 2–4 of first trim arm.
- Repeat Rows 1–4 of second trim arm 12 (14, 16, 18, 20) more times around.
Last Trim Arm
-
Rows 1–3: Work Rows 1–3 of second trim arm.
- Row 4 (close trim round):Do not ch 1, 5 sc in next 3 ch-4 sps, 3 sc in next ch-4 sp, insert hook from front to back in marked ch of first trim arm, yarn over and draw through all loops on hook to close trim round, 2 sc in same ch-4 sp, 5 sc in remaining ch-4 sp; join with slip st in first sc of trim. Fasten off.
Sleeves
-
With RS facing, join yarn with slip st in 8th (8th, 8th, 12th, 12th) ch of one underarm foundation (this should be the last ch of the underarm foundation).
-
Round 1: Ch 1, sc in same ch, (4 sc, ch 5, 4 sc) in next 8 (10, 10, 11, 13) ch-5 sps around armhole, sc in first ch of underarm foundation, [ch 5, sk next 2 ch, sc in next 2 ch] 1 (1, 1, 2, 2) times; join with ch 2, sk last 2 ch, dc in first sc—10 (12, 12, 14, 16) ch-sps.
- Rounds 2–21: Work Pattern Round of Body Pattern Stitch 20 times or until sleeve measures desired length before trim.
Sleeve Trim
-
Work trim around sleeve edge in the same manner as body trim, working 5 (6, 6, 7, 8) arms. Fasten off. Weave in ends.
- Work second sleeve on opposite armhole in same manner.
Finishing
-
Using yarn needle, weave in all ends. Block top, as desired.
Read NextSimply Savvy Crochet Ruana Pattern
Your Recently Viewed Projects
Thanks for your comment. Don't forget to share!
Delphine Bryant
Nov 14, 2018
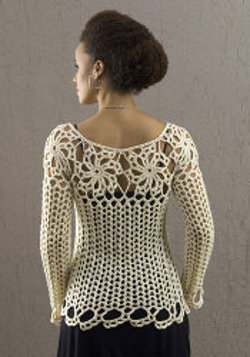
This Avalon top is beautiful but I would never wear it. Form fitting items just do not look very good on me. I would have loved to view the top from the front. From the directions I can only assume that this is a top and will look very similar in the front. This is a quality free pattern and I am sure that someone will make it and look stunning in it.
Morehouse17
Oct 31, 2018
This is classy and hard to believe that it is made with motifs. I love the design but I am not one that likes to wear clingy tops so I probably would never make one of these for myself. Howe ever I do know a few young ladies that would look stunning in this top. I am thinking of making it in brilliant red for the coming winter holidays.
melissasea22
Feb 15, 2016
I think caron or any sport/light worsted would work with this sweater.
suzanmiller1 38699 76
May 16, 2015
I made this sweater and had to do alot of adjusting because of the sizing which runs quite large. When finally finished, it was lovely but has to be re-blocked every time it is cleaned to make it lay right...
knutlerttp 8881056
May 04, 2015
This is a lovely pattern but I think it should have a front photo )
mcteixeira1994 780 0596
Nov 12, 2014
Gostaria muito de fazer esta blusa mais esta traduo eu no consigo entender. No teria outra mais em portugues.
Jldurfe 6063770
Aug 04, 2014
curious on how long this took everyone to make? I am a pretty quick crocheter, and have been doing it for years. I've not yet made a sweater though. I have a wedding in 2 weeks and would like this for then, any thoughts?
Melissa Ryan
Aug 06, 2014
Hi Jldurfe--Thanks for your comment! That's a great question. Depending on how long you spend crocheting, you can probably have this top ready in 2 weeks. For more feedback, you might want to post this on our Facebook page as well. Thanks!--FaveCrafts Editors
amybish1654 517488 1
May 18, 2014
I'm having trouble with this part of the pattern, not sure if I'm to do a loop or what can anyone help me out please. Arm 1 Row 1: Ch 8, place marker in first ch from hook. Row 2 (RS): Work 16 sc over the ch-8 just made, sk first sc of ring, slip st in next sc, turn
FaveCrafts Editor JL
May 19, 2014
Hi there, For specific pattern-related questions, please contact the designer (Caron Yarns) directly via their company profile page. Thanks!
liliputt09 6806410
Apr 25, 2014
Hi there! Unfortunately, the Naturally Caron Spa yarn has been discontinued, does anyone have any suggestions for a similar yarn that has worked for them? Thanks!
Melissa Ryan
Apr 25, 2014
Hi liliputt09--thanks for your comment! We suggest checking the Caron website for yarn suggestions. They might have a yarn that can replace the Spa yarn used here. Otherwise we suggest looking for a yarn with a similar weight to help obtain the proper gauge. Thanks so much and hope that helps! --FaveCrafts Editor
donnamichellesmith 4794820
Feb 01, 2014
I cannot wait to start this stunning sweater! Thanks you for sharing!
mom7911 3168884
Nov 09, 2012
I am utterly lost and confused. I am at the YOKE NECK EDGE round 1 and can not figure it out. I am following exactly what the pattern says and I can not get this to turn out right. Can nayone help me?
Melissa Ryan
Nov 29, 2012
@mom7911 Sorry to hear you're having trouble! I suggest contacting the designer, in this case Caron Yarns, and asking if they can help clarify the pattern. Feel free to post this on their Facebook wall and see if they can offer some guidance. Let us know how it goes!
patmcclain 1580637
Apr 27, 2012
I would also to know how to save patterns to my computer.
janimonti2 3189978
Apr 25, 2013
I highlight the pattern, hit copy and paste to a word doc page then save to my craft folder. I can print the directions when I'm ready to make the project. This one is 12 pages.
BellaPixie
Apr 25, 2013
You can save this pattern from there original website. http://www.naturallycaron.com/projects/avalon/avalon.pdf
ladysparkle55peace
Aug 04, 2011
I am making this pattern. . .Please note normac's post about the corrections. It's working up nicely.
yarnit 7156198
Apr 28, 2011
how can i save this pattern to my computer, i have a lap top and printer is not always with me thanks marie
Izzteryl
Jan 09, 2012
did you ever get an answer to this question? if not, i might be able to help you with that. :)
BellaPixie
Apr 25, 2013
http://www.naturallycaron.com/projects/avalon/avalon.pdf This is where you are able to download the pattern to your computer
BellaPixie
Apr 25, 2013
http://www.naturallycaron.com/projects/avalon/avalon.pdf This is where you are able to download the pattern to your computer
normac9062
Apr 10, 2011
I just finished working this pattern today. I think it came out great. I found two mistakes in the pattern. First is in the First Motif Row 2 were it states to 'sk first sc of ring' don't do this. The second mistake is in Arm 7 Row 4 line two after it states '3 sc in same ch-4 sp,' you need to insert '5 sc in 2nd ch-4 sp ' then go on to '3 sc in next(which is the 3rd) ch-4 sp,. Did any one else find this?
willekeo
Apr 02, 2011
This is my favorite in the group! Again, I don't think you could ever knit something like this, right?
rackster
Apr 02, 2011
This is outta this world!! I love it! However, the Bamboo knit is beautiful as well!!! I love both on this round! hahaha
sunshine76670
Apr 02, 2011
A little complicated for the beginner but a beautiful pattern. I vote crochet. It is so much prettier than knitting.
ksrum 3540121
Apr 02, 2011
Printing this pattern out today, will have to set my current WIP's aside can't wait to gather the materials I need to start LOL.
Ritzimitzy
Apr 02, 2011
To those having problems with this or any other pattern of Doris Chan's, may I suggest Ravelry? We have a forum (Everyday Crochet) where there's lots of support (including errata) for Doris' patterns.
sampara
Sep 26, 2010
Even though I am an experienced crocheter have been trying to work this project out for a week. Instructions not clear and hard to follow. After a week i finally managed to work out the yoke but could not do the rest so I finally gave up
juanitarogers316
Jun 18, 2010
Hello everyone! Do you think this pattern can be good with crochet thread? my friend like it but she gave me crochet tread not yarn, please if somebody all ready mad this please i need help. Thanks,God bless you!!! Juana Rogers
Crocheted
May 11, 2010
For those asking about errors in the pattern, try going to the original site that the pattern was posted at. You will have better luck getting a response from them. Hope it helps! httpwww.naturallycaron.comprojectsavalonavalon1.html
Member 17483
Mar 28, 2010
I am having trouble connecting the motif together. The pattern is telling me one thing and the picture is different. If anyone can help me with the neck connections I would be happy. Thank you, Nomina E Park nepark@gmail.com
happyheart
Mar 08, 2010
I am concerned to note there are errata with this pattern. Can you tell me what to watch for?
thelayers4614hotma ilcom
Mar 06, 2010
I am in the process of making this sweater.(which is beautiful ) I have come across several errors in the pattern. Please watch carefully. beginners should get help or they will look right over the errors. the pattern should be proof read, and then relisted. most of all the sweater is very beautiful and will receive alot of compliments.
Report Inappropriate Comment
Are you sure you would like to report this comment? It will be flagged for our moderators to take action.
Thank you for taking the time to improve the content on our site.