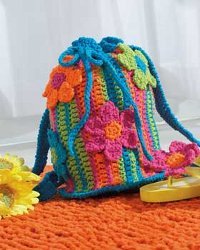
Flower Striped Drawstring Bag
Use a free crochet bag pattern from Bernat Yarns to make this adorable drawstring. The flower applique is a great embellishment to the bag. This is an easy pattern for beginners.

Materials:
- Bernat® Handicrafter Cotton
- (50 g/1.75 oz)
- Main color (MC) (Blue) 2 balls
- Contrast A (Green) 1 ball
- Contrast B (Orange) 1 ball
- Contrast C (Pink) 1 ball
- Size 4.5 mm (U.S. 7) crochet hook or size needed to obtain gauge.
GAUGE
14 sc and 16 rows = 4 ins [10 cm].
INSTRUCTIONS
Note: When changing colors, work to last 2 loops on hook of last st, then draw new color through rem 2 loops and proceed.
BASE
With MC, ch 2.
1st rnd: 6 sc in 2nd ch from hook. Join with sl st to first sc.
2nd rnd: Ch 3 (counts as dc). 2 dc in same sp as last sl st. 3 dc in each sc around. Join with sl st to top of ch 3. 18 dc.
3rd rnd: Ch 3 (counts as dc). 1 dc in same sp as last sl st. *1 dc in next dc. 2 dc in next dc. Rep from * around to last dc. 1 dc in last dc. Join with sl st to top of ch 3. 27 dc.
4th rnd: Ch 3 (counts as dc). 1 dc in same sp as last sl st. *2 dc in next dc. Rep from * around. Join with sl st to top of ch 3. 54 dc.
5th rnd: Ch 3 (counts as dc). 1 dc in same sp as last sl st. *1 dc in each of next 3 dc. 2 dc in next dc. Rep from * to last dc. 1 dc in last dc. Join with sl st to top of ch 3. 68 dc.
6th rnd: Ch 3 (counts as dc). 1 dc in same sp as last sl st. *1 dc in each of next 4 dc. 2 dc in next dc. Rep from * to last 2 dc. 1 dc in each of last 2 dc. Join with sl st to top of ch 3. 82 dc. Fasten off.
BODY OF BAG
With MC, ch 33.
1st row: (RS). 1 dc in 4th ch from hook (counts as 2 dc).
1 dc in each ch across. 31 sts. Join A. Turn.
2nd row: With A, ch 1. 1 sc in each dc across. Join MC. Turn.
3rd row: With MC, ch 3 (counts as dc). 1 dc in each sc across. Join A. Turn.
4th row: As 2nd row. Join B. Turn.
5th row:With B, as 3rd row. Join C. Turn.
6th row: With C, as 2nd row. Join B. Turn.
7th row: As 5th row.
8th row:With C, as 2nd row. Join A. Turn.
9th row: With A, as 3rd row. Join MC. Turn.
10th row:With MC, as 2nd row. Join A. Turn.
11th row: As 9th row.
12th row: With MC, as 2nd row. Join C. Turn.
13th row:With C, as 3rd row. Join B. Turn.
14th row:With B, as 2nd row. Join C. Turn.
15th row: As 13th row.
16th row:With B, as 2nd row. Join MC. Turn.
17th row: With MC, as 3rd row. Join A. Turn.
Rep 2nd to 17th rows for Stripe Pat until work from beg measures approx 22 ins [56 cm], ending on a 16th row of pat. Fasten off. Sew first row and last row tog for center back seam. (Stripes are vertical)
Top Edging: 1st rnd:With RS facing, join MC with sl st to center back seam and work 72 sc evenly around top edge.
Join with sl st to first sc.
2nd rnd: (eyelet rnd). Ch 3 (counts as dc). 1 dc in next sc. *Ch 1. Miss next sc. 1 dc in each of next 2 sc. Rep from * to last st. Ch 1. Miss last st. Join with sl st to top of ch 3.
3rd rnd: Ch 3 (counts as dc). 1 dc in each st or ch-1 sp around. Join with sl st to top of ch 3.
4th rnd: Ch 1. Working from left to right, instead of from right to left as usual, work 1 reverse sc in each st around. Join with sl st to first sc. Fasten off.
Pin Body of Bag to Base. With RS facing, join MC with sl st at center back seam. Work 1 row of sc evenly around to join Body of Bag to Base. Join with sl st to first sc.
Next rnd: Ch 1. Working from left to right, instead of from right to left as usual, work 1 reverse sc in each st around. Join with sl st to first sc. Fasten off.
Straps: (make 2) With MC, ch 72.
1st row: (RS). 1 sc in 2nd ch from hook. 1 sc in each ch across. 71 sc. Turn.
2nd and 3rd rows: Ch 1. 1 sc in each sc across. Turn.
4th row: Ch 1. 1 sc in each sc across. Do not turn.
5th row: Ch 1. Working from left to right, instead of from right to left as usual, work 1 reverse sc in each st across. Fasten off.
Edging: With RS facing, join MC with sl st to last rem loop of foundation ch. Ch 1. Working from left to right, instead of from right to left as usual, work 1 reverse sc in each rem loop across. Fasten off.
Drawstring: With MC, make a chain 42 ins [107 cm] long.
Turn ch sideways and sl st in each ‘bump’ at side of chain. Fasten off.
Weave drawstring through eyelet rnd at top of Bag having ends meet at center front. Knot ends.
APPLIQUE FLOWER
With color 1, ch 2.
1st rnd: 6 sc in 2nd ch from hook. Join with sl st to first sc.
2nd rnd: Ch 1. 2 sc in each sc around. Join with sl st to first sc. 12 sc. Fasten off.
First Petal: 1st row: Join color 2 with sl st to front loop only of any sc. *Ch 1. 2 sc in same sp as sl st. 2 sc in front loop only of next sc. 4 sc for petal. Turn.
Next 3 rows: Ch 1. 1 sc in each sc of petal. Turn.
Next row: Ch 1. (Draw up a loop in each of next 2 sts. Yoh and draw through all 3 loops on hook – sc2tog made) twice. Fasten off.*
Second Petal: **Rejoin color 2 with sl st to front loop of next unworked sc of 2nd rnd. Rep from * to * once.**
Third to Sixth Petals: Rep from ** to ** 4 times more. 6 petals.
Flower A (make 1)
Follow instructions for Applique Flower using MC for color 1 and A for color 2.
Flower B (make 1)
Follow instructions for Applique Flower using C for color 1 and B for color 2.
Flower C (make 1)
Follow instructions for Applique Flower using A for color 1 and MC for color 2.
Flower D (make 1)
Follow instructions for Applique Flower using B for color 1 and C for color 2.
FINISHING
Sew ends of straps on either side of back seam at top of bag, under Top Edging. Sew other ends of straps 3 ins [7.5 cm] on either side of back seam at base.
Pin Applique Flowers randomly on Bag, as shown in picture, and sew in position.
Read NextBuckle Bag Crochet Pattern
Your Recently Viewed Projects
Thanks for your comment. Don't forget to share!
lcarr
Dec 31, 2016
This is really sweet! I can see myself making this as gifts for friends and their little girls. It would make a great bazaar craft as well. There are so many colour options and ways you can change it up. You could even use something like animal or car embellishments and make them for boys too.
PianoMom20
Mar 23, 2013
Ohhh, I want to make this one! Don't know when I'll get to it, but I'm saving the pattern; it has my daughter's name all over it. Is there any way to save a pattern to my Nook, if it's not in one of the free e-books?
laramjohnson12469 2041717
Jan 01, 2013
I made this adorable bag over the New Years Holiday and it turned our soooooo cute! I made some mistakes but was able to compensate for them. I have been teaching myself how to crochet and this bag made me very proud of myself.
lilithiav 2592248
Mar 12, 2012
I really Liked it so that I began to crochet it>>>I'm in the edging step but I have a few question: at first what is the "rem" loop> and secondly in the draw string what is the "bump"..I'm new at the crocheting thing so I'm not expert at it and I son't know all the terms and abbreviations....and thx in advance for responding :)
daugustine78
May 20, 2012
The rem loops are the loops on the underside of chain. They are part of the ch. The bumps are the what the rev sc will form. Also known as the crab stitch. Hope this helps
Lynn Z
Mar 08, 2010
This is so cute and colorful. Adapting this pattern to a full size lapghan should be easy and a good way to use up "short" skeins of yarn I have accumulated. I am a volunteer with a hospital auxiliary, some of whose members crochet and knit year-round. On Christmas Eve, each hospitalized person gets a hand made lapghan wrapped in pretty ribbon. It really seems to cheer them up, especially the bright and colorful afghans.
Report Inappropriate Comment
Are you sure you would like to report this comment? It will be flagged for our moderators to take action.
Thank you for taking the time to improve the content on our site.