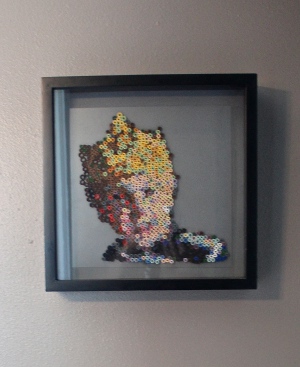
Quilled Photograph
This Quilled Photograph from Maureen Wilson makes for a unique and original art piece. Using small strips of paper, this quilling tutorial teaches you how to create an image that looks distorted up close, but magically becomes clearer from farther away.
Materials:
- Printed pattern
- Cardstock
- Tape
- Sakura Quickie Glue™ pen
- Craft plastic
- Skewer or quilling tool
- Clear spray sealant (recommended)
-
Shadowbox frame
Video:
Instructions:
-
First you’ll need to make a pattern from a photograph. I’m using a free online tool at PerlerBeadsSnapshots.com. It’s meant to be used for Perler iron beads, but it’s also perfect for this project. Follow the directions online to upload your photograph. For best results, choose a picture with a solid background. Select the largest sheet size available so that your picture will have a lot of detail. The tool will create a printable file for you. It even makes a shopping list of the colors you’ll need– but instead of buying beads, buy scrapbook paper to match the sample shades.
-
Print the pattern and tape together. Then tape a piece of clear craft plastic on top of the pattern. You’ll be adhering the paper coils directly to the plastic.
-
For this project, we’re doing the basic quilling technique of creating a tight coil. You can purchase special quilling tools that hold the end of your paper strip for you. If you plan on doing a lot of quilling in the future, you might want to buy one… but it isn’t necessary, and I didn’t use one for this project.
- You can also buy strips of pre-cut paper, but because we want our picture to be as close to the photograph as possible, it’s best to buy individual sheets of paper and cut the strips yourself for a close match. Do not choose specialty paper that has a white core, it needs to be the same color all the way through.
-
Cut your paper into strips that are 1/8 of an inch wide, and about three inches long. You want the finished coil to be the same size as the circles on your pattern.
-
To make a coil, wrap a strip of paper tightly around a barbecue skewer. Roll the paper directly on top of itself like a cinnamon roll.
-
Then scribble on the end of the paper strip with a Quickie Glue™ pen. Press the end of the paper down to finish the coil. Hold for a few seconds until the paper has adhered. You can do this with the coil off or on the skewer, it doesn’t really matter.
-
Color in the coordinating circle on your pattern with the Quickie Glue™ pen. Fill in the dot just like you would on a test, filling it completely. The glue is blue but dries clear, so it’s easy to apply it precisely where you want it. Press the coil down on the plastic and wait for a few seconds to allow it to dry.
-
Coil and glue, filling in all of the dots on your pattern with the correct shade of paper. I decided to make mine 10×10 inches so it could fit in a 12×12 frame with a border.
-
Now you can remove the pattern.
-
It’s a good idea to use a clear spray sealant to complete your project. This adds another light layer of adhesion to prevent any paper pieces from becoming loose in the future. I chose a matte spray to lessen some of the plastic’s shine.
- Mount your finished project onto a sheet of cardstock and frame it. Because this project is dimensional, it’s best to use a shadowbox frame.
Read NextHow to Make Paper Bookmarks
Your Recently Viewed Projects
Thanks for your comment. Don't forget to share!
Report Inappropriate Comment
Are you sure you would like to report this comment? It will be flagged for our moderators to take action.
Thank you for taking the time to improve the content on our site.