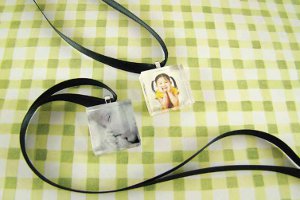
Glass Tile Keepsake Necklace
Keep your loved ones close to your heart with this Glass Tile Keepsake Necklace from Diamond Tech. This picture charm necklace can hold any photo of your choosing and would make creative gifts for mom, grandma, and all the special women in your life!
Materials:
- My Tile Kit 7/8 x 7/8
- Bowl with water
- Paper Towels
- Toaster Oven
- White Felt or White Acrylic Paint and Brush
- Scissors
- Color Laser Printer
- E6000 or other glass and metal adhesive
- Small Silver Bail (Fuseworks # FW855)
- Black Ribbon
DECOUPAGE TECHNIQUE:
- Judi Kins DG3 Art Gel™
- Color Laser Printer
- Card stock or Photo Paper
- Scissors
- E6000 or other glass and metal adhesive
- Small Silver Bail (Fuseworks # FW855)
- Black Ribbon
Instructions:
- Follow the instruction in the My Tile Kit and print your favorite family photo on the transfer paper. We’ve chosen to convert our photo to black and white. For the most economical use of the KrafyBlok™ Image Art, fill the entire page with images before printing.
- Cut around images with a scissors. Drop into clean water and wait until the decal starts to slide from the backing. Remove from water and slide the decal from the backing directly onto the surface of the glass tile.
- Carefully press out air bubbles and pat dry. Allow decal to dry according to package direction before baking.
- Once baked and cooled, either cut a square of white felt and glue it to the back of the stone or paint with several layers of white acrylic paint. Allow to dry.
- Affix the silver bail to the center back of the tile with E6000, and allow drying.
- Place pendant on your favorite chain or satin ribbon.
DECOUPAGE TECHNIQUE:
- Resize your favorite family photo to 7/8” x 7/8”. Print on photo paper or sturdy card stock.
- Once printed, allow ink to set (dry).
- Cut out photo with scissors.
- Use DG3 Art Gel according to directions. Apply a liberal amount of gel to the textured side of the glass square. Apply the photo onto the gel. Allow to dry.
- Coat the exposed bottom of the photo with gel, just enough to cover. Allow to dry completely.
- Affix the silver bail to the center back of the stone with E6000, and allow to dry. Place pendant on your favorite chain or satin ribbon.
Your Recently Viewed Projects

Thanks for your comment. Don't forget to share!
zoyajack
Jul 06, 2012
Thats really amazing creation and this can also be a lovely gift for the loved ones. http://www.greenproindia.com/greentiles.php
Report Inappropriate Comment
Are you sure you would like to report this comment? It will be flagged for our moderators to take action.
Thank you for taking the time to improve the content on our site.