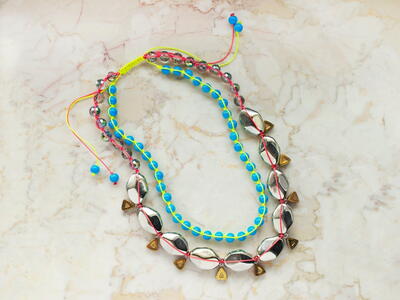
A Hoot and A Holler Necklace
Lovers of fun accessories (and owls!) will love A Hoot and A Holler Necklace from The O'Neil Sisters! This fun DIY necklace is easy to make and is a great way to show off all your favorite beads. You can also make beautiful beads out of clay to give your necklace a unique look.

Materials:
- Studio By Sculpey Oven-Bake Clay: Nutmeg #6782, Clover #6461, Denim #6576
- Studio By Sculpey Texture Makers: Spring Morning, Chantilly Lace, Swirls & Scrolls
- Inkadinkado Clear Stamp: Butterflies and Birds #98771, Owl Inchie
- Small clear alphabet stamps
- Beading wire, .30 mm, gold or copper color, 18”
- Copper wire, 20 gauge, 18”
- Toggle clasp set, Antique Copper, Bali Style, 16 mm
- Copper crimp beads and crimp covers, 4 pairs
- Copper doughnut spacer beads, 4 mm, 21
- Copper daisy spacer beads, 6 mm, 6
- Copper barrel beads, 6 mm, 5
- Round crystal beads, 8 mm, peach, 7
- Round crystal beads, 8 mm, sapphire, 4
- Bicone crystal beads, 6 mm, olive green, 6
- Bicone crystal beads, 4 mm, olive green, 2
- Bicone crystal beads, 4 mm, sapphire, 2
- Studio by Sculpey Antiquing Medium Chocolate Brown, 4 oz
- Studio by Sculpey Satin Glaze, 2 oz
- Studio by Sculpey Super Slicer
- Studio by Sculpey 5-in-1 Clay Tool
- Studio by Sculpey Acrylic Roller
- Spray bottle
- Deck of playing cards
- Packing tape
- Straight pins
- Cookie sheet
- Aluminum foil
- Craft paintbrush
- Paper towels
- Goop Adhesive
- Round-nose pliers
- Chain-nose pliers
- Wire cutters
Instructions:
-
Crinkle a sheet of aluminum foil, flatten it back out a little, and use it to cover half of a cookie sheet. Cover the other half with a flat sheet of aluminum foil.
-
To make the flat textured lentil beads, cut one section of Denim clay with the straight slicer and cut that piece into fourths. Roll each fourth in your palm to make a ball. Spritz the texture makers with water. Set the ball onto a texture maker and place another texture maker on top. Press down to flatten the bead into a lentil shape. Remove the top texture maker, wet a straight pin, and while the bead is still attached to the bottom texture maker, wiggle the straight pin though the bead from the side to make a hole. Remove the pin and place the bead onto the crumpled aluminum foil on the cookie sheet. Repeat to create two Nutmeg and one Clover textured beads.
-
To make the small round beads, cut one section of the Clover and one section of the Denim clay. Cut each section into 8 equal pieces. Roll one section into a ball in the palms of your hands. Wiggle a wet straight pin through the ball. While the ball is on the pin, texture the bead with the 5-in-1 Clay Tool using the metal ball end. Slide the bead off the straight pin and place on the crumpled aluminum foil on the cookie sheet. Repeat to make five Clover and one Denim texture beads.
-
To make the owl pendant, cut one section of the Denim clay. Soften the clay in your hands and place on your work surface. Place two stacks of 13 cards* on your work surface on either side of the clay. Roll out the clay with the acrylic roller placing the roller ends on top of the card stacks. Spritz the Inchie stamp with water. Place the Inchie face down on the clay. Trade the 13-card stacks for 9-card stacks and roll the Inchie into the clay. Set the card stacks aside, and with the Inchie still on the clay, trim the pendant with the straight slicer. Remove the Inchie and cut around the pendant with the wavy cutter. Carefully lift the pendant with a single playing card and place on the smooth foil part of the cookie sheet.
-
To make the “HOOT” bead, cut one section of the Nutmeg clay. Roll it out 9 cards high. Spritz the letter stamps with water. Press H-O-O-T into the clay. Cut the bead around the word into a rectangle with the straight slicer. Poke a hole in both ends with the 5-in-1 Clay Tool using the pointer tip. Spritz the lace texture maker with water and gently press on the surface to add some texture. Carefully lift the bead with a single playing card and place on the flat part of the cookie sheet. Bake the beads at 275º F for 30 minutes and let cool.
-
Antique each bead one at a time by painting it with the Antique Medium, then immediately wiping the surface with paper towel. Let the beads dry completely, then paint each one with a coating of Satin Glaze.
-
Make a bail for the owl pendant with a 3” piece of copper wire. Use the round-nose pliers to make a wrapped loop through the circle piece of the toggle clasp. Twist the other end into a spiral and use the Goop to glue the spiral flat to the back of the owl pendant. Let dry.
-
Cut a 3” piece of copper wire and feed one end through the loop on the toggle circle and secure with a wrapped loop. Feed 1 daisy spacer, 1 green round Sculpey bead, and 1 daisy spacer onto the wire. Finish the end with a wrapped loop. Cut another 3” piece of copper wire and feed it through the last loop and use it to create an identical spacer-bead-spacer component. Repeat until you have three linked components attached to your necklace.
-
Cut an 11” piece of beading wire. Feed a crimp bead onto the end of the wire, feed the end through the last loop of the last component, then back through the crimp bead. Press the crimp bead closed with the chain-nose pliers. Trim the excess wire and cover with a crimp bead cover. String the beads as shown in the picture. Finish the end with a crimp bead and cover.
-
Cut a 3” piece of copper wire and feed one end through the beading wire loop on the strung beads. Secure with a wrapped loop. Feed 1 sapphire bicone crystal, 1 round peach crystal, and 1 sapphire bicone crystal onto the wire. Feed the end through the “HOOT” bead and finish the end with a wrapped loop.
-
Cut another 3” piece of copper wire and feed it through the “HOOT” bead and secure with a wrapped loop. Feed 1 small olive bicone crystal, 1 round sapphire crystal, and 1 small olive bicone crystal onto the wire. Finish the end with a wrapped loop.
- Cut a 7” piece of beading wire. Feed a crimp bead onto the end of the wire, feed the end through the last loop of the last component, then back through the crimp bead. Press the crimp bead closed with the chain-nose pliers. Trim the excess wire and cover with a crimp bead cover. String the beads as shown in the picture. Slide a crimp bead onto the end, then slide the end through the bar piece of the toggle clasp, then back through the crimp bead. Press the crimp bead closed, trim the end, and cover with a crimp bead cover.