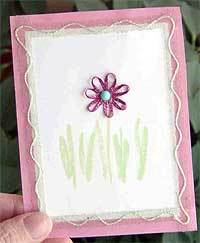
Vintage Print Sewn Notecard
This free notecard project from Baby Lock involves everything from sewing to quilting and even scrapbooking. It's a beginner level project that you will love to make. Great gift for Mother's Day. Combine you sewing skills and paper crafts to create some adorable Mother’s Day crafts. This how to sew on paper tutorial shows you how to create a mixed media paper craft project. The combination of paper and fabric textures add interest to this already adorable floral craft idea.
It is insanely easy to personalize this project, as well. Just find a charming sentiment that your mom will love to add to this card. If one craft project is not enough, this homemade card could easily be added to another gift.


Find even more Mother's Day Crafts in our free DIY crafts eBook: Crafts for Mom: 30 Free Craft Projects for Mother's Day.
Materials:
- Baby Lock Sewing Machine
- Baby Lock edge joining foot (ESG-EJF)
- All-purpose thread to match or contrast with fabrics
- 3 fat quarters of reproduction 1930’s prints
- Package of note cards with cut-out window (found at a local hobby or scrap booking supply store approximately 4” x 5 ½”)
- Additional sheets of decorative scrap book paper
- Rotary cutter, mat and ruler
- Pinking blade for cutter or green mini rickrack trim
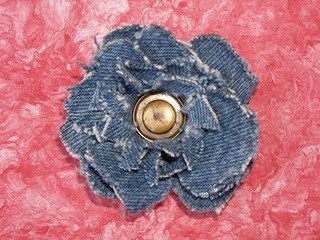
- Vintage shirt buttons (two for each card)
- Hand sewing needle
- Fabric marking pencil or pen
- Glue stick
Instructions:
For each card:
- Using the rotary cutter, mat and ruler cut two 1” x 18” strips from each of the three fat quarters.
- Thread the machine and select a zigzag stitch. Attach the edge joining foot.
- Align one fabric strip on each side of the metal guide on the foot.
- Zigzag the strips together.
- Attach the third strip to the first two in the same manner. Remember to place the edge of the fabric against the metal guide. Set aside.
- Stitch the remaining three strips together in a different color pattern combination than the first set.
- Press both strips. Using the Rotary cutter, mat and ruler cut the strips in half so they measure 3” x 9”.
- Stitch two strips together to form a 6” x 9” strip.
- Stitch the remaining two strips together to form another 6” x 9” this time with a different color combination.
- Using the rotary cutter mat and ruler cut 1” strips.
- Arrange the 1” strips into a pleasing color pattern.
- Sew the strips together using previous method.
- Position the card front over the top of your pieced fabric, cut a piece to fit behind the window.
- Trim a piece of decorative paper to fit the inside of the card.
- Using the glue stick secure the fabric to the wrong side of the decorative paper.
- Glue the fabric to the inside of the card, so that the fabric shows through the cut-out window and the decorative paper can be seen inside the card.
- Using the rotary cutter with a pinking blade cut a 7” strip 1/8” to 1/4” wide for the flower stems. You can also use mini rickrack trim for this step.
- Cut two circles from the remaining fabric. One approximately 2” the other slightly larger.
- Thread the hand needle with a double thread and knot the ends together.
- Make 1/4" long running stitches around the circle circumference and close to the folded edge.
- Stitch completely around the circle, and then gently pull the threads to gather the stitched edge toward the center.
- Spread out the gathers evenly, and take a few stitches to secure the threads.
- Bring the needle down through the gathers and up through the yo-yo opening. Make a knot close to the fabric. Clip the thread ends.
- Position the flower stems and the flowers as desired on the card. glue the stems in place. Use a little glue to keep the yo-yo flowers in position.
- Using the button fitting foot attach the vintage shirt buttons to the center of the yo-yo flowers.
- Repeat these steps for additional note cards.
- Don’t forget to write a personal note for the recipients!
Read Next101+ Mother's Day Crafts for Adults