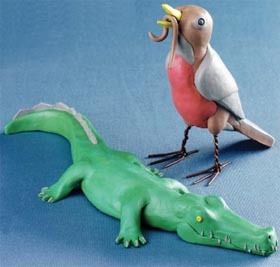
Past i Clay Alligator and Robin
Create fun animal shapes with Past-i-Clay and fun wire.
By Jake Linville for AMACO
Materials:
- AMACO® Plast-i-Clay®; one stick each of: Green, Yellow, Gray
- Craft knife
- Pencil
- AMACO® Plast-i-Clay®; one stick each of: Brown, Gray, Red, Yellow
- AMACO® Fun Wire™ — Brown
- Aluminum foil
- Needle nose pliers
- Craft knife
Steps:
Note: All photos and diagrams are displayed at the end of the instructions.
Alligator Instructions
- Mark the center of the stick of Green Plast-i-Clay® (see “A” on Top View diagram). Make a Mark at one end of the stick in the center (see “B” on Top View diagram) and two marks at the other end (see “C” on Top View diagram).
- Make two cuts from “A” to “B” to make a point for the tail. Mark across the stick about 1/4 from the other end (“D”). Make two cuts from “C” to “D” for the head.
- Make a mark at each end of the stick, about halfway down (see “E” on Side View diagram). Cut the stick horizontally ONLY FROM “A” TO “E” AND FROM “E” TO “D”. The stick should now be thicker in the middle than the ends.
- Smooth the squared edges and any cut marks. Bend the stick into an “S” shape with the tail end more curved than the head.
- Using the knife or your fingers, build up areas over the eyes, nose, jaw, and back of the head (see photo). Take the remaining Green Plast-i-Clay® and roll into a log then cut into fourths for legs. Attach legs to the body, rubbing with finger to blend into the body, press the ends flat, then cut out toes.
- Using the sharp end of a pencil, make holes for the eyes and press small balls of Yellow Plast-i-Clay® into the sockets. Press Yellow balls with pencil to create eyes. Make holes in the end of the nose for nostrils. Starting under one eye, make a cut toward the nose, under the nose, and around under the other eye for the mouth (see photo).
- Make teeth, nails, and scales on back of tail with Gray Plast-i-Clay® (see photo).
Robin Instructions
- Cut a stick of Brown Plast-i-Clay® in half (2½" long). Cut one of the halves lengthwise into four equal sheets. Shape piece(s) of aluminum foil to make “chest, belly and tail” (see diagram “A”). Using the foil shape as an armature, form the four sheets of Brown Plast-i-Clay® around the outside. Be sure to cover evenly.
- Cut four 2" lengths of Brown Fun Wire™ and two 4" lengths. Take two of the two inch lengths and wrap one around the other (see diagram “B”). Take one of the four inch lengths, bend it in half, then wrap around the already prepared two inch length continuing upward until wire is completely wound (see diagram “C”). Tighten with pliers for a firm hold. Repeat to make second leg.
- Make three balls with Brown Plast-i-Clay®, one about the size of a golf ball and the other two the size of marbles. Cut a 2" length of Brown Fun Wire™. Press one end of the wire into the neck of the body leaving 1" exposed. Press the large ball of clay onto the wire. Roll out a piece of Brown Plast-i-Clay® about the diameter of a pencil to wrap around neck. Smooth seams with fingers to connect head with body.
- Attach the two smaller balls of clay at the base of the body for “hips”. Secure them by pressing wire legs through “hips” and into the body. Cover seams with strips of Brown clay and smooth with fingers just like the neck.
- Cut a sheet of Brown clay (from remaining stick in step 1) that is ¾" wide and " thick for the tail. Cut a sheet of Gray clay the same size. Press the brown sheet to the underside of the body, extending out from the body, then blend into the body with fingers. Cut a “V” shape from one end of the Gray sheet (see diagram “D”). Press on top of brown tail, aligning straight end with brown tip of tail and “V” end at base of body. Do not blend to the body. Draw a line with knife from the “V” to the end of the tail (see diagram “D”). The tail and two legs form a “tripod” to balance the robin while standing.
- Flatten out a sheet of Gray clay and cut out shapes E, F, and G after enlarging the illustrations on a copier. Place shape “E” under the tail and between hips and press into place. Flatten out a thin sheet of Red clay to cover chest and belly. Press shape “F” under throat and press into place. Press shape “G” (wings) on back and wrap around until both sides touch red chest. Draw lines in wings with knife to indicate feathers.
- Cut a 2" length of wire and bend in half for beak. Press the folded end into head and cover exposed ends with Yellow clay. Using the sharpened end of a pencil, make holes in head for eyes about the diameter of the pencil. Roll two balls of Gray clay and place into sockets. Press pencil into Gray clay balls to create an opening for eyes. Mix equal parts of Red and Green (or Red and Blue) to make a dark gray for eyes. Roll two small balls of dark gray and press into eye rings. Roll out a small string of brown or red clay for worm and place into the robin’s beak.
Note: Illustrations A, D, E, F and G are for shape only. Enlarge to desired size before shaping or cutting clay.
Read NextFresh Faced Bookend