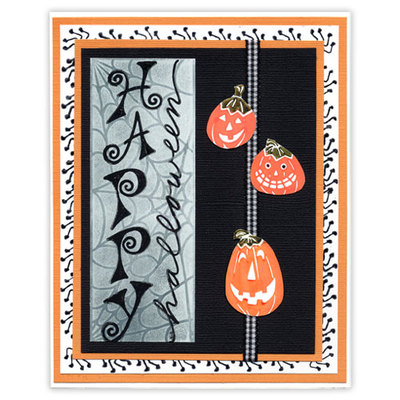
Happy Halloween Pumpkin Card
Spider legs peak out from a fun border around Halloween jack-o-lanterns in this spooky card from Posh Impressions. Whip up a few of these to invite friends to a Halloween bash.

Materials:
- Posh Limited Vertical Inspirations “Halloween” Set
- GridLine Acrylic Block
- Glossy white and matte cardstock
- Light orange textured card stock
- Black cardstock
- White Crack ‘n Peel
- Dee Gruenig Blending Box
- Shades of Gray
- VersaMark
- Stazon Black
- Brilliance Graphite Black Ink Pads
- Strip of ribbon (I used a black and white check 7 inches in length.)
- Dee’s Brush Art Markers in orange and light green
- Cotton ball
- Adhesive
Steps:
- Use a scrap of glossy white cardstock and ink the spider web background stamp with VersaMark and set aside to dry. (I let the image dry overnight; however, you could use your heat tool.) When the spider background is completely dry, use a cotton ball to pick up ink from the Blending Box Shades of Gray and smear the card with color until the image appears. The resist effect is perfect for a subtle background for the final “Happy Halloween” imprint.
- Ink the HAPPY HALLOWEEN greeting with Brilliance Graphic Black and over stamp the spider image. (NOTE: This is where the Gridline acrylic block works well for perfect, straight placement down the center. I like to heat set the message to avoid smearing until it is thoroughly dry.)
- Cut a piece of glossy white cardstock 6 inches by 4-3/4 inches. Ink the spider image with Black Stazon and stamp a border using the edge of the image with wider spaces between the legs for the border. (NOTE: I found it easier to stamp the corners first at a diagonal and then stamp the image along each side. For the length, I stamped the spider in the center of the panel and then filled in on each side. It took nine impressions for the long side of the card and six for the short ends.)
- Using a scrap of white Crack ‘n Peel, ink the pumpkin images (one at a time) with orange and green markers and stamp each as shown. For the center pumpkin, I colored in the eyes with a black marker after the impression was dry. Cut out images.
- To assemble the card, cut two light orange cards — one 6-1/4 by 5 inches and one 5-1/2 by 4-1/4 inches for borders. Cut a black card 4 by 5-1/4 inches and a strip of ribbon 7 inches in length. Remember to attach the ribbon around the first two layers (black and orange) before you attach it to the white spider leg white card. Layer as shown and attach the pumpkins to the ribbon to complete the card front. Attach to a folded white matte card.
Read NextCreepy Googly Eyes Topiary