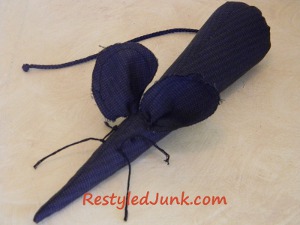
Creepy Sewn Rats
If you're looking for easy Halloween craft ideas for decorating your home, look no further than these Creepy Sewn Rats. This free sewing pattern is quick and perfect for beginners. You can even save money on materials by using scraps from your own fabric stash.
Materials:
- Card stock, standard-size sheet
- Ruler
- Pencil
- Scissors
- Compass
- Black cotton fabric, small amount
- Tailor's chalk
- Straight pins
- Sewing machine
- Stuffing
- Black cording
- Sewing needle and black thread
- Small, pointed scissors
- Craft glue
- Wooden skewer
- Embroidery needle
- Black crochet thread
Instructions:
-
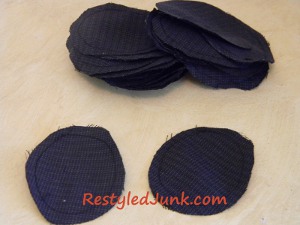
Fold an 8 1/2-inch wide by 11-inch long sheet of card stock in half, matching the long edges. Lay the folded rectangle with the folded edge running horizontal and at the bottom. On the right-hand edge measure up 1/4 inch from the folded edge. Mark the edge at this measurement. Line up a ruler from the right-hand mark to the top left-hand corner. Trace along the ruler's edge. Cut along the line through both thicknesses of the paper. Unfold the paper. The resulting triangle is the pattern for the rat's body. Using a compass, trace a 3-inch circle on card stock and cut out. This is the pattern for the ears.
-
Place the patterns on black cotton fabric and trace around them using tailor's chalk. You will need one body and two ears. Cut out the shapes inside the traced lines.
-
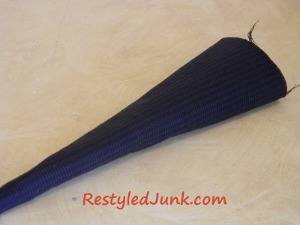
Fold the body triangle in half with long edges matching and the right sides together. Pin the long edges and sew using a 1/4-inch seam allowance.
-
Trim away the excess seam at the tip. Turn the body right side out and stuff.
-
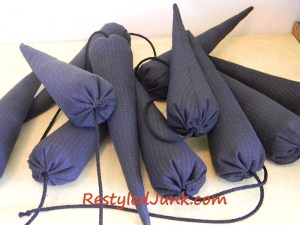
Cut a 12-inch length of black cording for the tail. Tie an overhand knot on each end.
-
Fold 1/4 inch of the opening's edge to the inside of the body. Using black thread, hand sew a running stitch around the opening. Pull the thread to gather, leaving a 1/2-inch opening. Apply craft glue inside the opening. Insert one knotted end of the tail. Continue to pull the thread to gather the opening closed. Knot and cut the thread.
-
Sew a straight stitch around each ear, 1/4 inch from the edge.
-
Lay the rat body on your work surface with the seam facing up and centered. Face the point toward you. Measure 4 inches back from the tip. Using small, pointed scissors, clip 1/4-inch slits 1/4 inch on each side of the seam.
-
Insert the nozzle on the craft glue bottle into one cut slit and squeeze in a dot of glue. Lay one edge of an ear over the slit. Place the blunt end of a wooden skewer on the ear's edge. Push down to insert the ear's edge into the slit. This gathers the bottom to shape the ear and attaches the ear to the body. Repeat with the remaining ear.
-
Measure 3 1/2 inches from the tip of the rat. Using an embroidery needle and black crochet threads, stitch one French knot 1/4 inch on each side of the seam for the eyes.
- Thread an embroidery needle with a double-strand of black crochet thread for the whiskers. Measure 3 inches from the tip of the rat. Insert the needle 1/4 inch from one side of the seam and out 1/4 inch on the other side. Extend the thread 2 inches from each insertion and cut. Separate the strands on one side of the nose. Tie a knot against the nose to secure the whiskers. Repeat on the other side of the nose.
Read NextDIY Halloween Polka Pumpkins