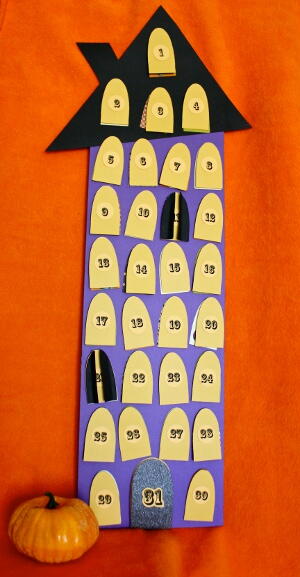
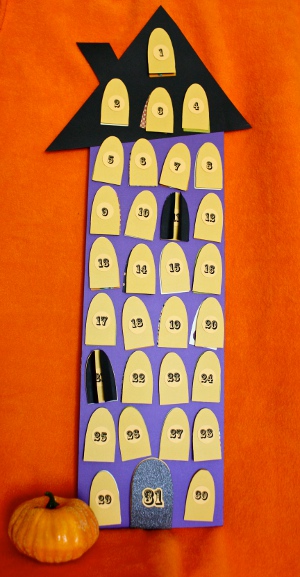
Countdown to Halloween Calendar
Count down the days to Halloween with this adorable Countdown to Halloween Calendar from Maureen Wilson. Fill each hole with a treat or family activity and celebrate the sweetness of fall all month long! This is a great project to do with the whole family, and a fun way to count down the days to any holiday or celebration.
Materials:
- Board (mine is 7 x 24 inches)
- Cardstock or Halloween print wrapping paper
- Printed or stamped numbers
- Window die cut (optional)
- Magnet tape roll (approx 24 inches)
- Double-sided adhesive
- Photos, stamps, etc.
Video:
Instructions:
-
Begin by covering your board with paper. I’m using Bazzill extra large cardstock that comes in sheets that are 12×24 inches. You could also use wrapping paper, but be aware that it will probably discolor over the years as it isn’t acid-free. Use double-sided adhesive, and trim off any excess paper.
-
Cut a triangle from black cardstock to make a roof. I chose to cut mine at a funny angle so it looks like the roof is askew. Cut a rectangle for the chimney.
-
Add the windows next. I chose to cut 30 windows and 1 door, for a total of 31 days. I used a die cut to make these windows, but you could also just cut rectangles. Adhere to the board.
-
Decorate the windows with photos, stamps, or stickers. You can write fun fall activities on some, like “go to a straw maze,” or “carve pumpkins.
-
Next make the countdown windows. I chose to make mine yellow. I printed out numbers and adhered one to each window. You could also use stamps, or just write them with a marker.
-
You can add dimensional shutters to a couple of your windows, by cutting a black window in half. Adhere one half to each side of the window, and fold back the paper to reveal the number.
-
Cut tiny magnet pieces from a roll of magnetic tape. You can buy this in the craft section and a roll costs around $3. Adhere one magnet to the top of each window on your board, and add another magnet to the back of each countdown window.
-
Put each countdown window over the background windows. Remove one for each day in October.
- I taped an envelope to the back of my board to store the windows as they’re removed.
Read NextDollar Store Floral Wire Pumpkins