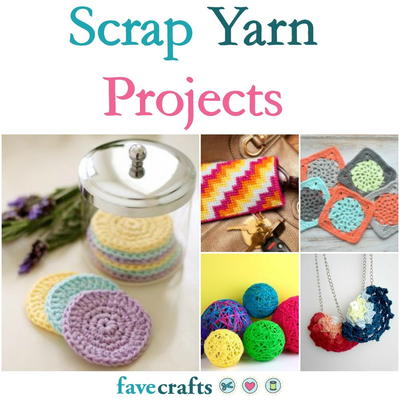
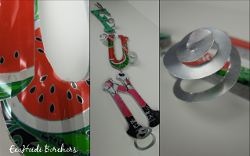
Soda Can Letter Art
If you're interested in making your own crafty wall decor, look no further than your recycle bin. Instead of throwing away an empty aluminum can, create Soda Can Letter Art from Heidi Borchers. You can spell out a word or phrase that motivates and excites you.
Materials:
- Aleene’s 7800 Adhesive
- Drink cans (soda, tea, etc.)
- Wood alphabet letters
- Acrylic paint (to complement soda can colors)
- Paint brush
- Scissors (dollar store scissors are best)
- Craft knife
- Craft foam sheet
- Stylus
- Circle template
- Wax paper
- Brick (1 for each letter)
- Eye pins
- Large jump rings
- Jewelry pliers
- Wet wipe
Instructions:
-
Paint wood letters. Set aside to dry.
-
Cut tops and bottoms from cans using craft knife to carefully punch through top and bottom sides and scissors to cut away top and bottom. Cut down side to open can.
-
Save the tops and bottoms for other projects :)
-
If needed, use a wet wipe to clean inside of can.
-
Place can right side up on craft foam sheet. Place alphabet letter on top of can – moving it around until you have it placed over desired design area. Hold letter firmly in place and use stylus to trace outline of letter onto can.
-
Cut out letter along embossed pattern line. Be sure to cut smooth lines so that no sharp edges remain. It’s those little jagged edges that can be sharp so take your time in cutting out the letters very carefully and smoothly and be sure to round all corner edges.
-
To add texture to your can letter, lay the letter on craft foam and use the stylus to draw light long lines on wrong side. Turn over and repeat on printed side. This will help the letter to lay flat.
-
To add swirls to your letters, draw round circles onto soda can piece with stylus. Cut out circle with scissors.
-
To create swirl, you are going to cut a 1/8″ strip from the circle. Do this by gradually cutting into the circle until you reach the 1/8th inch mark. Continue cutting the strip until you reach the center. (My video gives you a great detail on this step!)
-
Apply glue to front of wood letter. Lay soda can letter into glue. Insert end of swirl between wood letter and soda can letter – add a dab of glue if needed.
-
Place letter on firm work surface. Place piece of waxed paper over soda can letter and then place brick on top of letter. Keep brick in place until glue dries.
- Screw eye pins in top and bottom of letters (placement will be determined by letters used) and join with jump ring.
Read NextRecycled DIY Toothpaste Tube Pouch
Your Recently Viewed Projects
Thanks for your comment. Don't forget to share!
SheLikesHats
Jul 18, 2016
What a cute project! I'm constantly recycling cans, now I might save a few for crafting.
Report Inappropriate Comment
Are you sure you would like to report this comment? It will be flagged for our moderators to take action.
Thank you for taking the time to improve the content on our site.