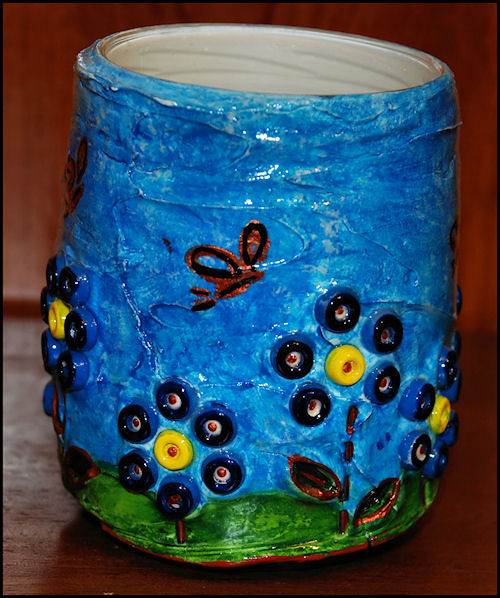
Repurposed Glass Jar to Colorful Catch All
Do you love to keep decorative jars in the house for spare change, loose pens, or even wrapped candies? With this craft by Alyice Edrich you can save the planet by repurposing an old food jar and create something beautiful for your home in the process.
This particular jar was created with children in mind, but even adults enjoy it. You can use the same process to create an abundance of looks and styles; using everything from personal mementos to dollar store finds.
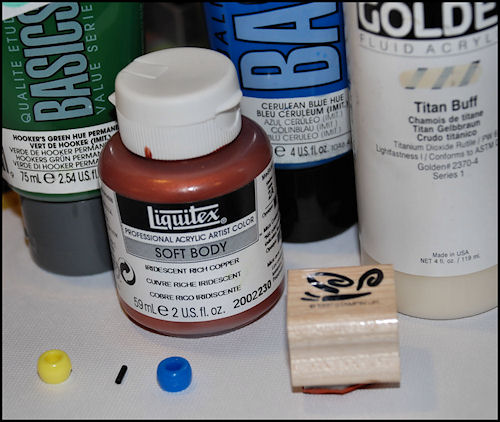
Materials:
- Empty glass food jar, wide mouth
- White Gesso Paint by Liquitex
- Wallboard Joint Compound (purchased at local hardware store)
- Acrylic paints: blue, green, copper, titanium buff, black
- 40 blue plastic beads
- 8 yellow plastic beads
- 24 thin black beads
- 8 tiny paper leaves (from scrap paper)
- Clear Acrylic Spray
- Napkin
- 2 Tb of waterButterfly rubber stamp
- Artist's spatula
- Wide tipped paint brush
- Medium tipped paint brush
- Thin tipped paint brush
-
Paint dish
Instructions:
- Using scrap paper, cut 8 tiny leaves.
- Wash, rinse, and dry a wide mouth glass food jar.
-
Paint the outside of the jar with Gesso. Let dry. (Do not skip this step. The Gesso has an additive that gives the glass jar "tooth". In other words, it gives the joint compound something to hold onto.)
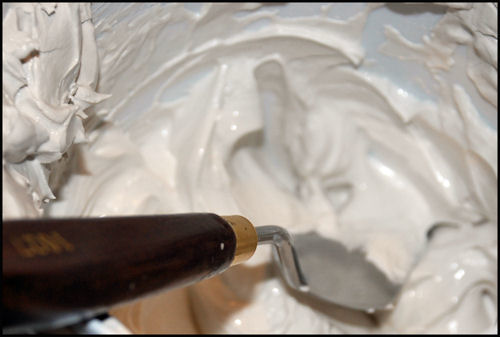
- Use artist's spatula to spread an even layer of joint compound on the outside of the jar. (Do not put any joint compound on the bottom of the jar, or inside the jar.)
-
Press the beads into the joint compound while it is still wet. Start by creating the first flower. Press a yellow bead into the joint compound where you want the center of the flower to be. Then place five blue beads around the flower. Next, create a stem using the thin black beads. Continue creating the flowers until you've gone completely around the jar, alternating between one short flower and one tall flower. Finally, add the leaves to the tall flowers, one leave on each side of the stem.
- Let the jar dry overnight. It usually takes joint compound anywhere from 24 to 48 hours to completely dry. (It all depends on the humidity in your area).
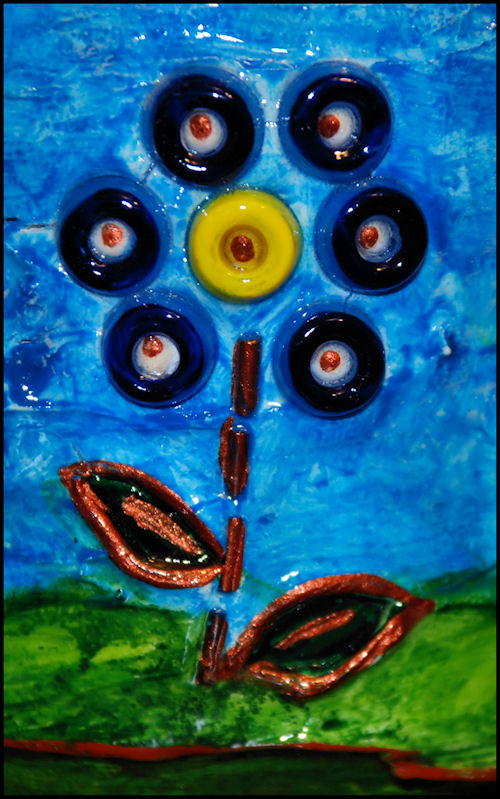
- Place blue acrylic paint in a small dish, then add 1 Tb of water to create a wash. Use a large paint brush to paint the entire outer surface of the jar. (Wipe off any paint that gets on the beads using a dry napkin.) Let dry. You can repeat this process for a darker blue or to create a two dimensional effect by having light blue in some spots and dark blue in other spots. Just make sure you allow the paint to dry between coats.
- Dip a very dry brush into the Titanium Buff paint, then dab the brush onto a napkin to remove most of the paint. Next, dry brush the sky. Be very careful, you just want to have a hint of this color in the sky. If you put too much, just wipe it off with a damp paper towel, let dry, and try again.
- Place green acrylic paint in a small dish, then add 1 Tb of water to create a wash. use a medium sized paint brush to paint the bottom of the jar as well as the very bottom of the sides of the jar. (This will be your grass, the place where your flowers take root.) Let dry.
- Use a thin tipped paint brush to paint the leaves. Don't use the wash, use the green directly out of the tube. Let dry.
- Use the thin tipped paint brush to paint Titanium Buff inside each bead. Let dry.
- Dip the back end of the thin tipped paint brush into the copper paint, then create a dot in the center of each bead. Let dry.
- Use the thin tipped brush to outline the leaves and the stems in copper paint. Let dry.
- Place copper paint on the butterfly stamp and stamp the image into the sky area of the jar. Let dry.
- Once the butterfly is dry, outline it with black paint. Let dry.
- Take your jar outside, place it upside down on used newspaper, and spray with acrylic sealer. You may have to apply 2 to 3 thin coats to get a good seal. Just make sure you allow each coat to dry for about an hour, otherwise the paint may smear.
Read NextMason Jar Vase

![Pill Bottle Crafts: Reuse Pill Bottles [15 Ideas]](http://irepo.primecp.com/2017/06/334076/PILL-BOTTLE-CRAFTS-Header_Category-CategoryPageDefault_ID-2274135.jpg?v=2274135)