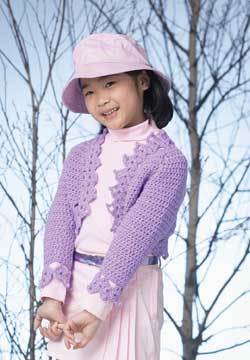
Children's Cord Sweater
Create a colorful cord sweater for your child with this free crochet pattern for children. Rainbow braids give this sweater a way to stand out from the rest!
Sizes: Child's 4 (5, 6, 7)
Finished Measurements:
Chest 26 (27, 28, 29)"/ 66 (68.5, 71, 73.5) cm
Length 14 (14 1/2, 15, 15 1/2)"/ 35.5 (37, 38, 39.5) cm, excluding braided cords
Materials:
- Caron International's Simply Soft Brites
- Caron International's Simply Soft (100% acrylic; 6 oz/170 g, 315 yds/288 m skein): 2 (2, 3, 3) skeins (A).
- (100% acrylic; 6 oz/170 g, 315 yds/288 m): 1 skein B; 1 skein C; 1 skein D; 1 skein E, for all sizes.
- Shown in: #9710 Country Blue (A); #9605 Mango (B); #9607 Limelight (C); #9610 Grape (D); #9604 Watermelon (E).
- One each size US G-7 (4.5mm) and US F-6 (4.0mm) crochet hooks, or size to obtain gauge.
- Embellish-Knit! automatic spool knitter
- Yarn needle
GAUGE:
In single crochet worked in front loops only, using US G-7 (4.5mm) hook, 16 sts and 15 rows = 4"/10 cm.
STITCHES USED:
Chain (ch), half double crochet (hdc), single crochet (sc), slip stitch (slip st)
SPECIAL TERM:
sc2tog: Single crochet 2 together – Insert hook in next stitch, yarn over and pull up a loop, (two loops on hook), insert hook in next stitch, yarn over and pull up a loop (three loops on hook), yarn over and draw through all three loops on hook.
NOTE:
All stitches are worked in front loops only throughout Sweater, except where otherwise noted. In the last stitch of every row, work through both loops for stability.
BACK:
With larger hook and A, chain 53 (55, 57, 59).
Row 1: Sc in second ch from hook and in each remaining ch across, turn—52 (54, 56, 58) sc.
Row 2: Ch 1, working in front loops only, sc in each st across to last st, sc through both loops of last st (for stability), turn.
Rows 3–34 (35, 36, 37): Repeat Row 2.
Shape Armhole
Note: Continue to work in front loops only throughout, working last st of every row through both loops (for stability).
Row 1: Ch 1, slip st in first 2 sts, sc in next 48 (50, 52, 54) sts; leave remaining sts unworked, turn—48 (50, 52, 54) sc.
Row 2: Ch 1, sc2tog, sc in next 44 (46, 48, 50) sts, sc2tog, turn—46 (48, 50, 52) sts.
Row 3: Ch 1, sc2tog, sc in each st to last 2 sts, sc2tog, turn—44 (46, 48, 50) sts.
Row 4–17 (18, 19, 20): Ch 1, sc in each st across, turn.
Shape First Shoulder
Row 1: Ch 1, sc in first 9 (10, 10, 11) sts; leave remaining sts unworked (for neck and second shoulder), turn.
Row 2: Ch 1, sc2tog, sc in each st across, turn—8 (9, 9, 10) sts. Fasten off.
Shape Second Shoulder
Row 1: Skip next 26 (26, 28, 28) unworked sts at neck; join A with slip st in next st, ch 1, sc in same st, sc in remaining sts across, turn—9 (10, 10, 11) sts.
Row 2: Ch 1, sc in first 7 (8, 8, 9) sts, sc2tog—8 (9, 9, 10) sts. Fasten off.
FRONT
Work as for Back to Armhole Shaping——52 (54, 56, 58) sc.
Note: Continue to work in front loops only throughout, working last st of every row through both loops (for stability).
Shape Armhole
Rows 1–10 (11, 12, 13): Work Rows 1–10 (11, 12, 13) of Back Armhole Shaping—44 (46, 48, 50) sts.
Shape First Shoulder and Neck
Row 1: Ch 1, sc in first 15 (16, 16, 17) sts; leave remaining sts unworked (for neck and second shoulder), turn.
Row 2: Ch 1, slip st in first 4 sts, sc in each st across, turn—11 (12, 12, 13) sc.
Row 3: Ch 1, sc in first 9 (10, 10, 11) sts, sc2tog, turn—10 (11, 11, 12) sts.
Row 4: Ch 1, sc2tog, sc in each st across, turn—9 (10, 10, 11) sts.
Row 5: Ch 1, sc in first 7 (8, 8, 9) sts, sc2tog, turn—8 (9, 9, 10) sts.
Rows 6–9: Ch 1, sc in each st across, turn.
Fasten off.
Shape Second Shoulder and Neck
Row 1: Skip next 14 (14, 16, 16) unworked sts at neck; join A with slip st in next st, ch 1, sc in same st, sc in remaining sts across, turn—15 (16, 16, 17) sts.
Row 2: Ch 1, sc in first 11 (12, 12, 13) sts; leave remaining sts unworked, turn.
Row 3: Ch 1, sc2tog, sc in each st across, turn—10 (11, 11, 12) sts.
Row 4: Ch 1, sc in first 8 (9, 9, 10) sts, sc2tog, turn—9 (10, 10, 11) sts.
Row 5: Ch 1, sc2tog, sc in each st across, turn—8 (9, 9, 10) sts.
Rows 6–9: Ch 1, sc in each st across, turn.
Fasten off.
SLEEVE (make 2)
Note: Work in front loops only throughout, working last st of every row through both loops (for stability).
With larger hook and A, chain 29 (29, 31, 31).
Row 1: Sc in second ch from hook and in each remaining ch across, turn—28 (28, 30, 30) sc.
Row 2: Ch 1, 2 sc in first st, sc in each st to last st, 2 sc in last st, turn—30 (30, 32, 32) sts.
Rows 3–11: Ch 1, sc in each st across, turn.
Row 12: Repeat Row 2—32 (32, 34, 34) sts.
Rows 15–32: Repeat Rows 3–12 twice—36 (36, 38, 38) sts.
Rows 33–36 (36, 37, 37): Ch 1, sc in each st across, turn.
Shape Cap
Row 1: Ch 1, slip st in first 2 sts, sc in next 32 (32, 34, 34) sts; leave last 2 sts unworked, turn—32 (32, 34, 34) sc.
Row 2: Ch 1, sc2tog, sc in next 28 (28, 30, 30) sts, sc2tog, turn—30 (30, 32, 32) sts.
Row 3: Ch 1, sc2tog, sc in each st to last 2 sts, sc2tog, turn—28 (28, 30, 30) sts.
Rows 4–8 (7, 7, 6): Repeat Row 3 5 (4, 4, 3) times—18 (20, 22, 24) sts.
Row 9 (8, 8, 7): Ch 1, sc in each st across, turn.
Row 10 (9, 9, 8): Repeat Row 3—16 (18, 20, 22) sts.
Rows 11 (10, 10, 9)–14 (15, 15, 16): Repeat last 2 rows 2 (3, 3, 4) times—12 (12, 14, 14) sts.
Row 15 (16, 16, 17): Ch 1, sc in each st across. Fasten off.
FINISHING:
With WS facing, sew shoulder seams. Set in sleeves.
Neckband
With RS facing and smaller hook, join A with slip st in either shoulder seam at neck.
Round 1: Work sc evenly spaced around neck; join with slip st in first sc.
Rounds 2 and 3: Ch 1, working in both loops, sc in each st around; join with slip st in first sc.
Fasten off.
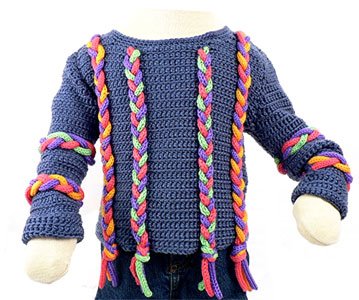
Braided Cords
Follow Embellish-Knit! package instructions to make knitted cording.
Front and Back Braided Cords: Make 2 cords each with B, D, and E, and braid into two long braided cords. Knot ends of braids. These braids need to begin 4"/10 cm below Front lower edge, extend up Front, over the shoulder, down the Back, and end 4"/10 cm below Back lower edge. Make 4 cords each with C, D, and E, and braid into four braided cords. Knot one end of each braid. These braids need to begin 4"/10 cm below lower edge, and extend to neck edge. Arrange braided cords on body of Sweater and sew in place.
Sleeve Braided Cords: Make 4 cords each with D and E, and 2 cords each with B and C. Braid the cords in the following combinations: make two braids using C, D, and E cords, and two braids using B, D, and E cords. Arrange one of each braided cord around lower half of each Sleeve and sew in place.
Using yarn needle, sew sleeve and side seams. Weave in all ends.
Read NextFunny Crochet Charms
Your Recently Viewed Projects
Thanks for your comment. Don't forget to share!
Kim Guzman
Apr 01, 2012
One of my biggest nightmare projects. I hated it and I won't even list in on Ravelry on my designer page. Sooooo embarrassing. But, the company wanted the braids to promote their Embellish-It tool. There was no getting around it. So glad someone sent it to What Not To Crochet. The things I had to do to design the sweater just to support the braids! What a nightmare.
Crafter 4296957
Oct 04, 2011
THIS PROJECT IS TO BUSY FOR ME. HOWEVER, I CAN'T HELP BUT THINK THAT CHILDREN WOULD LIKE IT VERY MUCH, SO I WOULD BE HAPPY TO MAKE IT, FOR MY LITTLE GIRL, IF I HAD ONE, OR FOR SOMEONE ELSE'S LITTLE GIRL. THANK YOU.
sandram611 9463613
Sep 23, 2011
Sorry, but I find this a very ugly sweater. Take off the braids!
Barbarap
Sep 23, 2011
In place of the cords, I would do a chain stitch on top of the sweater. Make the colors thin stripes instead of the the overly bulky braided cords. The sweater does need some color added. But the braids look like they may even hinder the child bending and arm!
klowen 94022
Sep 22, 2011
Yuck! Those braids make it a truly ugly sweater. I wouldn't want any child I know to wear it. I might consider making it without the braids.
lljennings
Sep 22, 2011
My first impression was please remove those braids from this cute sweater. Much to busy. Would be much nicer with an embroidered chain stitch in a contrast colored cable pattern.
jodyninatwix 42383 99
Sep 22, 2011
I scrunched my face when I saw this! Take those terrible chords off the sweater before someone rips them off and strangles someone.
PurpleG
Sep 22, 2011
Others may like the braided cords on the sweater, but I am more of a classic sweater lover... I could see the basic sweater without the cords, but with the cords I think it is too busy for my tastes.
Crafter 7353580
Sep 22, 2011
No, not for me either. Don't like those heavy braids. Sweater may be OK by itself but without the braids. Maybe with a multi colored band around the neck and the bottom to add more color to it.
Noble1965 2351615
Sep 22, 2011
I would downsize the braid and place it around the neck or even make sweater 6 inches longer and make a belted look. Otherwise an interesting concept but braids are too heavy and there are too many.
suzycue48
Sep 22, 2011
ummm..no...simply put, the chords on the sweater are too big..kids would laugh at the poor tyke wearing it. It looks way to fake!!
deb02809 0509695
Sep 22, 2011
My granddaughter would so wear this sweater. I think it is very fun. I just might adjust the pattern to fit me.
grace5066
Sep 22, 2011
This has to be one of the Top 10 on the sweaters no child would ever like to wear. It is too bulky and the cords and tassels make putting on a winter coat impossible.
mammawnan
Sep 22, 2011
I'm sorry but I think any child who wore this would be laughed out of school. It is hideous. :(
linda6885
Sep 21, 2011
No, never! Sweater without the braid is possibly okay. But those heavy braids! What was this designer thinking? 9And I use the word designer loosly! Sorry but it is a horrible design.
dechintabooks 0110 677
Sep 21, 2011
Since children grow out of clothes so fast and this is an advanced pattern, I would just buy a plain sweater and braid some matching yarn and sew it on the sweater. If this was something I was going to wear for several years or an afghan that was going to last a long time, I would just crochet a simple plain afghan and then sew on some braids. But I'm lazy.
milkh65 5060913
Jun 26, 2011
the size of the pattern is shown on the top of the page along with the changes throughout the pattern in ( )
mebgb 8654069
Jun 17, 2011
Hmmm. It does say sizes 4(5-6-7) This corresponds to the directions. Am I missing somehting here? Or has it been updated since the previous comments are from 8/10?
pcoat
Aug 08, 2010
This is a cute pattern. Please tell the sizes that it can make. How frequently and how often do the people in charge check the comments?
Crafter 4783318
Aug 07, 2010
I agree! Who wants to make a sweater when they don't know what size it's going to be when they're finished? I like a pattern for various sizes with changes for the larger, too.
Crafter 6589011
Aug 06, 2010
This pattern doesn't tell the size of the sweater. It should show that and then changes for larger sizes.
Report Inappropriate Comment
Are you sure you would like to report this comment? It will be flagged for our moderators to take action.
Thank you for taking the time to improve the content on our site.