Aunt Betty's Strip Pieced Potholder
Free easy sewing patterns have never been this colorful or fun to work with. Create your own version of Aunt Betty's Strip Pieced Potholders using fabric and rick rack. This piece will look great in a kitchen or hung on a hook. The warm colors and colorful look is both eye-catching and serene, just like an afternoon in the country. If you don't have an Aunt Betty to make you a potholder, you can make your own DIY sewing projects and say it was her handiwork. People won't believe you made this fabulous piece all by yourself.
Primary TechniqueSewing
Sewn byBoth Hand and Machine
Materials:
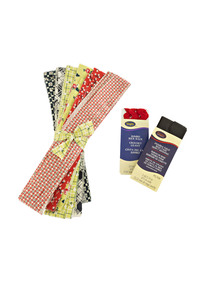
- 10” strips of fabric in varying widths (1” to 2”) – approximately twelve strips
- Backing fabric – one 9” X 9” square
- Insulated Fleece – two 9” X 9” squares
- Wrights Jumbo Rick-Rack – one package
- Wrights Double Fold Bias Tape 7/8” wide – one package
- General sewing supplies
- Rotary cutter and mat
- 9-1/2” Square Acrylic Ruler
Instructions:
- Layer the 9” backing square right side down with the two 9” insulated fleece squares on top. Pin-baste the three squares together.
- Place one strip of fabric right side up on top of the fleece, diagonally across the middle.
- Place a second strip of fabric on top of the first strip right sides together aligning one long edge. Stitch the long common edge of the strips with a 1/4” seam. Flip the second strip over and finger press along the seam.
- Continue aligning, stitching, and flipping strips until the entire square is covered with strips.
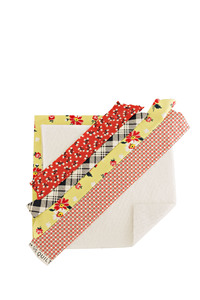
- Trim the strip-pieced square to 8-1/2” x 8-1/2”.
- Cut four 8 ½” long pieces of jumbo rick-rack. Place the rick-rack ¼” from the edge along each of the four sides of the strip-pieced square and baste. Note: Make sure the rick-rack is placed so that it will peek out from under the bias tape.
- Place the bias tape over the edge of the square, encasing the raw edge. At the corners, fold the bias tape so that it creates a mitered corner. Stitch the bias tape on all four sides of the square. Hand stitch the mitered corner seams.
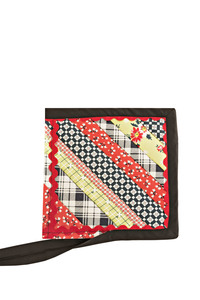
- Optional: Create a hanging loop with the bias tape. Begin applying the bias tape at one corner. After stitching the bias tape on the last side, leave a 5” length at the corner to create the hanging loop. Stitch the long edges of the bias tape together and fold it in half, stitching it down on the back side of the potholder.
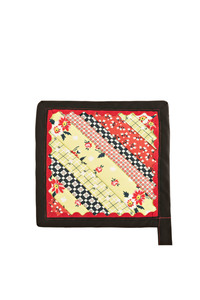
Finished Size: 8-1/2” Square