Granny Square Scarf Pattern
This unique scarf uses an intricate granny square pattern to build an accessory that's as beautiful as it is eye-catching!

This crochet Granny Square Scarf Pattern incorporates a new granny square design in a phenomenal way. In case you haven't tried it out yet, granny squares are the perfect way to add unique designs to virtually any crochet project. With the right colors, they can make your project decadent and elegant or stylish and kitschy, which makes them incredibly useful and versatile. While most crocheters tend use granny squares for afghans, there's nothing wrong with stepping outside of that standard. This crochet scarf uses an intricate granny square pattern to build an accessory that’s as beautiful as it is eye-catching. The scarf is so ornate that you would think it was made by a leading fashion designer. That’s the beauty of it. Even more beautiful is the fact that this crochet scarf pattern is easy to duplicate. With just a handful of materials, you could use this pattern to make a piece so stunning to go with every winter outfit you own.

Crochet HookJ/10 or 6 mm hook
Yarn Weight(4) Medium Weight/Worsted Weight and Aran (16-20 stitches to 4 inches)
Crochet GaugeOne granny square measures about 6½ x 6½” [16.5 x 16.5 cm].
Finished SizeScarf measures about 6½” [16.5 cm] wide and 74″ [188 cm] long, not including fringe.
Materials List
- RED HEART® Super Saver®: 1 skein each of 312 Black A, 313 Aran B, 334 Buff C, 336 Warm Brown D, 360 Café Latte E, and 378 Claret F
- Susan Bates® Crochet Hook: 6mm [US J-10]
- Yarn needle
Instructions:
NOTES
- Crochet scarf pattern is made from 11 granny squares, arranged into a strip and sewn together.
- Each granny square is worked in joined rounds with right side always facing. The yarn color is changed every round (except the last round) by fastening off the old color and joining the new color.
GRANNY SQUARE I (make 2)
-
With A, ch 5; join with slip st in first ch to form a ring.
-
Round 1 (right side): Ch 3 (counts as dc here and throughout), work 11 dc in ring; join with slip st in top of beginning ch- 3—12 dc. Fasten off.
-
Round 2: With right side facing, draw up a loop of E in any space between sts, ch 3, dc in same space, *ch 1, 2 dc in next space between sts; repeat from * around, ch 1; join wth slip st in top of beginning ch-3—24 dc and 12 ch-1 spaces. Fasten off.
-
Round 3: With right side facing, draw up a loop of F in any ch-1 space, ch 3, 2 dc in same ch-1 space, *ch 1, 3 dc in next ch-1 space; repeat from * around, ch 1; join with slip st in top of beginning ch- 3—36 dc and 12 ch-1 spaces. Fasten off.
-
Round 4: With right side facing, draw up a loop of C in any ch-1 space, ch 3, 2 dc in same ch-1 space, *ch 2, 3 dc in next ch-1 space; repeat from * around, ch 2; join with slip st in top of beginning ch- 3—36 dc and 12 ch-2 spaces. Fasten off.
-
Round 5: With right side facing, draw up a loop of B in any ch-2 space, ch 3, 3 dc in same ch-2 space, ch 1, 4 dc in next ch-2 space, *ch 1, (2 dc, 2 tr, ch 2, 2 tr, 2 dc) in next ch-2 space (corner made), [ch 1, 4 dc in next ch-2 space] twice; repeat from * 2 more times, ch 1, (2 dc, 2 tr, ch 2, 2 tr, 2 dc) in next ch-2 space, ch 1; join with slip st in top of beginning ch-3—4 corners with two 4-dc groups along each of 4 sides between corners. Fasten off.
-
Round 6: With right side facing, join A with slip st in any corner ch-2 space, *[skip next st, sc in next 3 sts, sc in next ch-1 space] 3 times, skip next st, sc in next 3 sts, 3 sc in corner ch-2 space; repeat from * 3 more times; join with slip st in first sc—72 sc (15 sc along each of 4 sides between 3-sc corners). Do not fasten off.
-
Round 7: Continuing with A, ch 1, *sc in each st to next 3-sc corner, 2 sc in each of next 3 sc; repeat from * 3 more times; join with slip st in first sc—84 sc. Fasten off.
GRANNY SQUARE II (make 2)
Make same as Granny Square I using B for Round 1, F for Round 2, A for Round 3, E for Round 4, C for Round 5, and A for Rounds 6 and 7.
GRANNY SQUARE III (make 2)
Make same as Granny Square I using C for Round 1, D for Round 2, E for Round 3, F for Round 4, B for Round 5, and A for Rounds 6 and 7.
GRANNY SQUARE IV (make 2)
Make same as Granny Square I using D for Round 1, A for Round 2, B for Round 3, C for Round 4, F for Round 5, and A for Rounds 6 and 7.
GRANNY SQUARE V (make 2)
Make same as Granny Square I using E for Round 1, B for Round 2, F for Round 3, A for Round 4, D for Round 5, and A for Rounds 6 and 7.
GRANNY SQUARE VI (make 1)
Make same as Granny Square I using F for Round 1, C for Round 2, B for Round 3, D for Round 4, E for Round 5, and A for Rounds 6 and 7.
FINISHING
Arrange the Granny Squares into a strip, in any order desired. With A, sew the squares together.
FRINGE
Cut lengths of A, B, C, D, E, and F, each about 24″ [61 cm] long. Holding 1 strand of each color together, fold lengths in half. Using crochet hook, pull fold through any stitch of one short edge of scarf, forming a loop. Thread ends through loop and pull to tighten. Attach a total of 7 fringes evenly spaced along both short ends of scarf. Trim fringe to even. Weave in ends.
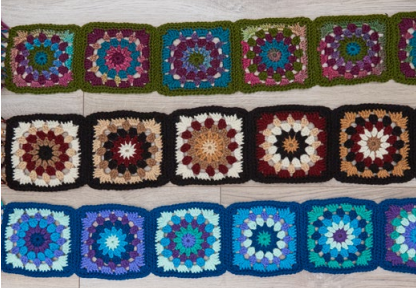
Examples of Other Color Variations
Abbreviations
- A, B, C, etc.
- Color A, Color B, Color C etc; ch = chain; dc = double crochet
- sc
- single crochet
- st(s)
- stitch(es)
- ( )
- work directions in parentheses into same st
- [ ]
- work directions in brackets the number of times specified
- *
- repeat whatever follows the * as indicated
What is your favorite use for granny squares?
Read NextJapanese Fan Crocheted Scarf