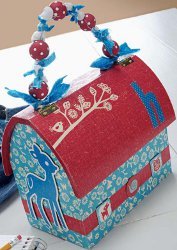
Darling Deer Woodsy Purse
This wooden purse was a fantastical thrift store find. Even if you don’t have a wooden purse, you can use this whimsical design as inspiration for a lunchbox or even a small chest. Make the Darling Deer Woodsy Purse from Plaid today.

Materials:
- Wooden purse (or similar shape)
- FolkArt Acrylic Paint – Calico Red, Wicker White
- Mod Podge Hard Coat
- Scrapbook paper, 4 sheets; 2 each of coordinating designs – I used Colorbok Friendly Forest collection
- Embellishments – I used Colorbok Friendly Forest chipboard accents and epoxy buttons
- Scrap fabric, turquoise and white
- 1” wood craft balls 5 to 6, with holes drilled through the center
- Stiff wire, about 12 inches
- Drill
- Tracing paper
Instructions:
- Prepare the surface as described in Basics, pg. 6.
- Paint the wood surface and your craft balls with Calico Red. Allow to dry. Use the end of the paintbrush to add Wicker White dots to the craft balls. Set aside and allow to dry.
- Use a sheet of tracing paper and pencil to create templates for the sides of your wooden purse. Use these templates to cut the papers to fit the sides. Measure the rectangular sides of your purse and cut the papers to fit; see the photo for suggestions.
- Mod Podge the papers down to your wooden purse. Spread a medium layer of Mod Podge and smooth the papers onto the purse. Start on the bottom, work around the sides and then to the top. Allow to dry for 15 – 20 minutes.
- Seal the purse with the Mod Podge. Allow to dry and then paint another layer. Allow to dry.
- Take scraps from one of the paper patterns and cut a strip to fit around the mid-section; adhere to the purse with Mod Podge and allow to dry for 15 – 20 minutes. Then Mod Podge over the top to seal. Allow to dry completely.
- Use the drill to create two holes through the top of the purse. String the beads on the stiff wire and put through the holes, twisting the wire underneath the holes to secure.
- Tie the fabric strips onto the handle and trim.
- Embellish the purse with chipboard accents and epoxy buttons as shown in the photo. Add a letter for personalization. Allow the purse to dry for 24 hours before using.
Your Recently Viewed Projects
Thanks for your comment. Don't forget to share!
Report Inappropriate Comment
Are you sure you would like to report this comment? It will be flagged for our moderators to take action.
Thank you for taking the time to improve the content on our site.