This project was submitted by one of our readers, just like you.
DIY Vintage Sign
Decorate your kitchen in a new vintage way

DIY Vintage Sign
In the Designer's Words: "Create a large sign with a vintage look using CHALK paint from PLAID! This project is easy and super affordable but looks like it came from a fancy home decor shop. Distress it to make it look truly vintage."
Turn a boring sign into a vintage piece of art that will transform your kitchen. Kitchens can be hard to decorate, but here is a way to warm up a room full of appliances and give it a homey feel. It’s an easy to make decoration that will have your friends asking where you bought it. Use this old fashioned sign yourself or gift it to your friends and family!
Estimated Cost$21-$30
Time to CompleteWeekend project
Primary TechniqueWood Crafts

SeasonSpring
Project TypeMake a Project
Materials List
- PLAID's FolkArt Home Decor Chalk Paint in White Adirondack (34878) and Rich Black (34882)
- Masking Tape
- Wood
- PLAID FolkArt Gold Taklon Detail Brushes (#10/0, #3, #5)
- Sandpaper or a Sander
- FolkArt Home Decor Varnish
- Electronic Cutting System like Sizzix eclips2 Electronic Cutter
- Cardstock or Vinyl
- Craft Knife
- Measuring Tape and Yard Stick
- Pencil and Eraser
- Drill, Drill Bits, Screws
Instructions
-
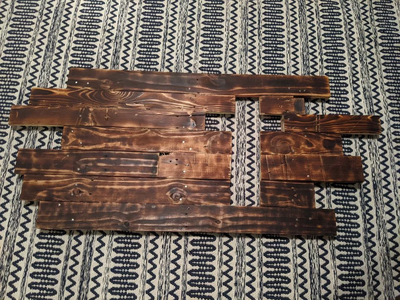
Cut the sign base from scrap plywood or piece it together using pallet wood. This sign is 48" x 10" but you can make your sign any size you like.
-
Sand the sign base to remove any excessively rough areas.
-
Paint the front of the sign completely with PLAID FolkArt Home Decor Chalk Paint in White Adirondack (34878) with a paint brush or foam brush. Allow to dry.
-
Mark 1" from each edge of the sign. Apply masking tape to the inside of the marks to create a border. Use a craft knife to cut straight edges on the ends of the tape strips.
-
Paint the border with PLAID's FolkArt Home Decor Chalk Paint in Rich Black (34882) with a paint brush or foam brush. Allow to dry.
-
Measure the space between the tape borders. This space was 40" x 8" on my sign.
-
Subtract 2 inches from the height of the sign. This will be the height of the letter stencils you'll cut. (6" in my case)
-
Subtract 4 inches from the width of the sign. Divide this by the number of letters in the word you want to paint. If you are painting multiple words, count each space as a letter. This will be the width of the letter stencils you'll cut. (also 6" in my case).
-
Using an electronic cutter, cut the letters from sheets of cardstock or vinyl to spell out the entire word or words.
-
Trim the letter stencils to fit the sign.
-
Mark a pencil line 1" above and 1" below the tape border on the sign.
-
Mark another pencil line 2" from the left and 2" from the right of the tape border on each side.
-
Find and mark the center of the sign.
-
Line up the letters along the lines, using them as guides. When the letters are in place, secure them with masking tape.
-
Apply PLAID's FolkArt Home Decor Chalk Paint in Rich Black (34882) to the stencils with a stencil brush or foam paint brush. Allow to dry.
-
Remove the stencils and masking tape from the sign.
-
Erase any visible pencil lines.
-
Using a round detail brush, touch up the sign with the PLAID's FolkArt Home Decor Chalk Paint in either color as needed. Allow to dry.
-
Sand the edges of the sign and over the letters if you want the sign to look distressed and aged.
-
Apply 2 coats of FolkArt Home Decor Varnish to the sign with brush to seal it. Allow to dry completely before mounting to the wall.
-
Drill a pilot hole in each upper corner of the sign, about 1" from the edge of the sign. Mount to the wall using anchors and dry wall screws. Paint the tops of the drywall screws with PLAID's FolkArt Home Decor Chalk Paint in White Adirondack (34878) if desired.

Read NextWooden Butterfly Welcome Sign
Your Recently Viewed Projects

Thanks for your comment. Don't forget to share!
flowergirl
Jul 05, 2018
Vintage signs are all on the rage right now and the perfect way to switch up your wall decor from framed photos. It's also something you can make from leftover pallet boards but looks so chic. I love the chalky finish, when you distressed it it looks super rustic .
Report Inappropriate Comment
Are you sure you would like to report this comment? It will be flagged for our moderators to take action.
Thank you for taking the time to improve the content on our site.