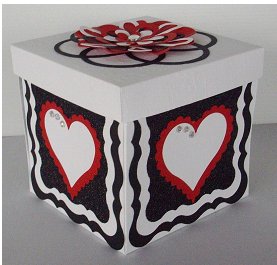
Wedding Explosion Box
Greet the bride and groom with a wonderful paper craft explosion box from Craftwell. This beautiful box is easy to make with the eCraft machine and can be coordinated with the wedding colors.
Materials:
- eCraft Cutting Machine
- Jen Allyson Celebrates SD Image Card
- Jen Allyson Designs SD Image Card
- Fundamentals 1 SD Image Card
- Red Cardstock
- White Cardstock
- Black Cardstock
- Black Glitter Paper
- Ribbons
- Rhinestones
- Greetings
- Adhesives
Instructions:
Inside Box
- Using a 12” x 12” sheet of white cardstock, score and fold 4” from each end.
- Using the fold lines as guides, cut the squares from the corners on 3 sides only.
- On the last side, draw a pencil line ½” and cut this line to the corresponding fold line.
- Attach to the outside panel of the box. Repeat with the other 3 panels.
- Fold over the ½” strip and glue it to the inside of the neighboring side panels.
- To make the lid, cut a piece of white cardstock 6” x 6”. Score ½” in from each side, snip corners and secure with glue.
- Using the eCraft, cut a 4” glitter paper ‘Image 9 Frame 3’ as before and attach to the lid of the box.
- Decorate with hearts or flowers as desired.
Outside Box
- Using the eCraft and the Jen Allyson Designs image card and the same frame image as before, cut a 4” frame from black glitter paper, two 3½” frames from black.
- Cardstock and two 3” frames from white cardstock.
- Glue the 4” glitter paper frame to the center square.
- Join the black and white cardstock frames together and glue them to the two front inside panels.
- Using the eCraft and the Jen Allyson Celebrates Image card, select the scalloped heart used previously. Cut two 1” red and two 2½” black scalloped hearts.
- To decorate the outside of the box, use the eCraft and the Jen Allyson Designs Image card, Category 2, Frames. Cut four 4” Image 9 ‘Frame 3’ from black cardstock.
- Using the same design card and image, cut four 3½” frames from white cardstock.
- Using the same design card and image, cut four 3” frames from black glitter paper.
- Using the Jen Allyson Celebrates Image card, Category 2 ‘Weddings’, cut four 2½” red cardstock and four 2½” white cardstock ‘Scalloped Edge Heart Cut Outs’.
- Using the photo as a guide, adhere one 4”, one 3½”, and one 3” together with preferred adhesive. Add the center from the white heart and the scalloped edge from the red heart to the center of the panel. Retain the red heart centers for the inside of the box.
- Separate the hearts from the scalloped edges and glue the 1” red hearts onto the front inside panels.
- Glue one red heart center and one black scalloped edge onto the corners of the back panels.
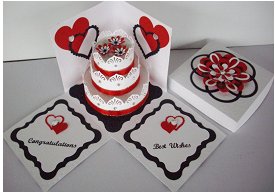
To Make The Cake
- Using the eCraft, Fundamentals 1 Image card and white cardstock, cut two 3½” circles, two 2 ½” circles, and two 2” circles.
- Attach ½” strips of white cardstock across the center of one circle and then bend over at the edges of the circles. Bend this strip again so that it measures 1” high and glue the other circle to the strips. This makes a platform to glue the cake sides on.
- Using a 12” x 12” piece of white cardstock, punch a decorative edge along one side and then cut it so that the edge will sit up above the edge of your cake platform. Glue all the way around your cake. Repeat this step with the other two cake platforms.
- Glue the three cakes together and decorate as desired.
- Glue to the inside center of the box.
- Simply add any rhinestones and greetings as desired.
Read NextPolka Dot Paradise Pinwheels
Your Recently Viewed Projects
Thanks for your comment. Don't forget to share!
DamarisSiramad
Feb 19, 2014
This is so cute. This would be great as a save the date invite, wedding invitation or for a Bridal shower. You can change the design and use this exploding box for any occation .. love it
Crafter 1971230
Feb 08, 2013
I find direction #4 in the inside box hard to explain. If I cut out the corners on the other 3 sides as in #2, I don't have them to attach to the 1/2 inch to attach to the other sides. Could you please verify that I have to cut the three corners and only glue the 1/2 inch on the back/cake side. Thank you Candi
Report Inappropriate Comment
Are you sure you would like to report this comment? It will be flagged for our moderators to take action.
Thank you for taking the time to improve the content on our site.