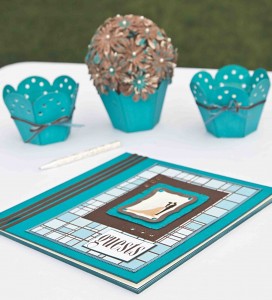
Turquoise and Brown Wedding Decorations
Turquoise and brown are a wonderful combination for an outdoor wedding reception. Find instructions for creating floral centerpieces, luminaries, place card holders and more in this DIY wedding project from Lisa Fulmer and C&T Publishing. All items are made with Ready-to-Go! Blank Board Products from C&T Publishing.

Floral Centerpiece
Materials:
- Ready-To-Go! Medium or Large Blank Board Petal Potcraft paint and brush
- styrofoam ball – diameter should fit snugly in pot
- pearl-head straight pins
- silk or paper flowers
- spray mist paint if needed to customize color of flowers (such as Adirondack Color Wash)
- 12×12 sheet of die-cut paper
- 12×12 sheet of contrasting card stock
Instructions:
- Paint pot with 1-2 coats of craft paint on the outside; allow to dry.
- If you want to paint your flowers, lay them out in a single layer, face up, on a newspaper. Spray with mist paint and allow to dry. Paint tips with contrasting craft paint if desired.
- Place Styrofoam ball inside pot and attach flowers with straight pins.
- Position as desired on top of die-cut paper and card stock.
Placecard and Menu Holders
Materials:
- Ready-To-Go! Blank Board Blocks (larger for menu; smaller for placecard)
- Exacto blade
- craft paint and brush
- Assorted adhesive embellishments
- S-shaped scroll paper clip
Instructions:
- Slice a slot on top of block with Exacto blade (match width of paper clip).
- Paint block with 1-2 coats of craft paint; allow to dry.
- Adhere desired embellishments.
- Insert half of paper clip into slot at top and twist 90 degrees to secure.
Wedding Favors
Materials:
- Ready-To-Go! Mini Blank Board Shadowbox
- craft paint (option for lid – rubber stamp pad)
- 14” length of ribbon
- craft glue or glue dots
- assorted adhesive embellishments
- netting or cellophane
Instructions:
- Paint or distress-ink the outside of shadowbox base and lid; allow to dry.
- Adhere desired embellishments to top of lid.
- Adhere ribbon around edge of lid with craft glue or glue dots.
- Place candies in a piece of netting or cellophane first, then place in box.
Candle Luminary
Materials:
- Ready-To-Go! Mini Blank Board Petal Pot
- heavy-duty hole punch (such as a Crop-A-Dile)
- duct tape
- craft paint and brush
- craft glue or glue dots
- 24” length of ribbon
Instructions:
- Punch holes in each panel of pot.
- Secure the bottom panel to each side panel with a bit of duct tape on the inside.
- Paint pot with 1-2 coats of craft paint, inside and outside; allow to dry.
- After pot is dry, adhere ribbon around pot with craft glue or glue dots and tie ends in a bow.
IMPORTANT:
Votive or tealight candle should be contained in glass or metal to prevent fire hazard; secure base of candle container inside pot with glue to prevent tipping.
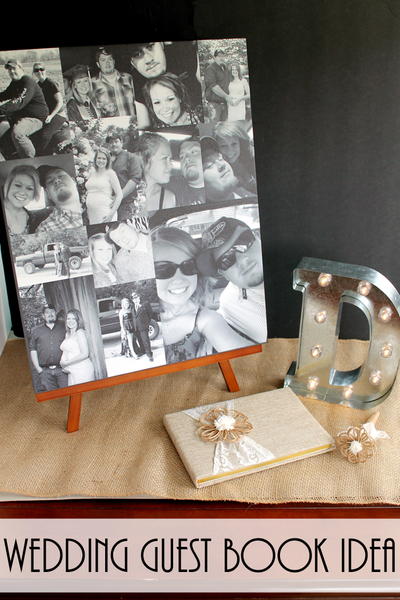
Guestbook
Materials:
- Ready-To-Go! 10″ x 10″ Blank Board Book
- solid paper color A :
- 2 shts. 9-7/8″ square
- 1 sht approx. 3” x 4”
- contrasting solid paper color B:
- 1 sht. approx. 4” x 6”
- 1 sht measuring ¼” larger than “guest” word (below)
- coordinating patterned paper:
- 1 sht. approx. 7” x 9″
- 1 die-cut border approx. 2” x 3”
- coordinating patterned narrow ribbon
- the word “guests” printed on white cardstock in desired font from computer and trimmed to size
- desired photograph or printed image trimmed to approx. 2” x 3″
- stamp pads to match paper A and paper B
- 6 coordinating eyelets and eyelet setter
- small hole punch
- decorative corner punch
- self-adhesive metallic dots or rhinestones
- double-sided tape and glue dots
- solid ribbon(s) to match paper color B (use multiple lengths of narrow ribbon or 1 length of wide ribbon)
Instructions:
- Adhere paper A to front and back covers with tape
- Distress-ink the edges of front and back covers and spine with stamp pad, bleed on to edge of paper
- Adhere patterned paper on top of paper A on cover;
- Adhere coordinating ribbon around edges of patterned paper with glue dots, trim ends flush with paper
- punch 3 accent holes on two sides of the 4” x 6” paper B; attach brown eyelets with setter; adhere on top of patterned paper.
- Punch corners of the 3” x 4″ paper A with decorative punch, then distress ink edges with contrasting stamp pad color; adhere to 4” x 6” paper B
- Adhere diecut border to 2” x 3” photo, adhere 2” x 3” photo to 3” x 4” paper A
- Embellish frames as desired with metallic dots or rhinestones
- Adhere “guests” print-out to center of trimmed paper B; adhere to book
- Adhere ribbon(s) along left side with glue dots
You can leave the inside pages white for guests to write their names, a special message to the bride and groom, or even sketches. Think about providing different color pens and pencils to make your guestbook a more memorable keepsake. Another option would be to cover each page with nice paper and embellishments, with a designated area for signatures. Then the rest of the book can be scrapped with pictures later.
Read NextHandmade Wedding Crafts
Your Recently Viewed Projects

Thanks for your comment. Don't forget to share!
bioljaniceregaton 6519958
Jan 15, 2014
pls, show me how to make native wedding favors those that not expensive for my wedding thanks
LenaaLor2 3289562
Mar 25, 2011
hey can you show me how to make stuff for my teacher shes gonna get married in 29 days please if you see these message please help me
Report Inappropriate Comment
Are you sure you would like to report this comment? It will be flagged for our moderators to take action.
Thank you for taking the time to improve the content on our site.