Fashion Redo Shirt to Dress
You don't have to pay a high price to be fashionable; instead, put a new spin on an old t-shirt. With some thrifty sewing, you'll be able to refashion a plain shirt into a one-of-a-kind DIY dress.

Materials:
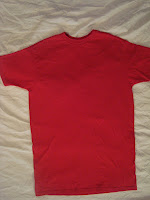
- Extra large tall man's t-shirt
- Elastic
- Crochet trim
Initial Instructions:
-
Using a tall size shirt allowed for a bit longer hemline, since I will be wearing it and I'm not quite young enough for the shorter dresses (unlike my model above, who can wear anything!).
-
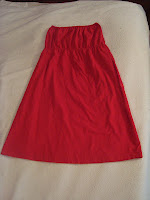
I also tried on the t-shirt to find how long I wanted it to be, measuring my top cut down from the top of the shirt the appropriate number of inches. And to determine how full I wanted the skirt (the fuller the better for me).
-
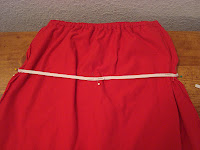
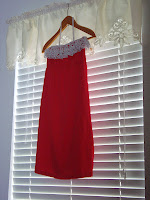
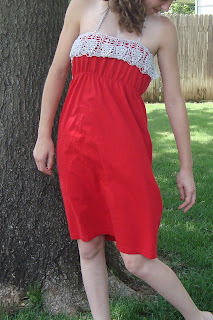
I attached elastic below the bust to give it some shape without a belt. (see A)
-
And, I attached a crochet trim around the top and for a halter-type strap. (see B)
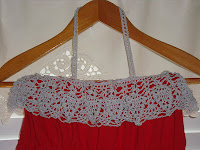
A B
-
To attach the elastic below the bust, measure the elastic around you as you wear it and place it where you want it sewn. Pin it to the wrong side all the way around, making sure the folds of the dress fall evenly between your pins. Oh, and pin it evenly, (not like mine which dips a little low on my left side) When you sew, you can use a straight stitch if you stretch the elastic to match the width of the dress as you sew.
-
The easiest way to attach the crochet trim is to pin it to the top edge of the dress and sew it before inserting the elastic. Then, after trying the dress on, you can pin the halter strap and sew it. Be aware, it will stretch when you wear it. I wanted mine to actually hold the dress up enough that it wouldn't slip down as I sit and stand in it. So, I sewed it pretty tight, and must be cautious when I put it on and take it off.
-
That's it! Now, the trim I used was crocheted specifically for this dress, but you could substitute with a ruffle made from available fabric, like scraps from this dress or another t-shirt. That would be very cute! I also thought of using purchased lace. But, I chose this trim because I've been wanting to try my hand at making some.
- I found a pattern for it from Crochetology.net. It's my first attempt at using a chart for crochet, but after a bit of research (including the Japanese terms), I did it! I simply measured my beginning chain stitch to fit the width of the dress where it was to be attached, then adjusted for the number of stiches needed for the pattern's repeat (which is nicely labled, 16). I crocheted from row 1 to row 10 (and apparently used it upside-down). The halter strap is the first three rows of the pattern (including the beginning chain) again, followed by two rows of single crochet.
Read NextNo Sew Infinity Scarf
Your Recently Viewed Projects
Thanks for your comment. Don't forget to share!
maralene
Apr 03, 2013
I think the writer has a wonderful sense of humor and with all her mistakes I am still going to make this dress I will use her mistakes to guide me too and chuckle all the way thru
Report Inappropriate Comment
Are you sure you would like to report this comment? It will be flagged for our moderators to take action.
Thank you for taking the time to improve the content on our site.