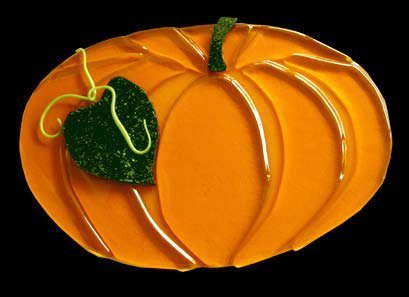
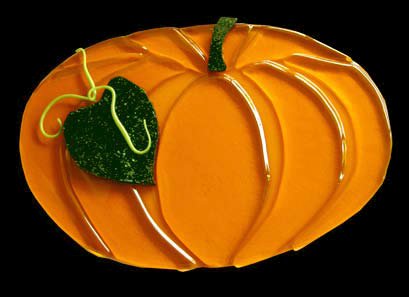
Harvest Glass Pumpkin
Use glass cutting and contour fuse techniques to create a 3D glass pumpkin perfect for Thanksgiving or autumn decorating. Hang from wire to create a festive autumn sun-catcher.
Materials:
- Glass Colors: 170.2 Tangerine
- Transparent, 128AVSF Aventurine Green
- Stringer: 226-74SF Amazon Green
- Pattern (pdf)
Instructions:
-
You will be cutting two pumpkin shapes. The first will be slightly larger than the second and it will be used as the base layer. Place the orange transparent glass on top of the cutting guide (page 2 of the pattern pdf . Using a Sharpie pen, trace around the solid, outermost, line. Cut out the shape.
-
For the second (detail) layer, place a second piece of orange transparent glass on top of the cutting guide. This time, trace over all dashed and dotted lines.
-
Follow the Cutting Order instructions on page 2 of the pattern pdf. Cut the longdashed line (oval pumpkin shape) first. The next cut must be the short-dashed line. The rest of the dotted line (“section” cuts) can be made in any order.
-
Arrange the pumpkin sections so that all outside edges are even with the bottom layer but the inside pieces have a gap between them.
-
Add a stem, leaf, vines, or a face, if desired.
- Contour fuse.
Read NextLovely Thanksgiving DIY Plates