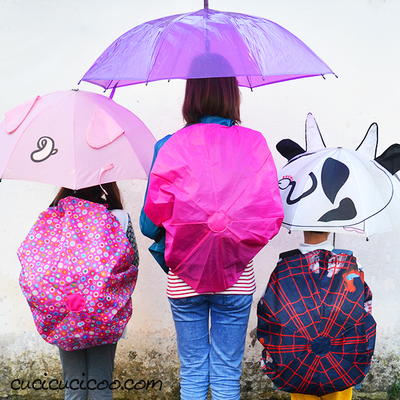
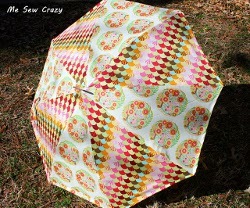
Umbrella Recovery Project
April showers may bring spring flowers, but until then you'll need an umbrella. With the Umbrella Recovery Project you can take a rainy day accessory and turn it into a bright and lively craft. For a spring craft idea, this one by Jessica Gerblick is truly useful and fun.

Materials:
- 2 yards of fabric
- 1 Extra large eyelet
- Old umbrella - the kind with a little metal pole sticking out from the top
- scrap of interfacing - 2” circle
- scissors
- thread
- needle for hand sewing
- scrap of velcro - 1” square
- silicone waterproofing spray
Let’s Get Sewing:
With scissors, snip all of the places the fabric is attached to the umbrella ‘skeleton’, removing the old fabric completely. See Photo:

Once that is done, carefully snip apart on of the triangle seams of fabric, giving you your pattern piece. See Photo:

You are going to need to be sure you cut your fabric on the bias, which basically means on the diagonal. This will add a bit more stretch which is necessary. See Photo:

Cut 8 pieces of desired fabric, adding an ½” all around for seam allowance.
With right sides together, lay 2 fabric triangles on top of each other, matching raw edges. Sew along one side edge. See Photo:

You will have this when done:

Continue repeating until you have all 8 sewn together. See Photo:

With right sides together, sew the last seam closed so that you have complete the circle.
Press open all seams.
On the outer seam of the umbrella circle, fold under ½” towards the wrong side and Press. Sew around edge.
For the small center circle, if you have an opening like I do (sewing skills not awesome enough to completely close up that little baby), sew a band of gathering stitches round the small circle and pull until closed.
Take your 2” piece of circle interfacing, and interface the inner umbrella circle fabric (on the wrong side of the fabric). See Photo:

Attach eyelet as instructed. I used Dritz Size 7/16”. See Photo:

(Yours will look much cleaner than this if you have the proper attachment tool, I didn’t and it was 4am in the morning and I was low on patience...woops!)
Cut (2) 8” x 1.5” piece of fabric on the bias. See Photo:

With right sides together, sew along 3 outer edges with ¼” seam allowance. Turn right side out and Press. See Photo:

Turn raw edge under ¼” and sew closed. You now have your umbrella closure band.
Taking one piece of the velcro - the soft piece, sew on 1 side of the closure band. See Photo:

Turn the band over, and on the OTHER side, sew the other piece of velcro - the scratchy piece, and sew the velcro on the opposite end. See Photo:

(Don’t mind my crazy stitch along the bottom edge, do as I say - not as I did - lol, maybe 5am by now as I was writing this)
Approximately 5” from the bottom of the outer circle umbrella fabric, attach the closure band to the umbrella - on one side only. Be sure to secure this with a few rows of stitches. See Photo:

Slip eyelet over the top of the umbrella metal pole and match up the seams with the umbrella skeleton. With needle and thread, attach the fabric to the umbrella skeleton - using the holes in the skeleton to secure. See Photo:

Repeat for all 8 sides.
Once the ends are all secure, we are going to secure down the seams in 2 places on each umbrella arm to the skeleton, with just a few quick hand stitches. This should help eliminate the umbrella from letting the wind getting under it and flipping it up...hopefully! Lol. See Photo:


Bringing your umbrella outside, to a well ventilated area, spray the fabric with the silicone waterproofing spray and allow to dry for the time recommended on the can. Be sure to cover it all with even strokes, any area missed will not be waterproof!
And voila, you now have your beautiful new umbrella!
Your Recently Viewed Projects
Thanks for your comment. Don't forget to share!
Weberme
Aug 08, 2016
Great idea to recover an umbrella that has holes in it or you get tired of the fabric. Never thought to reuse the old hardware. I like this but a lot of work. But if I found just the right fabric I would give it a try but I think the oil cloth will save the waterproofing and it comes in some cute fabric. Now the idea of making it a parasol is fantastic and will be so cute. Or you can make one for Halloween and go as Mary Poppins or Nanny McFee. That would be so cool. Thanks for the great tutorial.
AnnieApple
Apr 20, 2012
This is really nice! I'm sure you could use it also as a parasol by adding some extra trim etc. Thank you for sharing and your tutorial was very well done!
burtonpj 5303036
May 08, 2011
I've repaired umbrellas but never thought of totally re-covering them, thanks!
Report Inappropriate Comment
Are you sure you would like to report this comment? It will be flagged for our moderators to take action.
Thank you for taking the time to improve the content on our site.