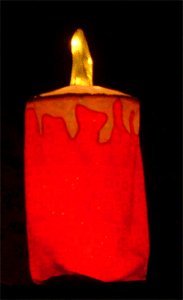
Christmas Candle Yard Decoration
Christmas house crafts really help make your holidays festive. When you display this Christmas candle yard decoration from Teres Whitney, you'll light up your whole neighborhood!

Materials:
- Fabric of your choice for the body. Two decorations 1 yard
- Fabric for the top and drips –usually white.
- Fabric for the flame – orange or yellow
- Wire for bottom and top #8 or #10
- Lighted Stand
Notes:
Your decoration can be thin and tall or fat and short. I made some of mine fat and short and some thin and tall.
The diameter of the top circle and height determine how the decoration will look. The pattern can be changed easily by changing the diameter of the top and the length of the body.
Most of the time you will make them in pairs.
Instructions:
MAKING THE DECORATION
- Draw a circle with a 13 ½ inch diameter which makes a 43 inch circumference. Cut one.
- Find an object that has those dimensions for that circle or use the string and pencil method for drawing this circle. Take a piece of string tie it to a pencil and measure ½ the diameter (6 ¾ inches of string). Mark the string at 6 3/4 inches. Place a dot on your paper. Placing your finger tightly down on the dot at the end of the string and holding the pencil vertically, draw around to form a circle.
- Draw a rectangle 43 inches wide and 22 inches long (height of candle) and add a seam allowance (1/2) to both 43 inch sides and 1 inch seam allowance to both 22 inch sides. Cut one.
TO MAKE THE CANDLE DRIPS
- Make the length of the drips ¼ of the height of the candle in this example 8” and the width of the drips are the width of the candle in this case 44 inches.
- Most of the time I make my candles in pairs so I cut out two drips at a time by using the following method. Drips 6 “ long with one inch seam and one inch margin at top makes 8 inches.
- Draw a rectangle the width of the drips (44 inches long) and then double the length 16 inches wide. Draw a line one inch in from each 44 inch side and a line dividing the middle. Cut one. On the fabric mark the middle and one inch lines. Starting at one side of the fabric draw an extremely undulating line curving upward toward the one inch margin and downward toward the other 1 inch margin. Cut on the curvy line. You now have two drips.
- Pin one set of the drips along the 44 inch side of the candle body fabric. Securely zig zag the drips on the body of the candle. Turn and cut the body of the fabric 1/8 inch away from the zig zaged edge and zig zag that edge down. This will make your drips illuminate.
- With wrong sides together sew the side seams of the body and zig zag the edges together.
MAKING A FLAME FOR THE CANDLE
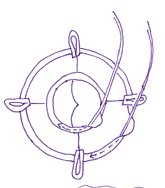
- The flame is positioned in the center of the circle top. My flame is 2 ½ diameter. Draw a triangle 6 inch tall and a 3 inch bottom. Round the tip of the triangle, add ¼ seam allowance. Cut two out of fabric. With wrong side together straight stitch around the length of the flame, then zig zag. Mark the bottom circle of the flame in four equal parts.
- In the center of the top circle draw a 2 ½ inch diameter circle and add ¼ inch seam allowance. Cut out. Mark this circle in four equal parts.
- With wrong sides together match the equal parts on the flame with the equal parts of the inner circle, straight stitch and then zig zag together.
- Divide the outer circle in four equal parts. Divide the body of the candle in four equal parts.
- With wrong side together, pin the top of the candle to the body, straight sew the 1 inch seam, zig zag the edges of the seams leaving 3 inches open for the wire.
- Turn bottom up ½ inch the turn up 1 inch. Sew in place leaving 3 inches open of wire.
ADD WIRE
- Put wire into one side of the pocket in the top of the decoration. Move it through the pocket until it pops out the other side. Overlap the wire about 2 inches. Tape the entire 2 inch section the duct tape making sure to cover the ends of the wire securely with the tape. I use a white tape color.
- Insert a wire in the bottompocket same as above.
Read NextEasy to Make Gift Card Holder
Your Recently Viewed Projects
Thanks for your comment. Don't forget to share!
Catsitt
Sep 12, 2018
Last year we only had one or two garden decorations, we were trying to do it all on a budget, I think this one will be a perfect addition to the garden this year with the others, looking forward to trying this out and seeing how it goes. Hopefully the neighbours will like it too.
Weberme
Nov 06, 2018
Have you made any of the Candle yard decoration yet? I was wondering if it was hard to make. I like that you can make it what size you like but I was also wondering the cost to make it too and how easy it really was. Also if you made it do you have any suggestions on any things you would change.
Report Inappropriate Comment
Are you sure you would like to report this comment? It will be flagged for our moderators to take action.
Thank you for taking the time to improve the content on our site.