Personalized Notebook Covers
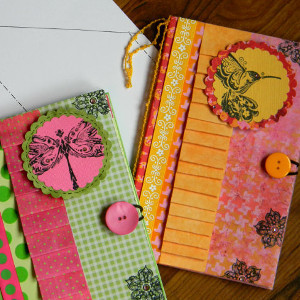
Everyone needs a few notebook decorating ideas or scrapbook cover ideas, and these Personalized Notebook Covers may be just what you're looking for. There's no better way to dress up a boring notebook or notepad than with a little bit of scraps and a whole lot of creativity. These make adorable gifts for students and teachers alike. Use any colors imaginable to create a personalized present. Maybe the recipient's creativity will be sparked as well.

Materials:
- 5″ * 8″ note pad (I purchase a package of 5 at Walmart for about $4.)
- Assorted double sided cardstock papers.
- 17″ half inch ribbon
- 24″ thin ribbon or yarn
- skinny hair twanger
- Buttons (1-about 1/2″ and 1- about 1″)
- Rhinestones
- Black Stazon Ink Pad
- Rubber Stamps
- Hot Glue Gun and Adhesive
- Paper Trimmer and Scissors
- Template
Instructions:
- Trace template and cut out.
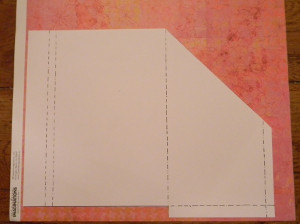
- Score along dotted lines and fold.
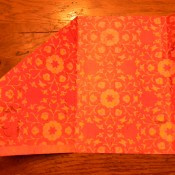
- Fold up the small little flap on the bottom an glue.
- Apply adhesive to the folded up flap and on along the short side, fold over and glue to create a little pocket.
- Cut out a 8″ *7″ piece of double sided cardstock.
- Measure over 5 1/8″ from short edge and score or fold. Then measure over 5/8″ past that score or fold line and score/fold again.
- Run adhesive down the middle of these two score/fold lines and then line up with the 5/8″ score/fold line on your pocket page and adhere.
- Adhere the inner flap of paper down to the opposite side of the pocket page and then wrap the back flap around to the front of the paper notebook cover and glue down.
- Decorate the inside of your notebook cover with rubber stamps.
- Decorate a circle for the front of the notebook cover or you could print out a saying, name, or initials.
- Cut two 1/2″ * 12″ strips.
- Make marks along the strips at 1″ then 1/2″ and repeat down the whole strip.
- Fold at marks making an accordion fold down both strips and adhere together.
- Cut a decorative piece of paper 8″ * 1 1/2″ and adhere down 1/4″ from left side of front cover.
- Run two lines of adhesive down to the right of this strip and place pleated paper strip down.
- Add a mat to stamped circle and adhere to front with dimensional tape behind the right side or if you ran like I did… just fold a small piece of cardstock like an accordion and adhere one end to cover and the top to the circle to add some dimension.
- Add decorative stamps to the front of the cover. You can use the back of the notepad as I did to stamp off the cover and protect the table.
- Tape half of hair twanger down in the middle on the right side of the notebook cover.
- Adhere notepad down securely over twanger.
- Using hot glue gun, glue small button down 1″ in from right edge of notebook cover.
- Using hot glue, glue larger button on top of the smaller button.
- Glue decorative ribbon around front cover 1/4″ from center.
- Wrap thin ribbon or yarn around the binding and tie letting loose ends dangle or tie in a bow on the side.
- Cut a 7/8″ * 5″ piece of paper and adhere to the top of the notepad and decorate with small crystals.
- Stamp back of notebook covers.